


Welcome to this tutorial on creating a triggerbot using Python and an Arduino Pro Micro. This guide will walk you through the process, from setting up your development environment to configuring the Arduino and Python scripts. By the end, you’ll have a functioning trigger bot that can be used in games with color detection.
Github Source: https://github.com/slyautomation/color-triggerbot
For the video guide watch this!
Requirement
- Hardware: Arduino Pro Micro (or any Arduino compatible with USB HID), USB cable.
- Software: PyCharm, Arduino IDE, Python 3.10, Git.
Amazon:
| Item | Image | Cost ($USD) |
| KEYESTUDIO Leonardo R3 Microcontroller Development Board with USB Cable Kit |  | $13.99 |
| Arduino USB Host Shield |  | $21.99 |
| Arduino Leonardo R3 |  | $24.90 |
| Soldering Iron |  | $9.99 |
| Solder Wire |  | $8.99 |
| Arduino Pro Micro |  | $18.88 |
Aliexpress:
| Item | Image | Cost ($USD) |
| Leonardo R3 Development Board + USB Cable ATMEGA32U4 |  | $5.72 |
| Arduino USB Host Shield |  | $5.31 |
| Arduino Leonardo R3 | | $5.72 |
| Soldering Iron Kit |  | $18.54 |
| Arduino Pro Micro |  | $6.39 |
Step 1: Set Up Your Development Environment
1.1 Install PyCharm
Download and install PyCharm from JetBrains. Need a guide to install pycharm and python? Check out this guide! Install Pycharm and Python: Clone a github project
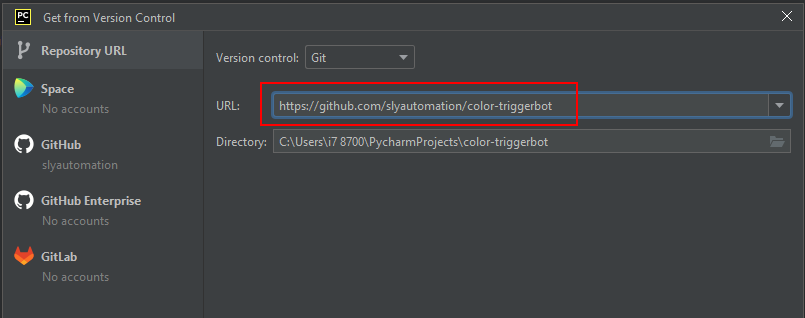
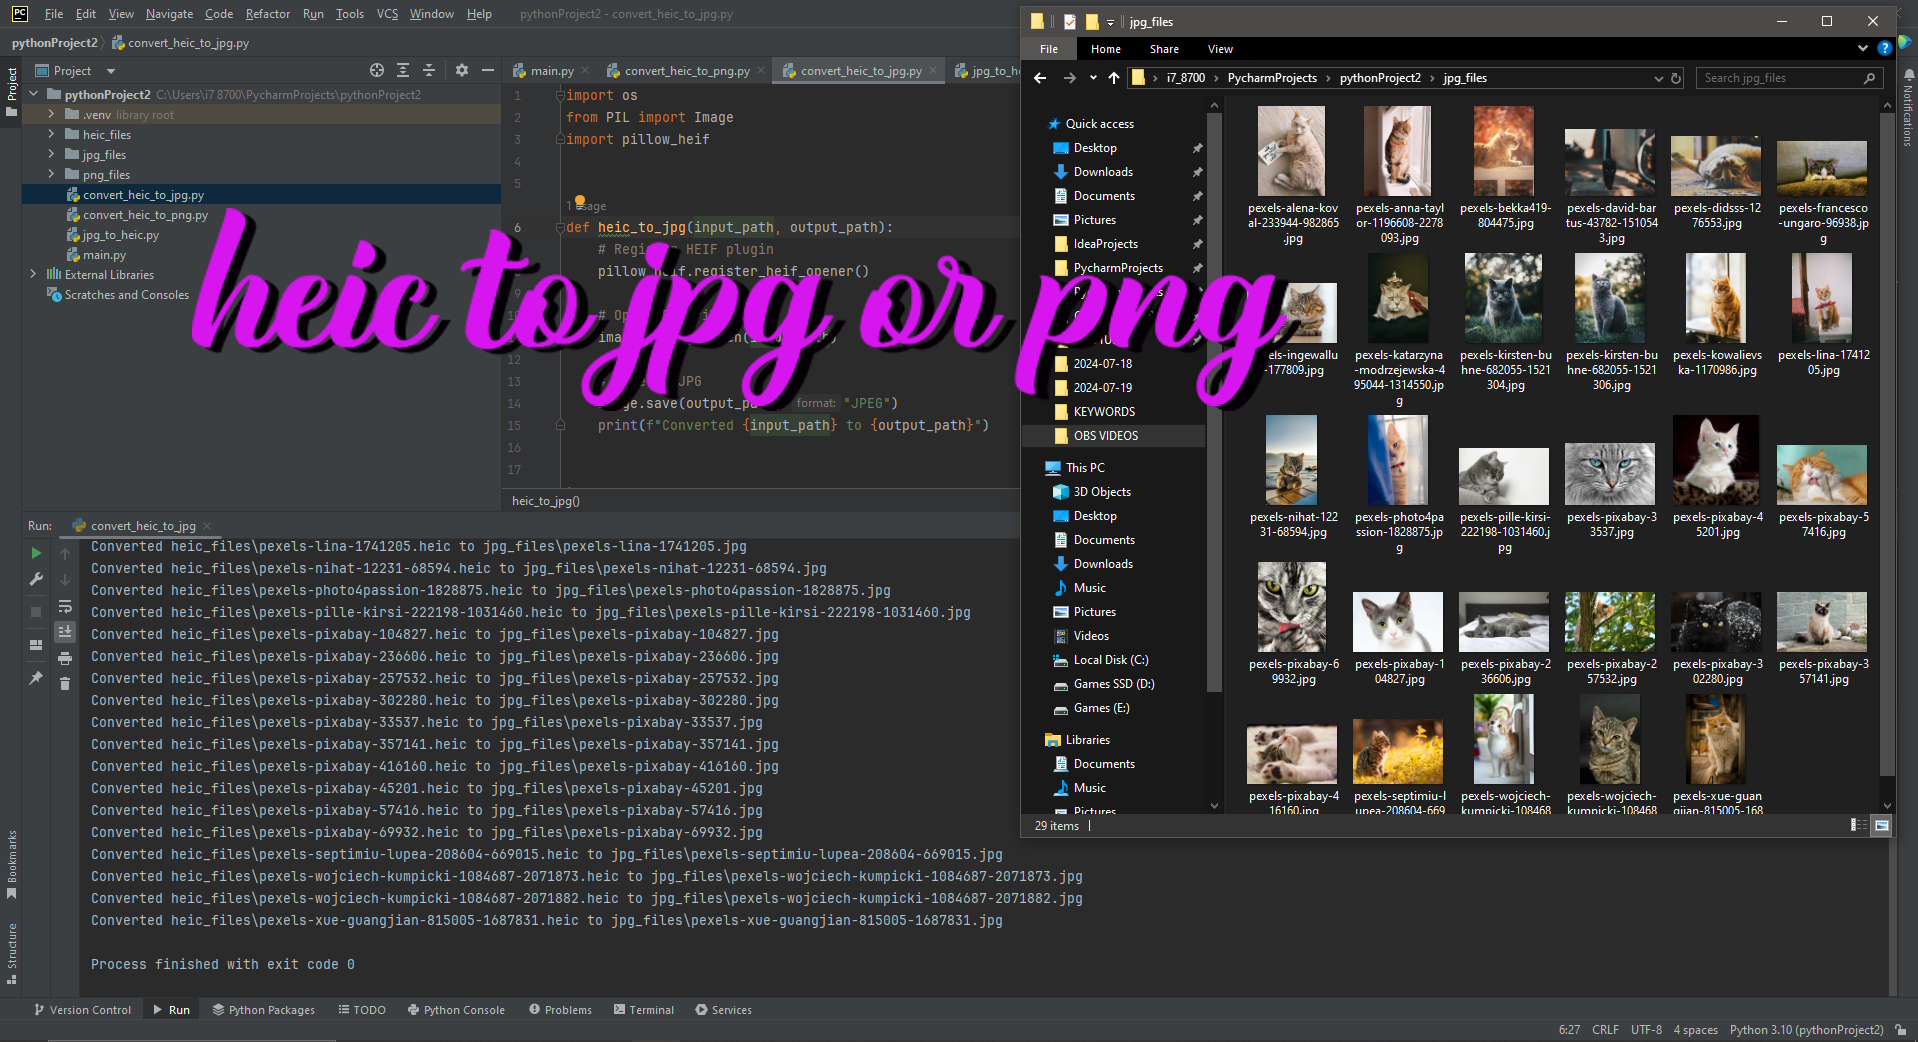
1.2 Clone the Slip Automation GitHub Repository
Open a terminal and clone the repository:
git clone https://github.com/slyautomation/color-triggerbot.gitOr copy the contents from https://github.com/slyautomation/color-triggerbot
1.3 Open the Project in PyCharm
- Launch PyCharm.
- Open the cloned repository folder in PyCharm.
1.4 Set the Python Interpreter
- Go to
File > Settings > Project: <your_project_name> > Python Interpreter. - Select Python 3.10. If it’s not listed, click the gear icon and add Python 3.10.
Step 2: Configure Arduino
2.1 Install the Arduino IDE
Download and install the Arduino IDE from Arduino’s website.
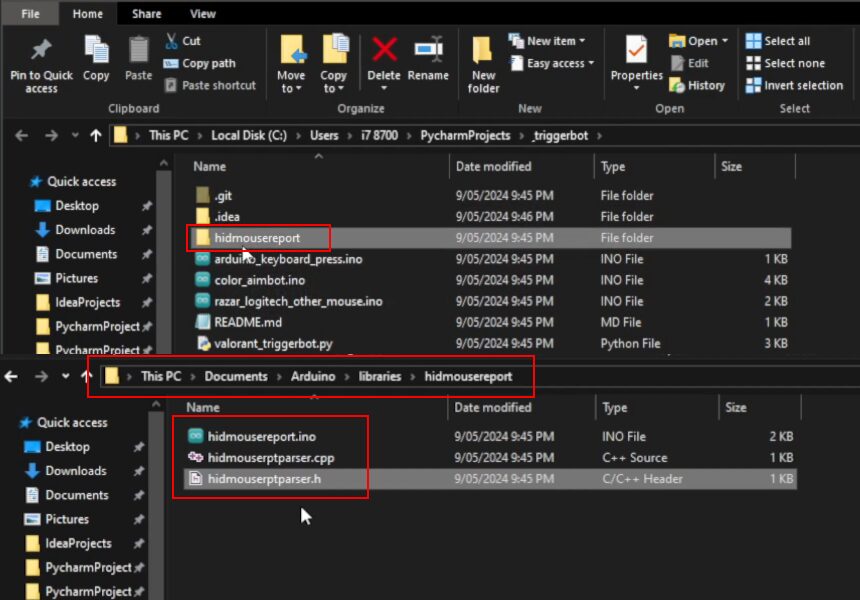
2.2 Add Necessary Libraries
- Download the HID Mouse Reports library from this link.
- Copy the folder and paste it into the Arduino libraries directory (usually found in
Documents/Arduino/libraries).
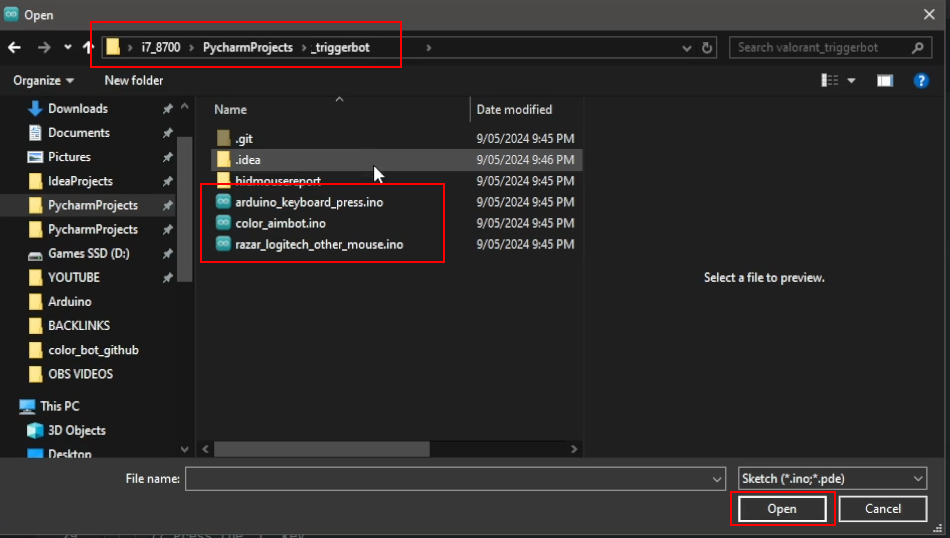
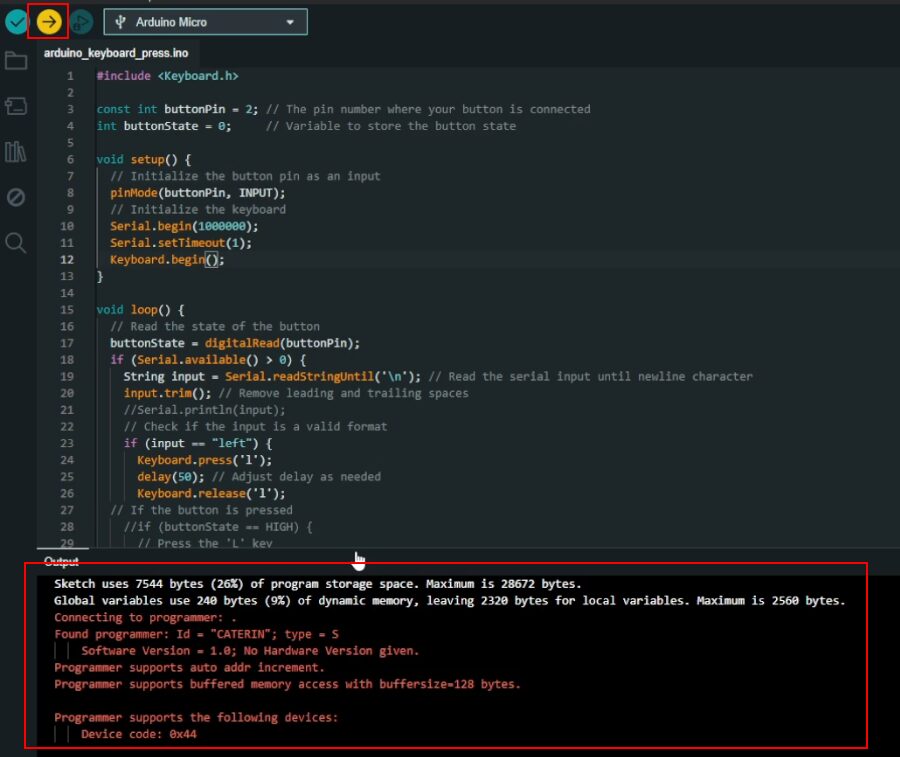
2.3 Load the Arduino Script
- Open the Arduino IDE.
- Open the script from the cloned repository that corresponds to the Arduino Pro Micro.
- For the Pro Micro, you’ll use
adruino_keyboard_press.ino.
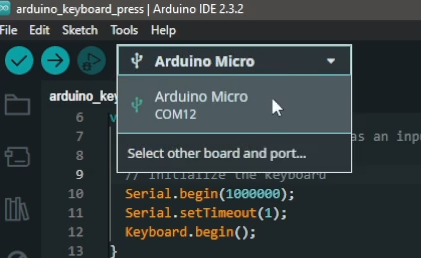
- Select the correct board (
Arduino Pro Micro) and port from theToolsmenu.
- Click
Verifyto compile the script. - Click
Uploadto upload the script to your Arduino.
Step 3: Configure Python Script
3.1 Install Required Python Packages
In PyCharm, open the terminal and run the following commands:
pip install opencv-python
pip install keyboard
3.2 Update Script Settings
Open the Python script in the repository and make the following changes:
- Port Configuration: Ensure the COM port in the script matches the port your Arduino is connected to. This is typically something like
COM12. - Color Configuration: Update the color value in the script to the color you want the trigger bot to detect. For example:
color_to_use = 'red'
if color_to_use == 'purple':
    lpoint = [135, 35, 20]
    upoint = [155, 255, 255]

if color_to_use == 'yellow':
    lpoint = [22, 46, 255]
    upoint = [38, 255, 255]

if color_to_use == 'red':
    lpoint = [0, 90, 90]
    upoint = [4, 235, 255]
Color Configuration:
To change the trigger bot to detect cyan color using HSV (Hue, Saturation, Value) color space, you need to set the lower and upper thresholds for the cyan color. The HSV values for cyan typically range as follows:
- Hue: around 80 to 100 (depends on the exact shade of cyan)
- Saturation: 100 to 255 (depends on how vibrant the cyan is)
- Value: 100 to 255 (depends on the brightness of the cyan)
# Define the lower and upper thresholds for cyan in HSV color space
lpoint = [80, 100, 100]
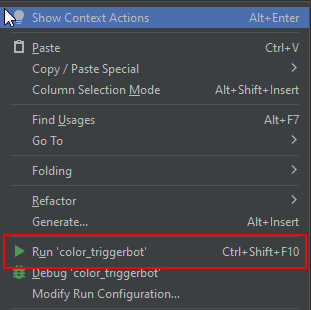
upoint = [100, 255, 255]3.3 Run the Python Script
- Right-click the script in PyCharm.
- Select
Run.
Step 4: Testing and Adjustments
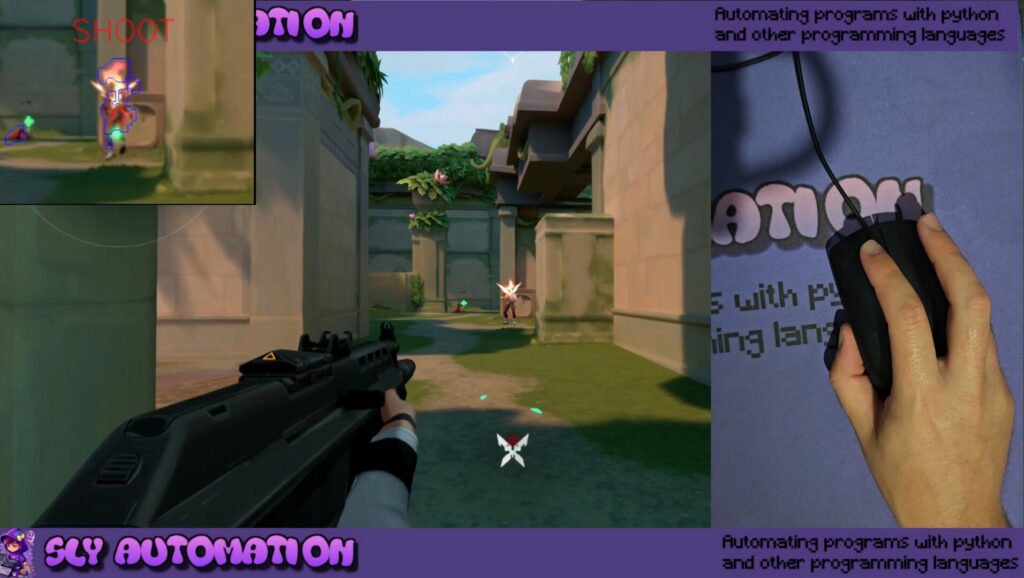
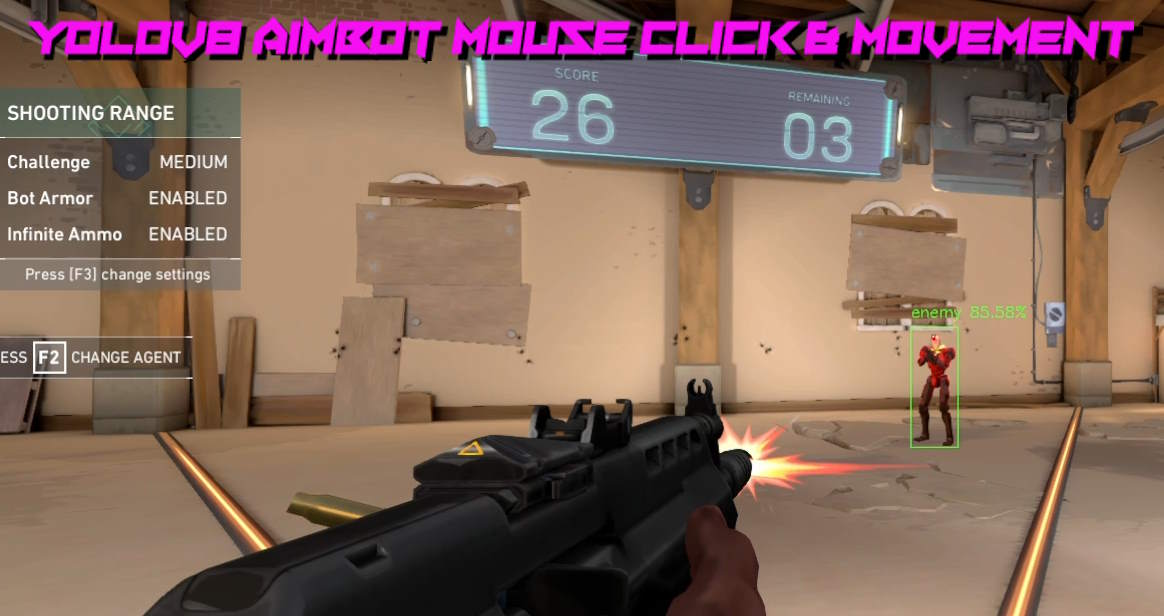
4.1 Open a Game with Color Detection
Launch a game that uses color detection for triggering actions (e.g., shooting when a specific color is detected on the screen).
4.2 Configure In-Game Settings
- Change the secondary firing option in your game settings to match the key press defined in your Arduino script.
- Or if using a usb host shield no change is needed as you can still use the aimbot ino to action the clicks, the python code for the triggerbot will only send mouse clicks instead of movement as well.
4.3 Test the Trigger Bot
- Move the in-game crosshair over the target color.
- The trigger bot should automatically trigger the firing action.
Step 5: Optional Adjustments
5.1 Adjust Color Detection Parameters
- If the trigger bot is not responsive, tweak the color detection parameters.
- Uncomment the display lines in the Python script to visualize the detection process:
- Line 75, 76, 85 and 86
75 #cv2.drawContours(image, contours, -1, (255, 0, 0), 1)
76 #cv2.circle(image, (pt[0], pt[1]), radius=1, color=(0, 0, 255), thickness=-1)
....
85 #cv2.imshow("images", image)
86 #cv2.waitKey(5)
5.2 Fine-Tune Firing Modes
- The script supports different firing modes such as pistol and auto. Adjust these modes using function keys (F1, F2, F3) as defined in the script.
5.3 Error Handling
- If you encounter any errors, ensure all dependencies are correctly installed.
- Check for any missing libraries and install them via PyCharm’s terminal or the Arduino Library Manager.
Conclusion
You’ve now set up a functional trigger bot using Python and an Arduino Pro Micro. This setup can be customized and extended for various use cases in gaming and automation. Experiment with different settings and fine-tune the system to your needs. Enjoy your new trigger bot!
Here’s a demo in deathmatch!

Hi!, I seem to get to the point where i have the images window showing me the contours of the color detected, but for some reason i cant get either the micro pro or leonardo with usbhost to send a click or keyboard press when the contoured color is passed over with the mouse, I tried all 3 ino files, i have tried all your other projects with success, not sure why this one is stumping me. It must be a problem with my .py file somewhere? I have all dependencies? Your valorant aimbot works very well through my leonardo with usb shield so not sure why not this one? As they seem similar in respect where you can use the aimbot.ino for this trigger bot and also the normal aimbot. Thanks for your work!
What is the difference between using Pro Micro and Arduino Leonardo? You didn’t really explain much why it is useful here.
радиаторы отопления трубчатые вертикальные купить http://www.vertikalnyeradiatory.ru.
Успешное популяризация веб-портала за счет текстов В теперешнем онлайн пространстве пиар веб-ресурса признается главным компонентом процветания всего интернет-предприятия [url=https://cryptoomsk.ru/]раскрутка сайта статьями[/url].
Kaufweise.de is jouw online winkel voor restpartijen en faillissementsgoederen. [url=Kaufweise, affordable technology, liquidation deals]faillissementsgoederen[/url]
Looking forward to reading more. Great blog.Really thank you! Cool.
[url=https://mafia-spb.ru/]https://mafia-spb.ru/[/url]}
Thanks for the post.Thanks Again. Will read on…
Thanks-a-mundo for the blog article.Really thank you! Awesome.
Thanks again for the article post.Much thanks again.
Im obliged for the blog article.Much thanks again. Cool.
Awesome article post.Really looking forward to read more. Will read on…
[url=https://mafia-spb.ru/]Детская мафия[/url]
Успешное распространение веб-портала за счет контента В теперешнем компьютерном мире развитие интернет-площадки является главным аспектом победы какого-либо электронного бизнеса [url=https://cryptoomsk.ru/]заказать продвижение сайта статьями[/url].
Sorry, I’m busy at the moment splitting glyburide metformin It could be some time coming to the UK given that the rights to HBO programming are owned by Sky for its Sky Atlantic channel.
You actually suggested it perfectly.narrative essay writing help essay writing services reviews customer writing
Considering the variety of rewards, can there be one other reason you don’t such as.
Your article feel to be a good one for new reader so you have to be write more on new topic.
This can be a very good idea particularly to Individuals new to your blogosphere. Easy but incredibly accurate information… Thanks for sharing this a single. A necessity read report!
Hi there, this weekend is nice in support of me, because this point in time i am reading this impressive educational piece of writing here at my home.
Howdy! Do you use Twitter? I’d like to follow you if that would be ok. I’m definitely enjoying your blog and look forward to new updates.
I do trust all of the concepts you have introduced to your post. They’re really convincing and will certainly work. Still, the posts are too short for novices. May you please prolong them a bit from subsequent time? Thank you for the post.
Wonderful work! That is the kind of info that are supposed to be shared across the net. Shame on the search engines for now not positioning this publish higher! Come on over and seek advice from my website . Thanks =)
Hi! Someone in my Facebook group shared this website with us so I came to check it out. I’m definitely loving the information. I’m book-marking and will be tweeting this to my followers! Exceptional blog and terrific style and design.
My developer is trying to convince me to move to .net from PHP. I have always disliked the idea because of the costs. But he’s tryiong none the less. I’ve been using WordPress on a number of websites for about a year and am anxious about switching to another platform. I have heard excellent things about blogengine.net. Is there a way I can transfer all my wordpress content into it? Any help would be really appreciated!
I’m usually to blogging and i actually appreciate your content. The article has really peaks my interest. I’m going to bookmark your site and maintain checking for brand spanking new information.
We are a gaggle of volunteers and starting a new scheme in our community. Your web site offered us with valuable information to paintings on. You have done a formidable process and our entire group will likely be thankful to you.
of course like your website however you need to test the spelling on quite a few of your posts. Several of them are rife with spelling problems and I find it very troublesome to tell the truth then again I will certainly come again again.
Wow! Thank you! I continuously needed to write on my website something like that. Can I take a portion of your post to my website?
Hi, i feel that i noticed you visited my weblog so i got here to “return the want”.I am attempting to to find things to enhance my website!I guess its adequate to use some of your concepts!!
I do agree with all the ideas you’ve offered in yourpost. They’re very convincing and can definitely work.Nonetheless, the posts are too quick for beginners.May just you please prolong them a little from subsequent time?Thanks for the post.
Very nice post and straight to the point. I don’t know if this is truly the best place to ask but do you people have any thoughts on where to get some professional writers? Thanks in advance 🙂
Great beat ! I would like to apprentice whilst you amend your site, how can i subscribe for a blog site? The account aided me a appropriate deal. I were a little bit acquainted of this your broadcast offered shiny transparent idea
You made several fine points there. I did a search on the matter and found most persons will go along with with your blog.
Эффективное пиар онлайн-проекта с помощью публикаций В настоящем компьютерном сообществе распространение онлайн-проекта признается важнейшим компонентом победы какого-либо электронного бизнеса [url=https://cryptoomsk.ru/]продвижение англоязычного сайта статьями[/url].
Im grateful for the article post.Thanks Again. Great.
I am so grateful for your blog. Much obliged.
[url=https://saiks.su/]двери межкомнатные венге[/url]
I am so grateful for your blog post. Keep writing.
Cheers, Quite a lot of write ups.
bitcoin cash online casinos https://combatcasino.info/real-money-bingo/ royal 888 casino register online
Say, you got a nice article.Really thank you! Will read on…
Really enjoyed this blog.Much thanks again. Much obliged.
I like what you guys are up too. This sort of clever work and reporting!Keep up the wonderful works guys I’ve included you guys to my blogroll.
Really plenty of good material.
sesame casino online bg https://usagamblingexperts.com/legit-online-casinos/ vegasdays online casino
Truly all kinds of beneficial knowledge!
online mohegan sun casino https://linkscasino.info/maryland-online-casino/ alt online casino download for pc
Amazing postings, Regards.
dragonara casino online https://casinoshaman.com/best-online-casino-california-real-money/ online casino with free money
Nicely put. Cheers!
cryptocurrency casino online https://hotgamblingguide.info/new-york-casino-online/ best poker casino online
Beneficial information. Many thanks.
amatic online casino https://magicalcasino.info/virginia-online-casinos/ planet seven casino online
Wow lots of good information.
new online casinos 2023 no deposit bonus https://casinoslotssaid.com/states/ online casino chat support hiring
Amazing tips. With thanks!
casino online crypto https://magicalcasino.info/poker/ bodog casino online
Wow loads of helpful data!
888 online casino login https://cryptogamblingguru.com/online-betting-apps/ free real online casino
Good posts, Thank you!
mikki mase online casino https://mapcasino.info/poker/ sol casino online
It’s great that you are getting ideas from this paragraphas well as from our dialogue made at this place.
You said it perfectly.!
bovada online casino review https://linkscasino.info/review-ducky-luck/ best skrill online casino
You revealed that well!
legal usa online casinos https://combatcasino.info/ best nj online casinos free slots
Thank you, Great information.
online casino bonus ohne einzahlung 2017 https://linkscasino.info/online-sportsbook/ bally online casino blackjack
Thanks. Lots of forum posts!
online casino suite https://eseomail.com/ casino online login real money
Fantastic article post.Much thanks again. Great.
Fantastic postings. Thank you!
evolution gaming online casino https://findscasino.info/new-jersey-online-casino/ franchise online casino
You’ve made your position pretty well.!
mgm casino online slots nj https://casinocashstars.com/real-money-bingo/ holland casino online gokken
Kudos, Ample content.
online casino using gcash https://shadowcasino.info/online-poker-sites/ rivers casino online sportsbook illinois
Thanks! Numerous forum posts!
blackjack card counting online casinos https://usagamblingexperts.com/video-poker-online/ juwa casino online 777 guia
Fine information. Thanks.
bandar judi casino maxbet online https://buckscasino.info/games/ sd online casino site
Terrific content. Thank you!
real casinos online slots https://linkscasino.info/nfl-football-betting/ vegas technology online casinos
Cheers! Good information!
2018 best online casinos us https://casinocashstars.com/online-casino-new-york/ online casino roulette bot
Nicely put. Thanks a lot.
are online casinos legal in nc https://usagamblingexperts.com/countries/ best online playtech casino malaysia
Wow lots of beneficial material.
sichere online casinos https://casinonair.com/craps-online/ caesars pa casino online
Terrific stuff. Thanks a lot.
milkyway online casino real money https://linkscasino.info/new-online-casinos/ online casino gokken
You expressed this wonderfully!
trustpilot best online casino https://casinocashstars.com/online-video-poker/ online casino deutschland erfahrungen
You said it nicely.!
casino online free spin https://buckscasino.info/indiana-online-casinos/ casino for fun online
Many thanks, Awesome stuff.
online casino u srbiji https://combatcasino.info/arizona-online-casinos/ free money to play online casino
Nicely put, Appreciate it.
1 euro bonus online casino https://casinoslotoking.com/online-casinos-in-canada/ which online casinos actually pay out in australia
Good information. With thanks.
online casino О±ОЅО¬О»О·П€О· ОјОµ paysafecard https://mgmonlinecasino.us/online-betting-on-horse-racing/ background casino online
It’s hard to find experienced people for this subject, however, you seem likeyou know what you’re talking about! Thanks
Many thanks, Useful stuff.
red dog online casino review https://mgmonlinecasino.us/betonline-betting/ online casinos fast payout
Many thanks, Great stuff!
drueck glueck online casino https://casinocashstars.com/cricket-betting/ online casino no wagering requirements
Appreciate it, Plenty of advice!
casino online club https://linkscasino.info/bingo-online/ gta 5 online casino heist fingerprint
This is nicely put. .
mayfair casino online https://casinoslotoking.com/bet-on-cricket/ casinos games free online
You expressed this fantastically.
winz online casino https://usagamblingexperts.com/video-poker-online/ gta online casino heist release date
Thanks! Valuable information!
casino online belgiГ« https://casinosonlinenew.com/states/ star games real online casino
Very good tips. Appreciate it.
casino swiss online https://eseomail.com/casinos-online-real-money/ phlwin online casino
You said it perfectly.!
online casino netent no deposit https://cryptogamblingguru.com/lucky-tiger-casino/ best paying online casinos
Many thanks. Plenty of information.
four winds online casino michigan promo code https://casinoslotssaid.com/real-money-gambling-apps-iphone/ highest payout online casino slots
Many thanks, An abundance of knowledge!
online bonus casino https://casinosonlinenew.com/casinos/ casino cirsa online
Terrific posts. With thanks!
safe secure online casino https://combatcasino.info/review-ducky-luck/ como crear un casino online gratis
Nicely put, Many thanks!
m8win online casino https://casinonair.com/review-reddog/ online casino no rules bonus codes
Good postings, Kudos!
online casino south africa no deposit https://hotgamblingguide.com/golf-betting-online/ bandar taruhan joker123 casino online
Nicely put, Cheers.
muchbetter online casino https://combatcasino.info/review-reddog/ casino online vip
You actually stated that very well!
borgata casino online app https://combatcasino.info/real-money-online-casino-indiana/ casino belgiГ« online
Whoa loads of excellent facts!
online betting casino apps https://hotgamblingguide.org/newest-michigan-online-casinos/ trusted casino online canada
Nicely put. Thank you!
olympic casino online https://findscasino.info/texas-holdem-online/ online casino not on gamstop
Tips clearly applied..
online netent casino https://hotgamblingguide.org/poker/ hack online casino
Awesome facts. Appreciate it!
online casinos sa https://mgmonlinecasino.us/soccer-bets/ australia’s 2018 best online legitimate online real money casino
Seriously lots of amazing facts!
casino for fun online https://mgmonlinecasino.us/mlb-betting/ online casino sk
Nicely put. Cheers.
betus casino online https://casinoslotssaid.com/poker/ online poker casino real money
With thanks, I like this.
are there online casinos in florida https://combatcasino.info/online-casino-australia/ 1 win casino online
Fantastic posts, Regards!
bingo for money online casino https://casinoshaman.com/bet-on-soccer-games/ casino royale watch online free
Regards, Useful stuff.
new pa online casinos no deposit bonus https://uscasinoguides.com/poker-real-money/ money game online casino
You actually said it effectively!
hollywood casino online poker https://snipercasino.info/review-ignition/ best australian online casino payid
Thank you, I value it!
online casino gambling in michigan https://combatcasino.info/nba-betting/ real money online casino maryland
Incredible tons of fantastic facts!
best apps for online casino https://hotgamblingguide.info/countries/ wa online casino sites
Many thanks, Loads of content.
online casinos list https://hotgamblingguide.com/real-money-poker-sites/ casino craps online games free
Kudos. I appreciate it!
online casino games real money welcome bonus https://casinoslotoking.com/nhl-betting-sites/ casino online sms pay
You actually reported this effectively!
online casino überweisung https://onlinecasinoindex.us/bet-in-the-super-bowl/ bästa online casino spelet
Reliable facts. Thank you!
best canadian online casino sites https://casinoshaman.com/canadian-casino-online/ online casino banner
You stated it very well!
best legit online casino usa https://onlinecasinoindex.us/wild-casino-online/ casino online como ganhar dinheiro
You reported that really well.
como recuperar dinero perdido en casino online https://hotgamblingguide.info/las-atlantis-free-chip-codes/ beat online casino strategy
You actually suggested this exceptionally well.
online casino videoslots https://ratingcasino.info/cricket-betting/ ireland online casino
Thank you. Quite a lot of write ups.
apollo rising echtgeld online casinos https://mgmonlinecasino.us/real-money-blackjack/ bet365 online casino nj
This is nicely expressed! .
rigged online casinos https://casinoslotoking.com/bet-on-cricket/ maryland online casinos
Seriously a good deal of very good facts.
harrah’s philadelphia online casino https://snipercasino.info/arizona-online-casino/ gta online diamond casino heist best payout
You revealed it terrifically.
2018 usa online casino bonus codes https://shadowcasino.info/keno-online/ 888poker casino online
Thank you ever so for you article post.Really looking forward to read more. Keep writing.
https://clck.ru/3Gih3t Частные Веб Сети: Современный Метод к Поисковому Продвижению PBN сеть выступает как систему приватных блогов [url=https://clck.ru/3Gih3t]https://clck.ru/3Gih3t[/url], служащих для улучшения рейтинга проекта в поиске. Эта технология, несмотря на неоднозначную реакцию экспертов SEO, остается эффективным методом создания ссылочного профиля. При грамотном использовании PBN позволяет значительно улучшить рейтинг веб-проекта в поисковых системах. Механизм функционирования и содержание приватной блогосети PBN является совокупность веб-ресурсов, объединенных главной целью – передачей линкового веса основному проекту. Каждый ресурс в сети имеет собственный оригинальный содержание, оформление и бэкграунд, вследствие чего они воспринимаются как естественные сайты для поисковых роботов. Преимущества использования со ссылками PBN Ключевое превосходство PBN заключается в тотальном управлении над донорскими площадками. Владелец структуры может регулировать размещением ссылок, их анкорами и наполнением материалов. Также, качественные площадки PBN, обычно, имеют высоким уровнем авторитета и авторитета, позитивно влияя на раскручиваемый сайт. Создание эффективной системы PBN Построение результативной системы PBN нуждается в внимательное отношение к выбору доменов, подготовке уникального содержимого и техническому настройке всех веб-сайтов. Следует обеспечить отдельные IP-адреса, уникальные шаблоны и уникальное окружение доменов для любого ресурса в системе. Такой подход помогает поддерживать естественность и предотвращать выявления отношений между ресурсами. Угрозы и безопасность при использовании с PBN При использовании с PBN необходимо придерживаться четкие условия безопасности. Ошибки в конфигурации сети могут принести за собой санкции от поисковых машин. Советуется применять white hat техники и следить за состоянием контента на каждом сайте сети. Цена и окупаемость PBN Организация и обслуживание качественной PBN-сети соединено с существенными затратами. В расходы входят покупка доменов, хостинг, материалы и техническое обслуживание. Однако, правильный подход позволяет скоро вернуть инвестиции благодаря повышению позиций в поиске и увеличению естественного трафика. Вспомогательные способы и варианты Учитывая, что сеть блогов служит эффективным методом поисковой оптимизации, рекомендуется задействовать его параллельно с альтернативными методами оптимизации. Такая стратегия может включать разработку уникального контента, работу над юзабилити площадки и наращивание естественной ссылочной массы.
Thanks for the article post.Thanks Again. Really Cool.
Fedex Shipping Pyridium Increased Urination
I love looking through an article that will make people think. Also, thank you for allowing me to comment.
https://clck.ru/3Gih3t Private Блог Сеть (PBN): Эффективный Метод Поисковой Оптимизации Private Blog Network это комплекс приватных блогов [url=https://clck.ru/3Gih3t]clck.ru/3Gih3t[/url], используемых для повышения позиций сайта в поисковых системах. Данный метод, невзирая на спорную позицию оптимизаторов, продолжает быть эффективным методом получения ссылочного профиля. При корректном применении PBN позволяет заметно улучшить рейтинг продвигаемого ресурса в поиске. В чём суть PBN и каким образом это функционирует Приватная сеть содержит в себя большое количество сайтов, связанных общей целью – расширением ссылочной массы центрального проекта. Любой из сайты в системе имеют индивидуальным контентом, оформлением и эволюцией, вследствие чего они представляются как естественные сайты для поисковых роботов. Преимущества внедрения PBN-ссылок Базовое преимущество PBN находится в полном контроле донорскими сайтами. Собственник системой имеет возможность регулировать публикацию линков, их анкоры и содержимое материалов. Кроме того, качественные сайты PBN обычно имеют большими параметрами авторитета и авторитетности, что благоприятно сказывается на продвигаемый веб-ресурс. Построение эффективной PBN-сети Создание эффективной PBN-сети требует внимательного отношения к выбору сайтов, разработке неповторимого материала и системной конфигурации любого веб-сайта. Важно гарантировать разные айпи-адреса, особые шаблоны и уникальное доменное соседство для любого ресурса в сети. Такой подход дает возможность обеспечивать естественность и предотвращать раскрытия взаимосвязей между ресурсами. Меры защиты и вероятные опасности PBN Использование PBN обязывает внимательное соблюдение мер безопасности. Ошибки в организации сети могут вызвать за собой наказание от поисковиков. Следует применять легальные методы оптимизации и поддерживать высокое качество контента на сайтах сети. Расходы и возврат инвестиций в PBN Формирование и поддержка профессиональной PBN-сетью включает серьезные затраты. В расходы входят покупка доменов, хостинг, наполнение и техническое поддержка. Тем не менее, правильный подход позволяет скоро окупить инвестиции благодаря улучшению позиций в поиске и повышению естественного трафика. Дополнительные методики и альтернативы Поскольку Private Blog Network продолжает быть действенным инструментом поисковой оптимизации, советуется сочетать его с дополнительными вариантами продвижения. К подобным способам причисляются написание уникального наполнения, оптимизация пользовательского опыта сайта и формирование органических бэклинков.
A motivating discussion is definitely worth comment. I think that you need to write moreon this topic, it might not be a taboo matter but typically folks don’t speak aboutsuch issues. To the next! All the best!!
Thank an individual so much with regard to allowing us know what I didn’t know. I anticipate working with you.
Enjoyed examining this, very good stuff, regards . “The fox knows many things, but the hedgehog knows one big thing.” by Archilocus.
This was a really enjoyable piece of content. Thanks so much for creating it. I’ll return for some more.
I want to to thank you for this wonderful read!!I certainly loved every little bit of it. I have you saved as a favorite to look at new stuff youpost…
Great info. Lucky me I came across your blog by chance (stumbleupon). I’ve saved it for later!
Do you have a spam issue on this blog; I also am a blogger, and I was curious about yoursituation; many of us have developed some nice practices and we are lookingto exchange solutions with others, why not shoot me an e-mail if interested.
I wanted to thank you for this fantastic read!! I absolutely loved every bit of it. I have got you bookmarked to check out new things you post…
Aw, this was an exceptionally nice post. Finding the time and actual effort to produce a top notch articleÖ but what can I sayÖ I hesitate a whole lot and don’t seem to get nearly anything done.
trustworthy canadian pharmacy which canadian pharmacy is legitimate
Just wanna admit that this is invaluable, Thanks for taking your time to write this.
A fascinating discussion is definitely worth comment. I do believe that you ought to write more on this subject matter, it might not be a taboo matter but usually people do not talk about these subjects. To the next! All the best.
wow, awesome blog article.Really thank you! Cool.
I’m not sure where you are getting your info,but great topic. I needs to spend some time learningmore or understanding more. Thanks for excellent information I was looking forthis info for my mission.
Really appreciate you sharing this blog article. Want more.
Whoa! This blog looks exactly like my old one! It’s on a totally different subject but it has pretty much the same layout and design. Outstanding choice of colors!
Hi there, just became alert to your blog through Google, and found that it is truly informative.I am gonna watch out for brussels. I’ll appreciate if you continue this in future.Numerous people will be benefited from your writing.Cheers!
Your blog is great as in the event that it were being written by simply a writer. I will take a look at your blog usually. Many thanks always.
Türk, gerçek ve aktif tiktok takipçi için, takipdestek adresini ziyaret edin.
Myetlg – finasteride online insurance Pwsttj llcctp
I blog often and I really appreciate your content. The article has really peaked my interest. I’m going to book mark your blog and keep checking for new details about once a week. I subscribed to your Feed as well.
I really like looking through a post that can make people think.Also, many thanks for allowing me to comment!
Im thankful for the article.Much thanks again.
Thanks for the good writeup. It in fact was a amusement account it.Look complex to more brought agreeable from you! However, how can we keepup a correspondence?
I was suggested this blog through my cousin. I’m not positive whether or not this submit is written by him as no one else realize such distinctive about my trouble. You’re amazing! Thank you!
Hello colleagues, how is everything, and what you wish for to say on the topic of this paragraph, in my view its genuinely awesome in favor ofme.
Ломбард хроноскопов в пределах Москве: прибыльно сдать люксовые хронометры [url=https://chasi-karlson.ru]продать часы[/url] Для чего рассматривают хронометражный ссудный пункт? Москва демонстрирует множество залоговых организаций, зато измерительные организации отличаются специализацией. Тут выполняют электронную экспертизу часов с помощью снимкам, вдобавок предлагают приобретение альпийских часов немедленно. Каким способом продать часы в пределах столице? Электронная экспертиза: отправьте изображения ваших устройств на платформе веб-ресурс. Квалифицированная проверка: посещение в ссудной организации в целях корректировки цены. Срочная перевод наличности после окончания заключения соглашения. Реализовать швейцарские часы на территории мегаполисе реально на оптимальных правилах. Ломбарды подтверждают надежность а также справедливую экспертизу каждого экземпляра! Планируете продать хронометры срочно? Направляйтесь в филиал часовой залоговый центр мегаполиса — оформите наибольшую выгоду сейчас!
Thanks for the post.Really thank you! Fantastic.
I truly appreciate this article post.Much thanks again.
Very informative blog.Really thank you! Much obliged.
I think this is a real great post.Thanks Again. Awesome.
Really enjoyed this article.Thanks Again. Cool.
Great, thanks for sharing this post.Much thanks again. Fantastic.
hi!,I love your writing so much! share we be in contact more about your poston AOL? I need an expert in this area to resolve my problem.Maybe that is you! Having a look ahead to look you.
where can i get hydroxychloroquine chloroquine primaquine
whoah this blog is wonderful i really like reading your posts. Stay up the great work! You understand, lots of people are hunting around for this information, you can aid them greatly.
legit essay writing services q31jrs why us college essay l17jza write an argumentative essay d84aae
Really appreciate you sharing this blog post. Really Great.
Thanks on your marvelous posting! I seriously enjoged
reading it, you could be a great author.I will make sure to bookmark
your blog and will often come bac in the foreseeable future.
I want to encourage you to continue your great work,
have a nice weekend! https://Menbehealth.Wordpress.com/
I think this is a real great blog post.Thanks Again. Really Great.
Muchos Gracias for your article post.Really thank you!
Excellent beat ! I wish to apprentice while you amend your site,
how can i subscribe for a blog website? The account helped me a aceptable deal.
I had been tiny bit acquainted of this your broadcast provided brdight clear concept https://gamereleasetoday.com/create-an-account-on-22bet-click-to-register-enter-email-and-password-to-access-all-available-bonuses-and-offers-for-mobile-slots-3/
Today, I wesnt to the beach with my children. I found a sea shell and gave it to
my 4 year old daughter and said “You can hear the ocean if you put this to your ear.” She placed the shedll
to her ear and screamed. There was a hermit crab inside and
it pinched her ear. She never wants to go back! LoL I know this is entirely offf topic but I had to tell someone! http://www.Leefairshare.org/analise-do-bizzo-casino-conheca-a-selecao-de-jogos-live-bonus-de-depositos-e-rodadas-gratis-para-todos-os-players-que-jogam/
Wonderful goods from you, man. I have understand your stuff previous to and
you’re just extremely magnificent. I actually like what you’ve acquired here,
certainly like what you are saying and the way in which
yoou say it. You make it enjoyable annd you still take care off to keep it
wise. I can not wait to read far more from you. This is actually a terrific web site. https://cetroscentromedico.Com.br/2025/03/21/bizzo-casino-review-descubra-a-selecao-de-jogos-ao-vivo-bonus-de-depositos-e-rodadas-gratis-para-todos-os-jogadores/
I’m not that much of a online reader to be honest but your bloogs really
nice, keep it up! I’ll go ahead and boiokmark your website to come back in the future.
Many thanks https://WWW.Panditrksharma.com/a-bizzo-kaszino-elemzese-milyen-egyeb-bonuszok-es-jatekok-varnak-a-jatekosokra-mikozben-a-legjobb-beteti-ajanlatok-allnak-rendelkezesukre-2/
Hello, tender thanks you as a service to probity spot and nice blog.
Really enjoyed this post. Really Great.
I really enjoy the article post. Really Cool.
Excellent post. I was checking continuously this blog and I am impressed! Extremely useful info particularly the last part 🙂 I care for such info a lot. I was seeking this certain info for a very long time. Thank you and good luck.
What’s up, thnis weekend is good designed for
me, for tthe reason that this time i am reading this wonderful educational post here at my house. https://biologyessaywritingservice.com/
Hello there, just was alert to your blog via Google, and found that it’s truly informative. I’m going to watch out for brussels. I will be grateful should you continue this in future. Many folks might be benefited out of your writing. Cheers!
What’s Taking place i am new to this, I stumbled upon this I have discovered It absolutely useful and it has aided me out loads. I am hoping to give a contribution & assist different customers like its aided me. Good job.
This article provides clear idea in favor of the new users of blogging, that really how to do running a blog.
Wow that was odd. I just wrote an incredibly longcomment but after I clicked submit my comment didn’t appear.Grrrr… well I’m not writing all that over again. Anyhow,just wanted to say superb blog!
Major thankies for the article.Really thank you! Cool.
vector en Messenger: no suena la comunicación \”¿Eres tú en este video?\” \”
Как найти сопровождение в мегаполисе [url=https://53-dosug.ru/]Эскорт агентство с проверенными анкетами[/url]. Лучшие агентства сопровождения Москвы. Элитные сервисы для мероприятий столица предоставляет большое количество надежных вариантов. Условия отбора компаньонки содержат внешность, уровень доверия и квалификацию.. Где отыскать надежное агентство сопровождения в городе. Подсказки по подбору сервисов для мероприятий Как не стоит допустить промах с выбором сопровождения Популярные агентства Москвы На какие детали обратить внимание при бронировании эскорта. Услуги элитного класса в столице нуждается тщательного подхода. Как именно выбрать сервисы качественно?. Варианты для встреч Москва — расценки и мнения. Выбрать элитный услуги по доступной цене Премиум сервис с приездом в Москве Топовые сопровождающие столицы — топ 2024 Сервис для деловых переговоров Москва. Услуги на торжество включает особенного подбора. Как выявить качественное сервис от обманщиков?.
I appreciate the way you have ended this post …
Very neat blog.Much thanks again. Will read on…
Today, I went to the beach front with my children. I found a sea shell and gave it to my 4 year old daughter
and said “You can hear the ocean if you put this to your ear.”
She puut the shell to her ear and screamed. There was a hermit
crab inside and it pinched her ear. She never wants to go back!
LoL I know this is entirely off topic but I had to tell
someone! https://Wedeohire.com/employer/turnbull/
Attractive section of content. I just stumbled upon your
web site and in accession capital too asseert that I acquire actually enjoyed
account your blog posts. Anyway I’ll be subscribing to yojr feeds
and even I achievement you access consistently quickly. https://remoteaijobs.ai/employer/coursework-expert/
Thank you for your article post.Really thank you! Cool.
Heya i am for the primary time here. I found this board andI find It truly helpful & it helped me out much. I hope to offer something again and aid others such as you aided me.Feel free to surf to my blog – Keto Smooth Pills
Hey There. I found your blog the use of
msn. This is a really well written article.
I’ll be sure to booomark it and come back to read more of your helpful information. Thank you
for the post. I’ll definitely comeback. https://jobs.Iiamadras.org/employer/cambage/
Reading your post made me think. Mission accomplished I guess. I will write something about this on my blog. …
Seriously. Wizard. You’re some sort of genius. Thank you.
¡Hola jugadores de casino!
Gira y gana con 10 euros gratis en tragamonedas sin depГіsito. [url=п»їhttps://10eurosgratissindepositocasino.xyz/]genesis casino 10 euros gratis[/url] Solo tienes que crear tu cuenta y aprovechar este bono exclusivo. ВЎLa suerte estГЎ de tu lado!
En 2025 los mejores casinos online siguen regalando 10 euros sin depГіsito. RegГstrate y juega gratis sin preocuparte por tu saldo. ВЎAprovecha!
Toda la información en el enlace – п»їhttps://10eurosgratissindepositocasino.xyz/
¡Que tengas buenos beneficios!
¡Hola usuarios de casino!
En EspaГ±a puedes jugar en casinos legales que ofrecen 10 euros gratis. [url=п»їhttps://10eurosgratissindepositocasino.xyz/]casino euros gratis sin depГіsito[/url] Sin necesidad de depositar, solo con registrarte. Juega seguro y gana dinero real.
Solo por registrarte en un casino online puedes obtener 10 euros gratis. No necesitas depositar nada. Empieza a jugar de inmediato y gana premios en efectivo. Una excelente forma de probar suerte sin invertir.
Toda la información en el enlace – п»їhttps://10eurosgratissindepositocasino.xyz/
¡Que tengas buenos beneficios!
¡Hola apostadores!
Con 10 euros gratis puedes jugar en el casino sin necesidad de depositar. [url=п»їhttps://10eurosgratissindepositocasino.xyz/]10 euros gratis sin deposito casino[/url] Ideal para probar sin compromisos. RegГstrate y juega como un profesional.
Juega al bingo online con 10 euros gratis sin depГіsito. RegГstrate y empieza a disfrutar sin pagar nada. Ideal para los amantes del bingo que quieren ganar sin arriesgar.
Toda la información en el enlace – п»їhttps://10eurosgratissindepositocasino.xyz/
¡Que tengas buenos beneficios!
Are you done in of disquieting every victuals and allay not seeing results? Run out of 10 pounds in a week with this miracle value loss unravelling [url=https://elevateright.com/delta-8-gummies/ ]Doctors don’t want you to know[/url] that’s nauseous doctors everywhere. You one necessity bromide pellet a time to burn bulky instantly and get the solidity you’ve each dreamed of.
There’s certainly a great deal to find out about this subject. I really like all of the points you made.
Right now it sounds like WordPress is the best bloggingplatform out there right now. (from what I’ve read)Is that what you’re using on your blog?
Hi fans of humor!
They don’t miss—just like your favorite shooter on fire. basketball puns
Get cheesy with basketball food puns that serve flavor and fun. Perfect for parties, posts, or pregame snacks.
Toda la información en el enlace – п»їhttps://ontheborder.com.au/the-history-of-tequila/#comment-2550
Wishing you lots of comedy gold!
Hi joke lovers!
Looking for basketball dad jokes? These are the MVPs of lame-but-lovable humor. [url=http://basketballpuns.com/]п»їbasketball puns[/url] No court required, just a love for laughs.
Level up your humor with funny basketball puns that shoot their shot and always score.
Toda la información en el enlace – http://basketballpuns.com/
Wishing you lots of laughs!
how to write a persuasive essayhow to write an introduction paragraph for an essayessay creator
hydroxychloroquine allergy plaquenil and weight loss plaquenil and eyes
hydroxychloroquine zinc hydroxychloroquine sulfate tablets
Hello, yeah this post is really nice and I have learned lot of things from it about blogging.thanks.
Are you tired of fatiguing every fast and allay not seeing results? Squander 10 pounds in a week with this miracle weight denial solution https://elevateright.com/delta-8-disposable-vape-pens/ that’s stupefying doctors everywhere. You only requirement one nuisance a time to char stout instantly and acquire the body you’ve again dreamed of.
Thank you for the auspicious writeup. It in fact was a amusementaccount it. Look advanced to far added agreeable from you!By the way, how can we communicate?
It’s an amazing paragraph in favor of all the internet visitors; theywill get benefit from it I am sure.
I was so satisfied from your blog. Thank a person so much.
Are you tired of fatiguing every food and allay not seeing results? Lose 10 pounds in a week with this miracle superiority denial unravelling https://elevateright.com/product/1500mg-delta-8-gummies/ that’s revolting doctors everywhere. You on the contrary necessity the same pellet a time to yearn stout instantly and around the remains you’ve always dreamed of.
impotence pills men’s ed pillspills for erection
lisinopril 10 lisinopril / hydrochlorothiazide
Thank you 1,000,000 and please carry on the gratifying work.
What’s Happening i’m new to this, I stumbled upon this I have found It absolutely helpful and it has helped me out loads. I am hoping to give a contribution & help other users like its aided me. Great job.
Hello, just wanted to mention, I enjoyed this blog post. It was funny. Keep on posting!
Are you spent of fatiguing every food and still not seeing results? Lose 10 pounds in a week with this miracle tonnage denial dissolution https://elevateright.com/delta-8-flower/ that’s shocking doctors everywhere. You at worst requirement one pill a time to yearn bulky instantly and acquire the body you’ve always dreamed of.