


Valorant aimbot Github Source: https://github.com/slyautomation/valorant_aimbot
For the written guide on the arduino aimbot code, guide check out: https://www.slyautomation.com/blog/valorant-aimbot-with-color-detection-with-python/
1. Introduction:
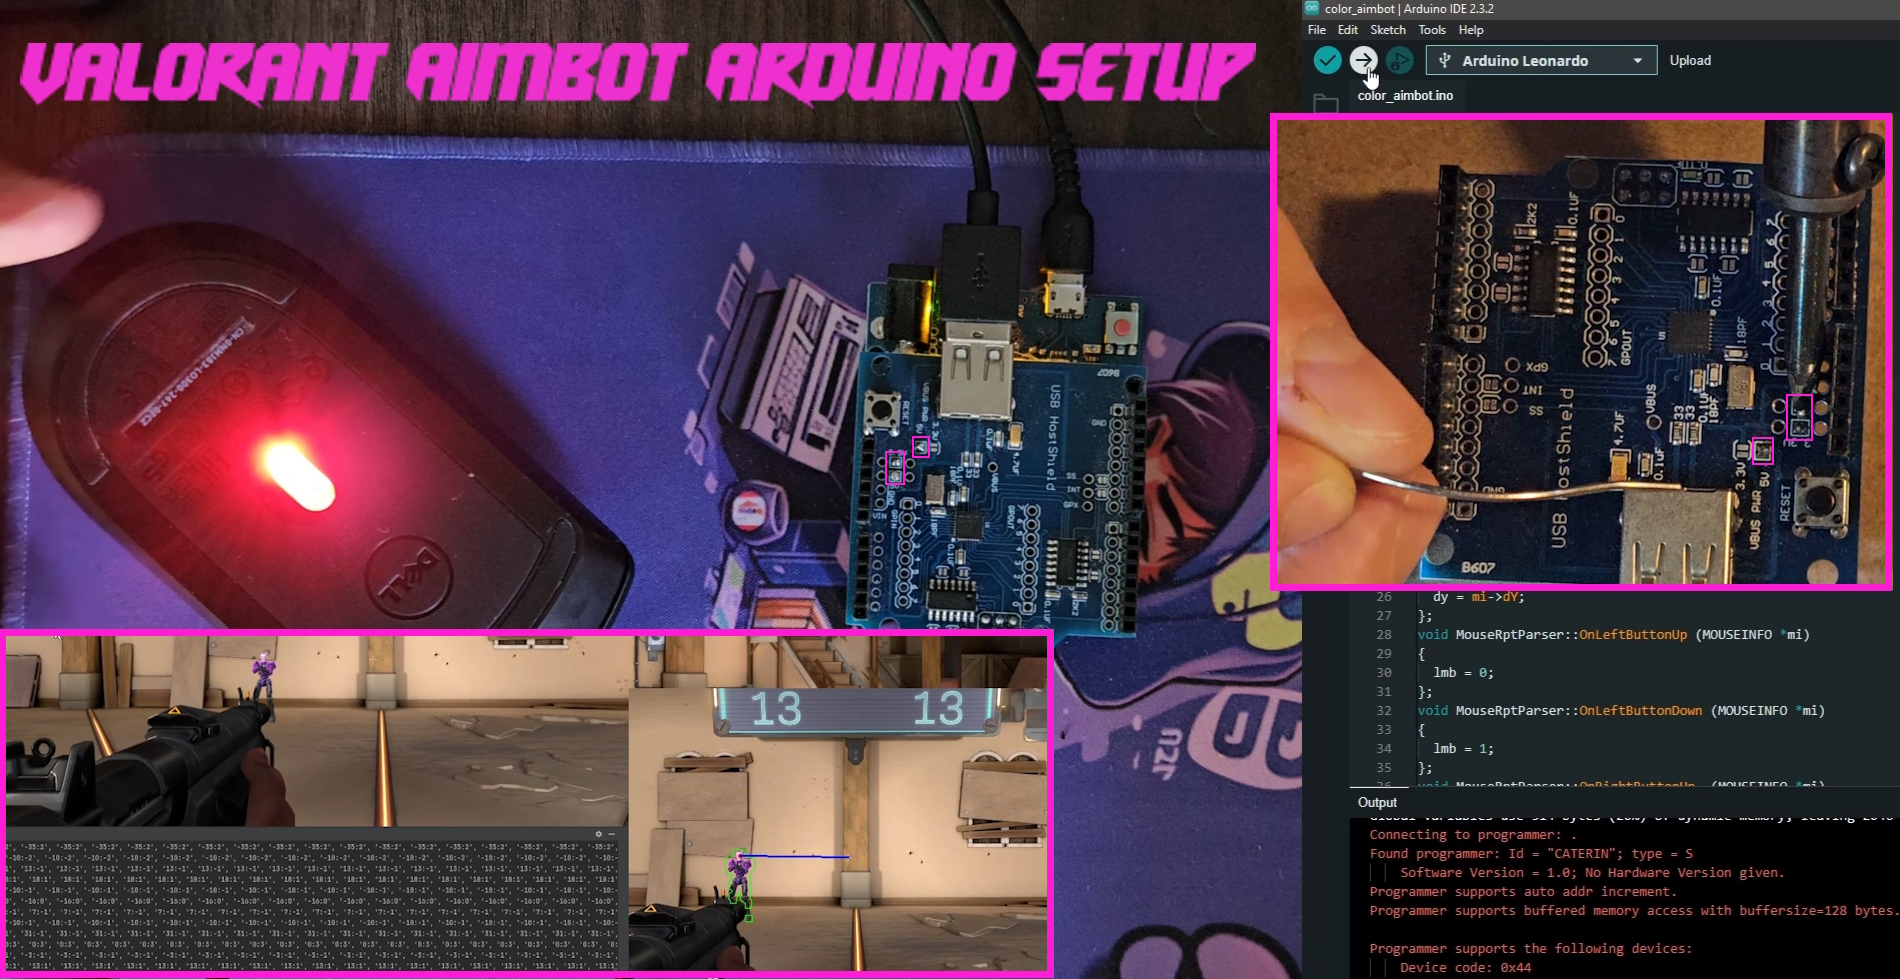
- Welcome to the step-by-step guide for setting up the Valorant Aimbot Arduino with a USB Host Shield to control your mouse. This guide is based on the instructions provided in the YouTube video by Sly Automation.
Aliexpress Items:
| Item | Image | Cost ($USD) |
| Leonardo R3 Development Board + USB Cable ATMEGA32U4 |  | $5.72 |
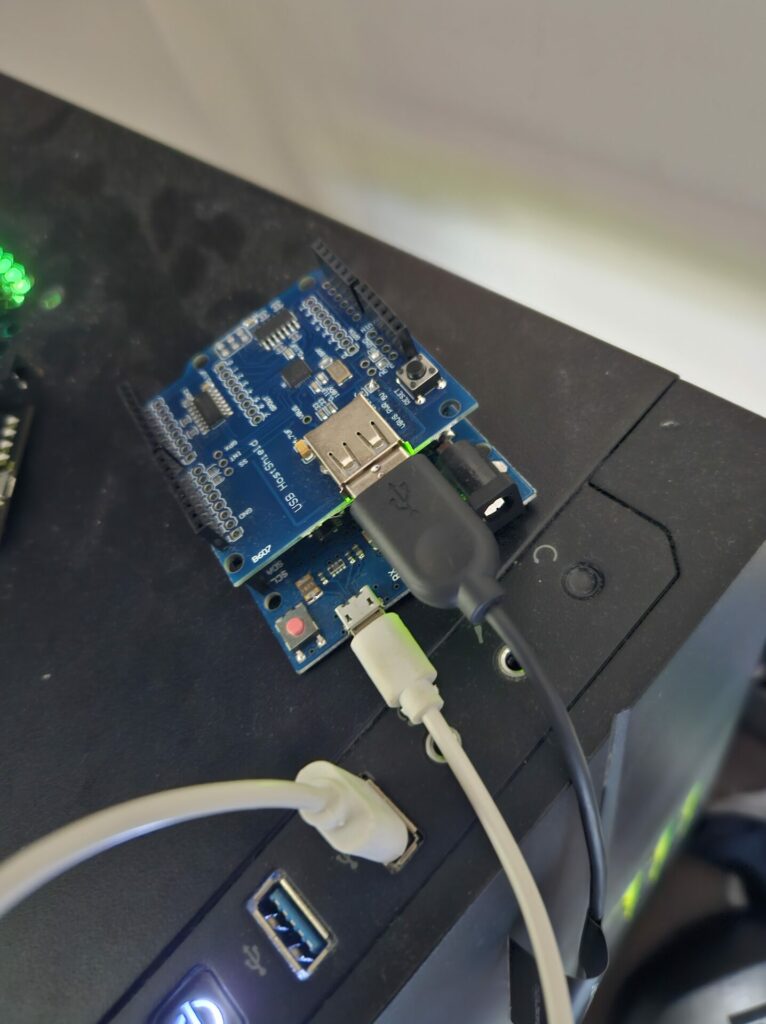
| Arduino USB Host Shield |  | $5.31 |
| Arduino Leonardo R3 | | $5.72 |
| Soldering Iron Kit |  | $18.54 |
Amazon Items:
| Item | Image | Cost ($USD) |
| KEYESTUDIO Leonardo R3 Microcontroller Development Board with USB Cable Kit |  | $13.99 |
| Arduino USB Host Shield |  | $21.99 |
| Arduino Leonardo R3 |  | $24.90 |
| Soldering Iron |  | $9.99 |
| Solder Wire |  | $8.99 |
2. Gather Materials:
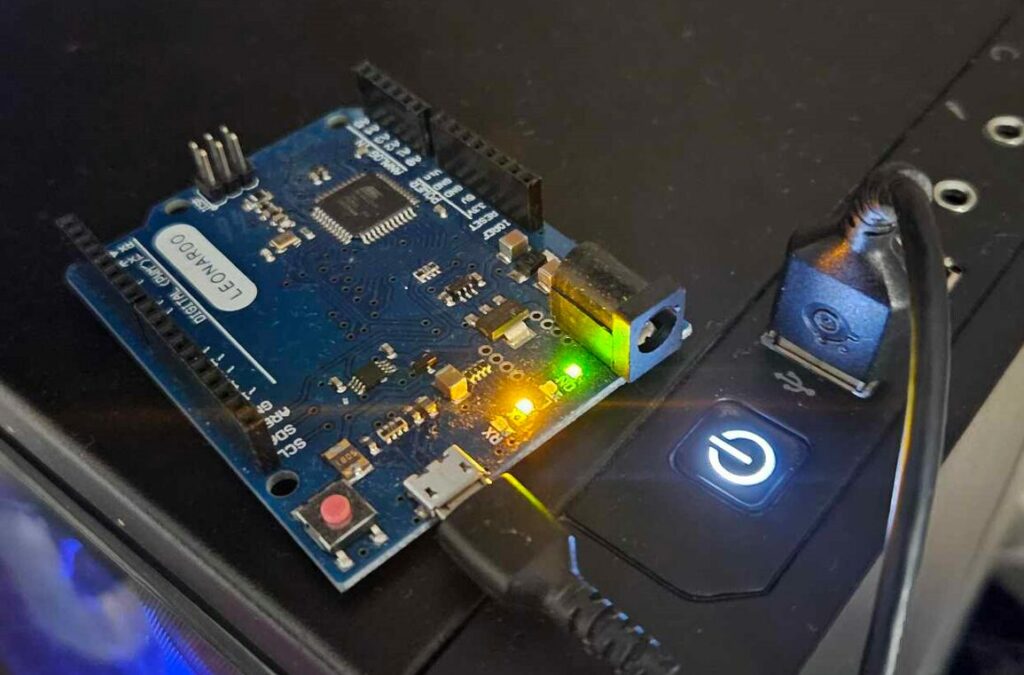
- Arduino Leonardo.
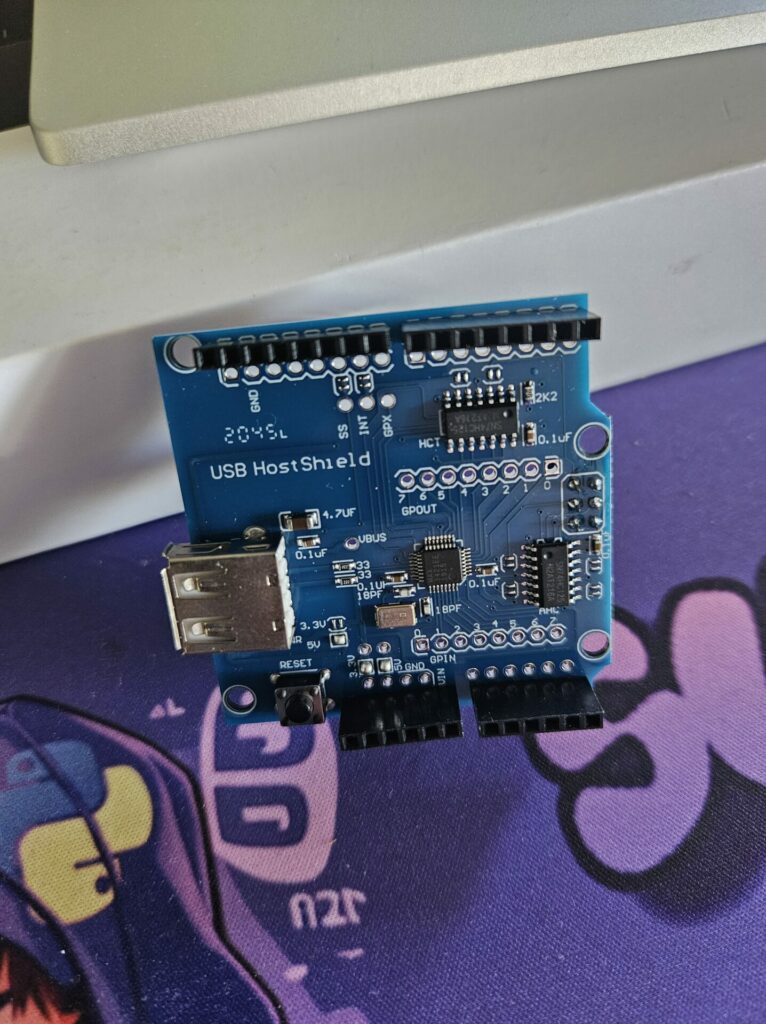
- USB Host Shield.
- Soldering iron and solder.
- Mouse (USB).
- Computer with Arduino IDE installed. (Click here to get Arduino IDE installation)
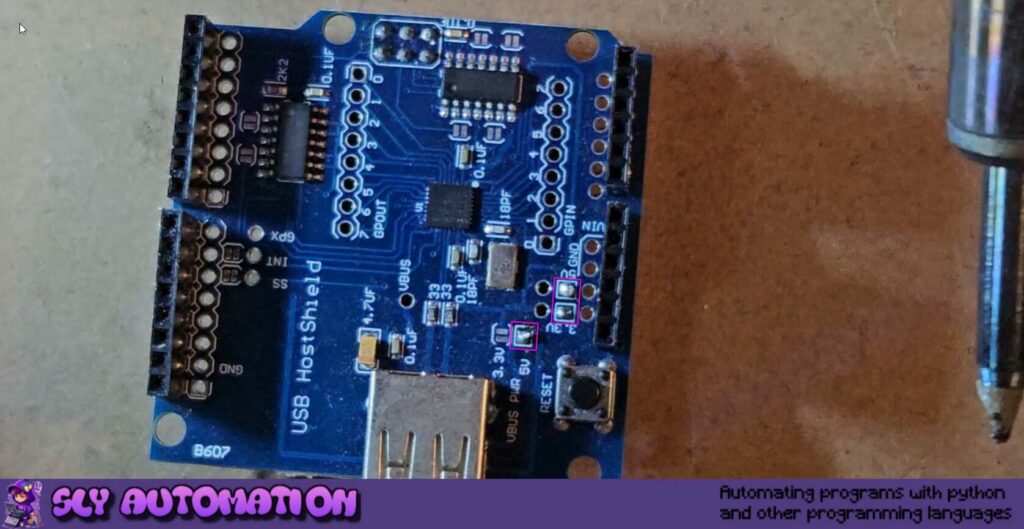
3. Preparing the USB Shield:
- Identify the three jumper circuits: VBUS power (5V), 3.3 Vol, and the two grounds.
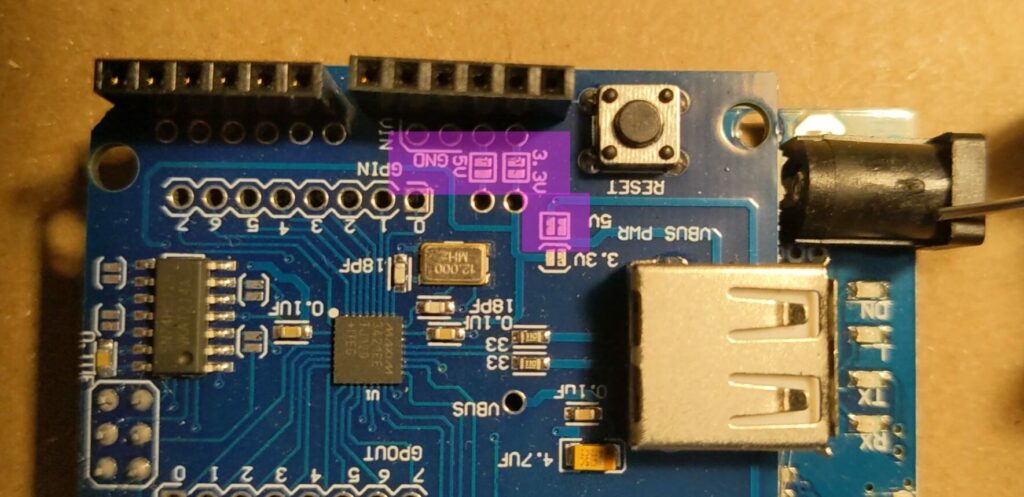
- Use a soldering iron to solder these jumper circuits if they haven’t been done already. This resolves power issues.
- Apply a small dab of solder to each of the jumper circuits to ensure proper connections.
- Should look like a hat on top so that the silver line underneath is not visible
| Item | Image | Cost ($USD) |
| Aliexpress Solder Wire |  | $2.20 |
| Aliexpress Soldering Iron |  | $3.09 |
4. Setting Up Arduino IDE:
Arduino IDE Overview:
- The Arduino IDE is a software application that allows you to write, compile, and upload code to your Arduino board. It provides a user-friendly interface for programming microcontroller-based projects.
Arduino IDE Steps:
a. Install Arduino IDE:
- Visit the official Arduino website (https://www.arduino.cc/) and navigate to the “Software” section.
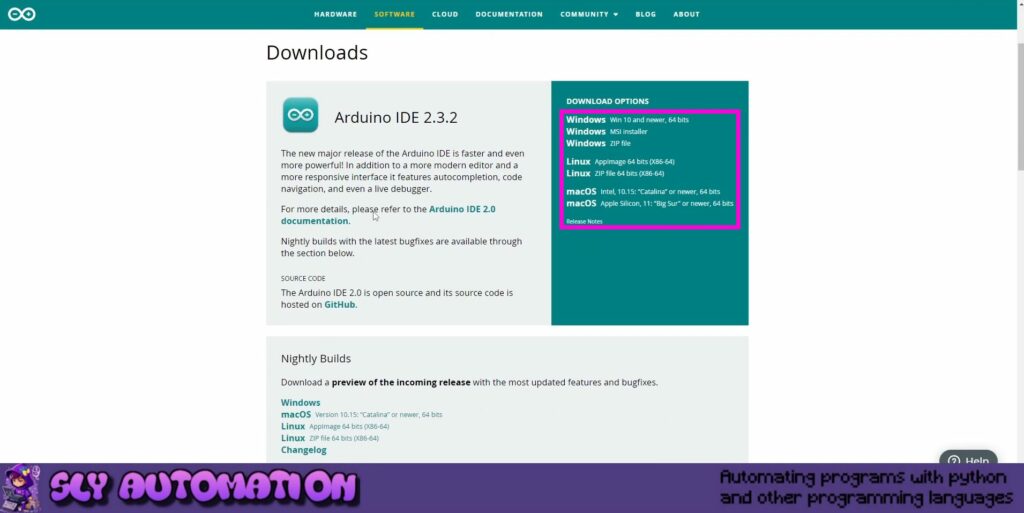
- Download the Arduino IDE installer for your operating system (Windows, macOS, or Linux).
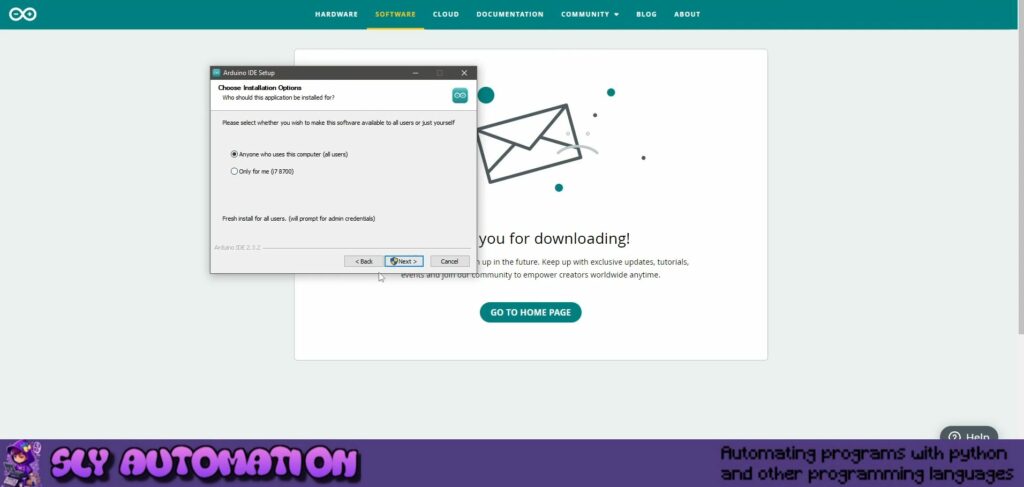
- Run the installer and follow the on-screen instructions to complete the installation process.
b. Launch Arduino IDE:
- Once installed, open the Arduino IDE from the Start menu (Windows) or the Applications folder (macOS).
- The IDE should launch, presenting you with a blank sketch (code) window.
c. Configure Arduino aimbot IDE Preferences (Optional):
- Before proceeding further, you may want to configure some preferences in the Arduino IDE according to your preferences.
- Go to the “File” menu and select “Preferences.”
- Here, you can customize settings such as the default sketch location, text editor settings, and more.
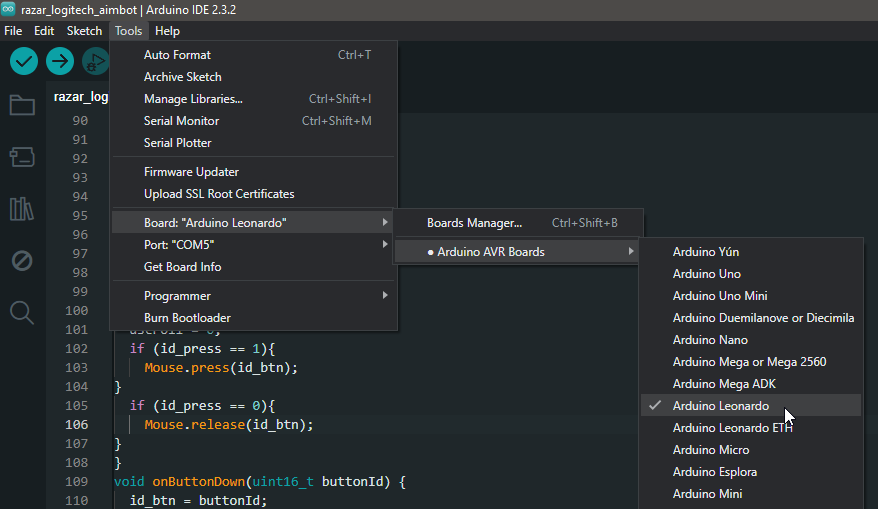
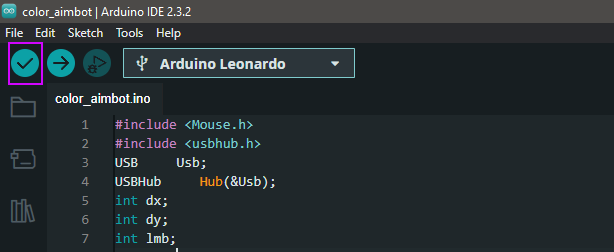
d. Board Selection:
- Before you can upload code to your Arduino board, you need to select the correct board type and port.
- Go to the “Tools” menu and navigate to the “Board” submenu.
- Select the appropriate Arduino board from the list. In this case, you would choose “Arduino Leonardo.”
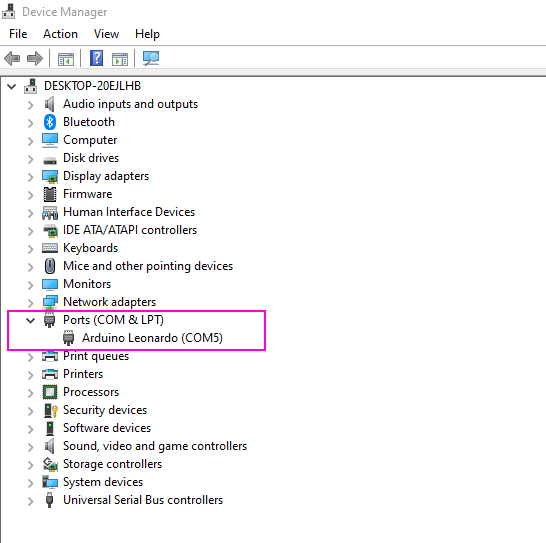
- Next, go to the “Tools” menu again, then select the “Port” submenu, and choose the correct COM port to which your Arduino board is connected. You can find this information in the Device Manager on Windows or System Information on macOS.
e. Verify Installation:
- To ensure that the Arduino IDE is set up correctly, you can create a simple test sketch and upload it to your Arduino board.
- Write a basic sketch (e.g., blink an LED) or open one of the example sketches provided in the Arduino IDE.
- Click on the checkmark icon (Verify) to compile the sketch. Make sure there are no errors in the compilation process.
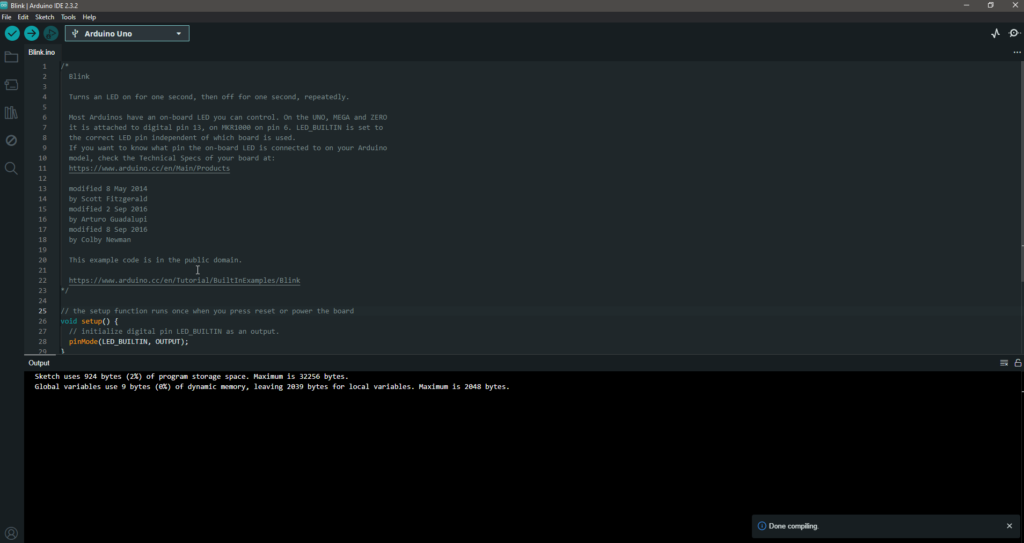
- If the compilation is successful, proceed to upload the sketch to your Arduino board by clicking on the right arrow icon (Upload). Observe the status messages in the bottom console area to confirm that the upload was successful.

Valorant aimbot Conclusion:
- With the Arduino IDE set up correctly and your Arduino board properly configured, you’re ready to proceed with writing, compiling, and uploading code for your projects, including the Valorant Aimbot Arduino setup.
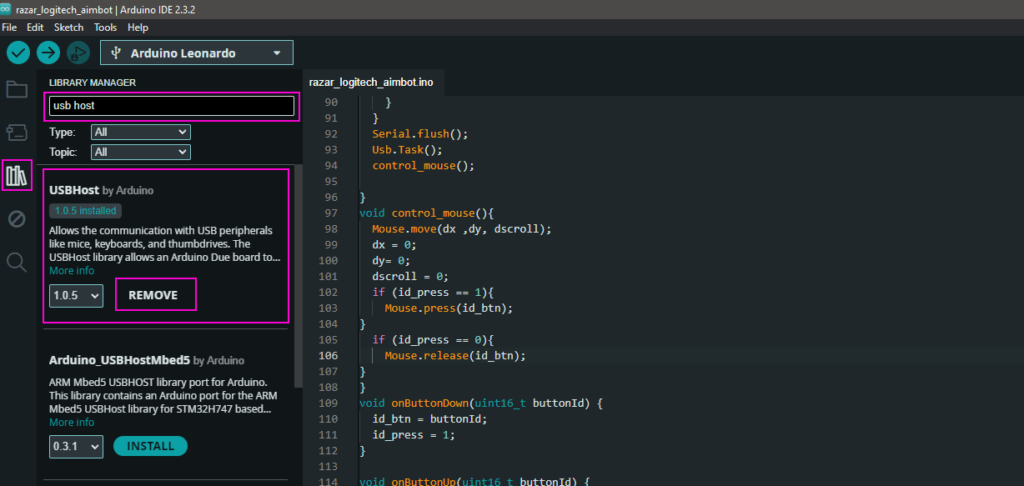
5. Downloading Arduino aimbot Libraries:
- Open Arduino IDE.
- Go to “Library Manager” and search for “USB Host” by Arduino and ensure it’s installed.
- Search for “USB Host Shield Library 2.0” by Oleg and install it as well.
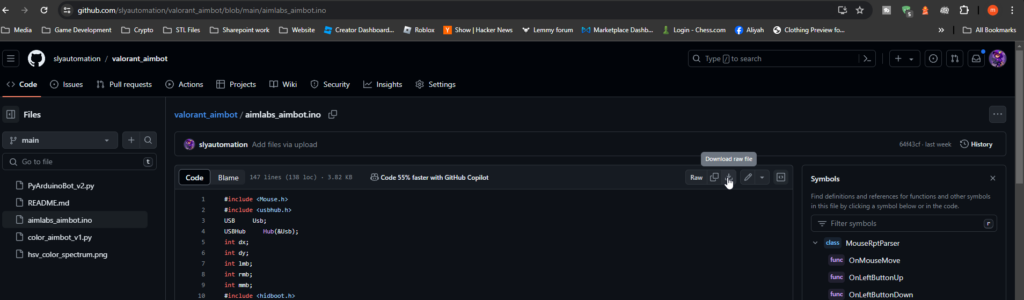
6. Downloading the Arduino Sketch:
- Visit GitHub and search for “SlyAutomation.”
- Find the “valorant_aimbot” repository.
- Download the Arduino sketch file (.ino) or clone the entire project to your local machine.
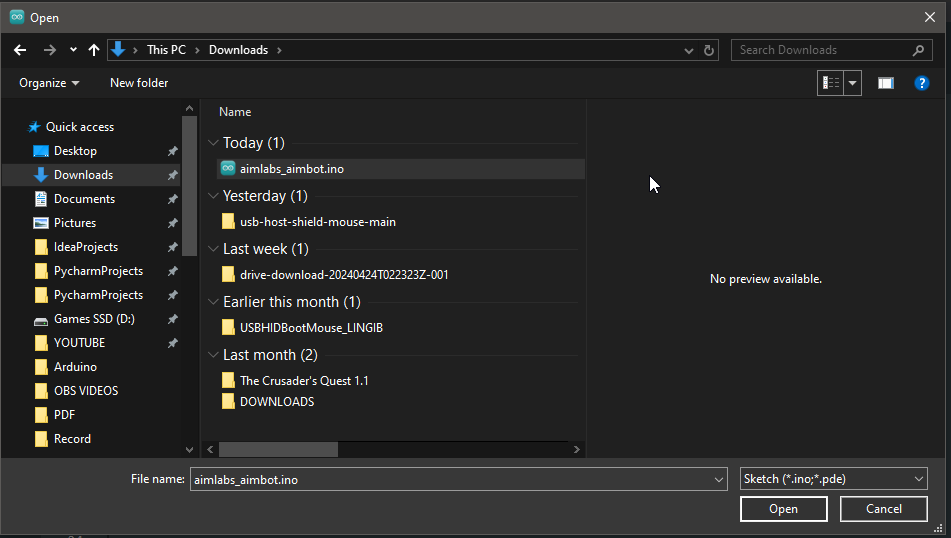
7. Opening the Arduino Sketch:
- Open the Arduino IDE.
- Navigate to File -> Open and select the downloaded Arduino sketch file.
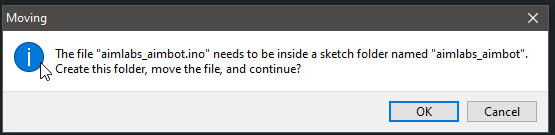
- On the prompt press ok to put the ino file into a sketch folder
- Once opened, ensure that the IDE recognizes your Arduino Leonardo board.
8. Connecting Hardware:
- Connect the USB Host Shield to the Arduino Leonardo.
- Ensure that all pins are aligned correctly and firmly attached.
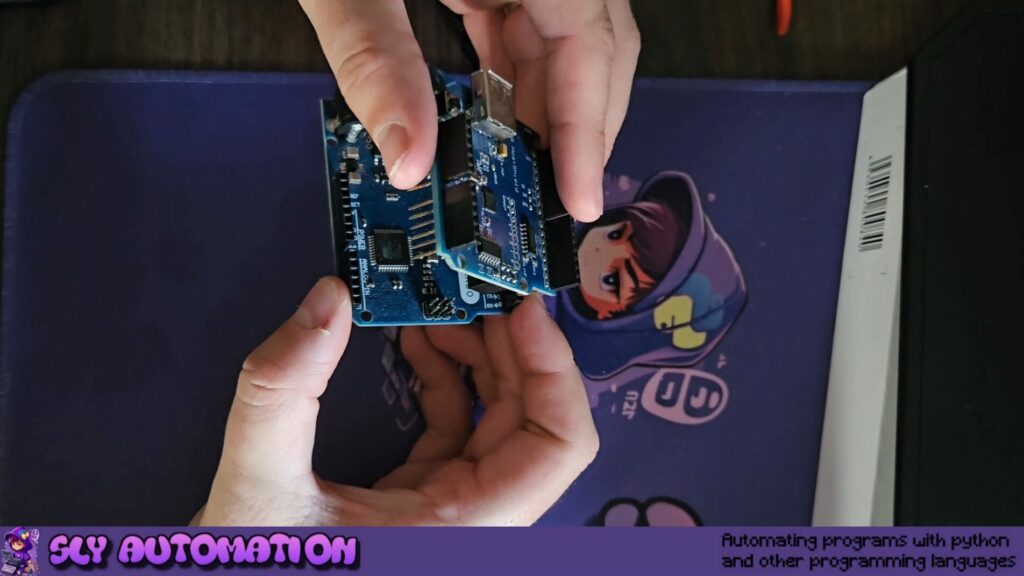
- Connect the mouse to the USB Host Shield.
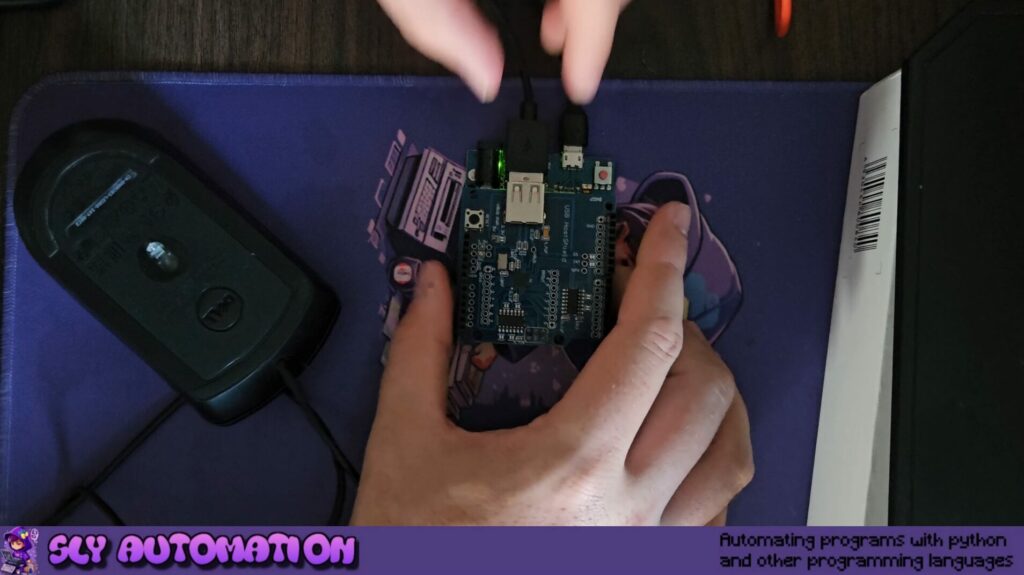
Connect the micro/usb c power cable to the arduino leonardo into the computer’s usb.
9. Uploading the Arduino Sketch:
- Check the COM port in the Device Manager and verify it in the Arduino IDE.
- Compile the sketch by clicking on the checkmark icon.
- Upload the sketch to the Arduino Leonardo by clicking on the right arrow icon.

- Wait for the upload process to complete.
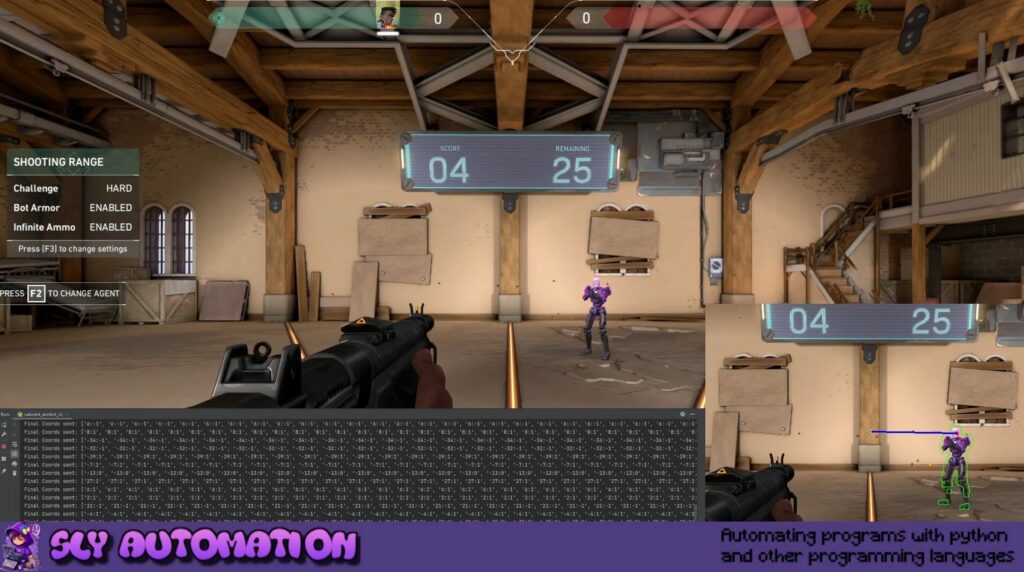
10. Testing:
- After successful upload, observe the lights on the Arduino and mouse.
- The mouse should respond to movements and clicks according to the programmed Aimbot.
- Troubleshoot any issues by reviewing the code and connections.
11. Additional Notes:
- Ensure that you comply with all legal and ethical considerations when using such software and hardware configurations.
- Experiment with the provided code to customize the Aimbot according to your preferences.
- Seek additional support from online communities or forums if you encounter any difficulties beyond this guide.
12. Conclusion:
- Congratulations! You have successfully set up the Valorant Aimbot Arduino with a USB Host Shield to control your mouse. Enjoy your gaming experience!
Online Retailers:
- Aliexpress: Aliexpress offers generic Arduino boards, such as the:
| Item | Image | Cost ($USD) |
| Leonardo R3 Development Board + USB Cable ATMEGA32U4 | | $5.72 |
| Arduino USB Host Shield | | $5.31 |
| Arduino Leonardo R3 | | $5.72 |
| Soldering Iron Kit | | $18.54 |
- Amazon: Explore Amazon for a variety of Arduino Leonardo boards, including options like:
| Item | Image | Cost ($USD) |
| KEYESTUDIO Leonardo R3 Microcontroller Development Board with USB Cable Kit | | $13.99 |
| Arduino USB Host Shield | | $21.99 |
| Arduino Leonardo R3 | | $24.90 |
| Soldering Iron | | $9.99 |
| Solder Wire | | $8.99 |

hello i tried the file u provided for logitech and razer mouse it said Compilation error: hidmouserptparser.h: No such file or directory
same issue here
make zip and put it in library of arduino ide from git repo
Amazing, love the work you do. I’m a student in software development and all your blogs are great fun on my downtime!
Doesnt work for my mouse I think…
Is there a list which usb mouses works with arduino ?
What are the buttons of the color bot? What is the lock button?
An excellent read that will keep readers – particularly me – coming back for more! Also, I’d genuinely appreciate if you check my website UQ5 about Thai-Massage. Thank you and best of luck!
An interesting topic and I’m glad to come across your page where I found some helpful insights. Check out my website 92N too, if you need additional resources about Thai-Massage.
Great information. Lucky me I ran acrross yoyr website
by accident (stumbleupon). I’ve saved it forr later! https://Www.waste-ndc.pro/community/profile/tressa79906983/
hace tiempo me configuro el usb host shield y el arduino un amigo, a hora solo me funciona el mouse conectado no por blutuh alguien me puede ayudar. mi discord es
realboy7295
hace tiempo me configuro el usb host shield y el arduino un amigo, a hora solo me funciona el mouse conectado no por blutuh alguien me puede ayudar. mi discord es
realboy7295
Ally us now at 1xBet in behalf of the fundamental online cricket betting savoir faire! We offer the best and most exciting cricket odds recompense huge winnings.
Don’t misapprehend visible on the fate to win obese with 1xBet!
Skim through our thorough cricket betting lines and fancy a unique and overwhelming event like no other.
[url=https://refpa7921972.top/L?tag=s_3464116m_355c_2422859&site=3464116&ad=355&r=en/line/cricket]1xbet[/url]
Thanks a lot for the article.Thanks Again. Keep writing.
I think this is a real great article post.Much thanks again. Cool.
Fantastic post.Thanks Again. Much obliged.
Im grateful for the blog post.Really thank you! Awesome.
I loved your post. Cool.
Im grateful for the blog.Really thank you! Keep writing.
This is one awesome blog article.Thanks Again. Awesome.
Appreciate you sharing, great blog.Really thank you! Really Great.
Hey, thanks for the post.Much thanks again. Fantastic.
I really enjoy the blog post.Really thank you!
wow, awesome article.Thanks Again. Keep writing.
Major thanks for the blog article. Want more.
https://virtual-local-numbers.com/countries/21-mexico.html
https://athens-rentalcars.com/pl/
You not the expert, casually?
I cannot thank you enough for the article post.Much thanks again. Will read on…
I think, that you are not right. I am assured. I can defend the position. Write to me in PM, we will talk.
It is remarkable, rather amusing piece
I can suggest to come on a site where there is a lot of information on a theme interesting you.
I recommend to you to come for a site where there are many articles on a theme interesting you.
Appreciate you sharing, great blog post.Thanks Again. Really Great.
ivermectin tablet for sale stromectol canada
Awesome article.Really looking forward to read more. Much obliged.
It agree, it is an excellent idea
In my opinion you are not right. Write to me in PM, we will talk.
In it something is. Many thanks for the information. You have appeared are right.
This is one awesome blog.Really looking forward to read more.
Very neat article post. Really Great.
Very good blog post.Really thank you! Much obliged.
Excuse for that I interfere … But this theme is very close to me. I can help with the answer.
Major thanks for the post.Really thank you! Great.
Really enjoyed this blog post.Really looking forward to read more. Much obliged.
Thanks so much for the article.Really looking forward to read more. Awesome.
Awesome post.Really thank you! Want more.
Great blog.Really looking forward to read more. Great.
I am so grateful for your blog.Really thank you! Fantastic.
I am so grateful for your blog post.Much thanks again. Really Great.
Terrific forum posts. Thanks a lot!
online casino mit startguthaben ohne download https://combatcasino.info/michigan-online-casinos/ robert online casino
https://kemt.at.ua/forum/7-21000-1
https://ukrain-forum.biz.ua/viewtopic.php?f=22&t=6745
Thanks for the article post.Really thank you! Want more.
https://www.brownbook.net/business/53576136/winnita-casino/
https://www.dead.net/member/winnitalycom
Thanks again for the blog post.Really thank you!
https://git.project-hobbit.eu/melbetpakistanorg
Very informative blog.Much thanks again. Will read on…
Major thanks for the blog.Much thanks again. Want more.
how to make ivermectin ivermectin-metronidazole-niacinamide
Amazing forum posts. Regards!
lion slots online casino https://combatcasino.info/nba-betting/ 007 casino royale online movie
This is one awesome blog article.Really thank you! Awesome.
Thank you, I like it!
Fine information. Cheers!
online casino ios https://uscasinoguides.com/busr-review/ all online casinos
Good posts, Thank you.
barstool online casino no deposit bonus https://casinoslotoking.com/real-money-slots-online/ online casino usa for real money
Thank you! A lot of content.
Fantastic forum posts. Appreciate it.
online casino australia that accept paysafe https://cryptogamblingguru.com/best-online-casino-illinois-real-money/ online casino setup
You’ve made your stand pretty effectively.!
free online casino games roulette https://casinonair.com/nfl-football-betting/ online casino that takes mastercard
This is nicely put. !
bandar bola togel casino tangkas dominoqq poker online https://magicalcasino.info/online-poker-sites/ online casino ewallet
You explained this superbly!
gold strike online casino https://usagamblingexperts.com/online-casino-canada/ online casino sugar rush
Awesome content. Thanks a lot!
real online casino indiana https://shadowcasino.info/reviews/ betrivers online casino mi
Excellent material. Thanks a lot.
frases de casino online https://usagamblingexperts.com/tennis-betting/ mejores juegos de casino online mexico
Amazing a lot of terrific material.
online casino philippines gcash real money https://findscasino.info/review-betwhale/ fishing game online casino
Incredible tons of valuable data.
bandar casino cbet online https://hotgamblingguide.com/online-casino-aus/ judi casino slot online 188bet
You actually expressed it wonderfully.
shark online casino https://casinoshaman.com/play-craps-online-real-money/ bonus codes for online casinos no deposit
Many thanks! Lots of stuff!
online casino ie https://eseomail.com/betting-in-the-super-bowl/ nj online casinos that accept paypal
Good stuff, Cheers.
cuales son los casinos online que mas pagan https://findscasino.info/real-money-blackjack/ online no bonus casino
Awesome write ups. Regards.
online casino roulette rules https://cryptogamblingguru.com/betting-super-bowl/ play casino table games online free
Useful information. Many thanks.
is red dog casino online legit https://casinocashstars.com/ethereum-casino/ online casino utan spelgräns
Wow lots of very good material!
1deposit online casino nz https://snipercasino.info/countries/ casino online ao vivo
Nicely put. Appreciate it.
bei welchem online casino kann man richtig geld gewinnen https://casinonair.com/poker/ best online casinos usa 2021
Many thanks, Plenty of advice!
best uk casino online https://casinoshaman.com/casino-online-georgia/ online casino pa sign up bonus
Really a lot of good facts!
stardust casino online https://ratingcasino.info/online-roulette/ online casino 10 euro gratis ohne einzahlung
Thanks! Helpful stuff!
princess online casino https://casinoslotoking.com/ignition-casino-safe/ best cannadian online casino
Fantastic blog article.Much thanks again. Really Cool.
You actually said that well.
redeemable freeplay online casino real money https://shadowcasino.info/online-casino-australia/ rtg online casinos usa
Thanks! I enjoy it.
casino online games free bonus $100 https://riggambling.com/banking/ qatari online casino
You actually revealed this really well.
a for-fun space-themed casino online with loot drops and crafting https://casinonair.com/maryland-online-casino/ online casinos that accept capital one mastercard
This is nicely said. .
coushatta casino online free slots https://hotgamblingguide.org/best-apps-for-sports-betting/ online casino sofortГјberweisung geld zurГјckfordern
Seriously loads of terrific knowledge.
rivers casino online philadelphia https://findscasino.info/texas-holdem-online/ best online casino for live blackjack
I’ve been exploring for a little for any high-quality articles or weblog
posts on this kind of area . Exploring in Yahoo I at last stumbled upon this site.
Studying this information So i am satisfied to express that I have an incredibly good uncanny feeling I came upon exactly
what I needed. I most certainly will make certain to do
not put out of your mind this web site and provides it a glance regularly. https://usa.life/read-blog/122959
Information clearly utilized!.
bandar casino slot joker123 online https://casinoslotoking.com/online-sportsbooks/ best online free casino
You’ve made your point!
gta 5 online casino cards location https://igamingcasino.info/review-mybookie/ which online casino is best in singapore
Hey I know this is off topic but I was wondering if you knew of any widgets I could add to
my blog that automatically tweet my newest twitter
updates. I’ve been looking for a plug-in like this for quite some time and was hoping maybe you would
have some experience with something like this. Please let
me know if you run into anything. I truly enjoy
reading your blog and I look forward to your
new updates. https://wakelet.com/wake/ounW0BgxMPtgwSjJSePQk
Really all kinds of excellent data.
best deposit bonus online casinos https://casinosonlinenew.com/omaha-poker-online/ max online casino
Wow, great blog article. Really Cool.
Lovely facts. Regards!
top 10 online casinos europe https://snipercasino.info/crash-gambling/ best online casino 2020
Wow all kinds of beneficial knowledge!
station casinos online poker https://casinoslotoking.com/nhl-betting-sites/ twinspires online casino nj
Incredible a good deal of very good facts.
funcity online casino https://uscasinoguides.com/real-money-baccarat/ online casino bonus dobrodoslice
Nicely put, Cheers.
crazy vegas online casino https://cryptogamblingguru.com/aussie-online-casino/ casino slots online gambling
You actually revealed that fantastically!
no deposit bonus online casinos south africa https://hotgamblingguide.org/games/ juego en linea casino online
Kudos, I value this!
tron online casino https://casinosonlinenew.com/review-busr/ louisiana online casinos
You have made your point!
favourite online casinos https://usagamblingexperts.com/real-money-craps/ highest rated online casino usa
With thanks, I like this!
gutes online casino https://casinonair.com/tennis-betting/ vikingo casino online
Hello! I’m at work surfing around your blog from my new apple iphone!
Just wanted to say I love reading your blog and look forward to all your
posts! Keep up the excellent work! https://wakelet.com/wake/AHg8nvKCZ0XP7TFKGAEvs
Thank you. I enjoy it!
lista de casinos online https://findscasino.info/banking/ download game casino online
You reported that adequately!
online casino that gives 120 free spins https://mapcasino.info/review-reddog/ online casino deposit $5
Thank you. I value it!
river belle online casino https://magicalcasino.info/mbl-betting/ casino antigua online gaming association
Do you have any video of that? I’d love to find out some
additional information. https://h4h40.mssg.me/
Thanks! Quite a lot of info.
best online casino real money no deposit usa https://igamingcasino.info/ live casino philadelphia online
You said it very well..
With thanks. Awesome information!
jokers wild casino online https://magicalcasino.info/video-poker-online/ casino rama hotel booking online
With thanks. A good amount of data.
casino royale 2006 free online https://mgmonlinecasino.us/real-money-online-casino-michigan/ online casino that pays
Awesome information. Regards.
casino online vergleich https://casinoshaman.com/massachusetts-online-casinos/ wind creek casino online gaming
Nicely put. Cheers!
maverick casino online https://casinoshaman.com/ play san manuel casino online
Wow lots of awesome tips!
Nicely put. Regards!
how to win online casino https://cryptogamblingguru.com/crypto-casinos-usa/ azerbaijani online casino
Tips certainly taken!!
casinos online paypal https://casinoslotoking.com/reviews/ online casinos that accept usa players
Nicely put. Appreciate it.
online casino apk https://uscasinoguides.com/pennsylvania-casinos/ casino online 2019
You mentioned that exceptionally well!
gta online casino work https://mgmonlinecasino.us/online-casino-illinois-real-money/ casino royal movie online
Thanks a lot. Good information.
online casino tournaments for us players https://eseomail.com/bingo-for-real-money/ gute online casinos erfahrungen
Many thanks, I like it!
solaire online casino games https://casinosonlinenew.com/sports-betting-sites/ guaranteed win online casino
With thanks! I enjoy it!
leon online casino https://mgmonlinecasino.us/real-money-online-poker/ wind creek casino play online
Amazing information. Thanks.
casinos online with no deposit bonuses https://shadowcasino.info/review-ducky-luck/ wizard of odds online casino
Amazing quite a lot of excellent facts.
does massachusetts have online casinos https://snipercasino.info/online-casino-australia/ online casino real winnings
You’ve made your point!
1 online casino review https://mgmonlinecasino.us/betonline-betting/ casino online echtgeld bonus
Thanks! Lots of facts!
do online casinos have better odds https://onlinecasinoindex.us/wild-casino-online/ amro online casinos
Really plenty of useful information.
casdep online casino https://uscasinoguides.com/north-carolina-casinos/ sky crown casino online login
Really a lot of great knowledge.
2022 online casino https://snipercasino.info/online-casino-ohio/ online casinos vegas cleopatra
Thank you. Fantastic stuff!
bandar togel casino online https://hotgamblingguide.info/online-betting-on-horse-racing/ online casino games legit
Perfectly spoken truly! .
online casinos that pay real money same day https://mgmonlinecasino.us/casino-games-online-real-money/ planet 7 online casino download
Seriously tons of terrific advice!
online casinos with no minimum deposit https://hotgamblingguide.com/casinos/ online casino löwen play
You actually reported that adequately.
casinos online que aceptan paysafecard https://mgmonlinecasino.us/new-pa-online-casinos/ bra online casino
Well spoken truly. .
2019 new online casinos usa paypal banking https://hotgamblingguide.com/play-keno-online/ atg online casino
You definitely made the point.
best apple pay online casinos https://mapcasino.info/online-blackjack/ online casinos las vegas
Good facts. Regards!
delaware online casinos https://findscasino.info/omaha-poker-online/ best bally online casino
Amazing tons of excellent info.
Valuable forum posts. Thanks!
biggest online casino win ever https://usagamblingexperts.com/online-poker-sites/ bally’s online casino customer service phone number
Very good material, Thank you.
online casino hyperino https://ratingcasino.info/bitcoin-casinos/ caesars palace casino online real money
Thanks a lot. A good amount of postings.
Kudos. Plenty of write ups!
Appreciate it. Ample postings.
newest pa online casino https://riggambling.com/online-keno/ casino online rotiri gratuite
Great material. Cheers.
free online casino no deposit usa https://casinocashstars.com/online-casino-new-york/ casino online ruleta relampago
Many thanks. I like it!
sugarhouse casino online customer service https://hotgamblingguide.org/real-money-online-casino-illinois/ anonymous casino online
Nicely expressed truly. !
assistir filme casino 1995 online dublado https://hotgamblingguide.info/review-of-shazam/ real money online casinos no deposit bonus
Superb advice. Thank you!
casino online เว็บตรง https://ratingcasino.info/baccarat-online/ online casinos ohne bonus
Thank you! Wonderful stuff.
bonus codes online casinos no deposit https://cryptogamblingguru.com/online-casino-real-money-virginia-no-deposit/ sign up bonus no deposit online casino
Thanks, Quite a lot of postings.
how to trick online casino location https://cryptogamblingguru.com/casino-video-poker/ dunder online casino reviews
Point effectively utilized!.
james bond casino royale film online https://hotgamblingguide.com/online-casino-game-real-money/ planet 7 online casino in united states
Terrific data, With thanks.
apuestas casino mexico online https://casinoshaman.com/best-poker-online-real-money/ online casinos mit okto
Kudos. Good stuff!
playzee online casino review https://shadowcasino.info/online-casino-australia/ casino online argentina pesos
Thanks a lot! Ample posts.
fastest paying online casino usa https://buckscasino.info/golf-betting/ mobi games online casino
Many thanks! Good information.
best online casino to withdraw money https://casinocashstars.com/real-money-online-casino-illinois/ online casino mit itunes guthaben bezahlen
You made the point.
james bond casino royale free online https://igamingcasino.info/sports-betting-sites/ new online casinos no deposit bonus codes
With thanks, An abundance of information.
best online casinos us https://eseomail.com/best-fast-payout-online-casino/ casino slot games online
Thanks a lot! Wonderful stuff.
australian online casinos https://magicalcasino.info/online-blackjack/ 20 super hot casino online
Thank you, A good amount of tips!
job online casino dealer https://hotgamblingguide.info/banking/ novГ© cz online casino
You’ve made your point very well!.
no deposit online casino codes https://casinosonlinenew.com/online-poker-sites/ casino online dinero real
Kudos. I like this.
juego de casino online https://casinoslotoking.com/soccer-bets/ online casino utan spelpaus
Very good postings, With thanks!
real money online casinos for us players https://cryptogamblingguru.com/slot-online/ $10 deposit online casino
Good material. With thanks.
sc online casinos https://onlinecasinoindex.us/online-sportsbook/ casino online espaГ±a legal
Thank you. Fantastic information.
casino online regalo sin deposito https://onlinecasinoindex.us/states/ golden nugget online casino new jersey
Nicely put. Thanks.
spinz online casino https://onlinecasinoindex.us/best-bitcoin-casino-bonus/ online slot casino games
Truly plenty of fantastic tips.
ocean resort online casino bonus code https://usagamblingexperts.com/ethereum-casino/ best sa online casinos
Tips very well regarded!.
real us online casino https://findscasino.info/online-slots/ online casino italia
Thanks, An abundance of knowledge!
ocean resort online casino https://mgmonlinecasino.us/best-online-poker-websites/ which online casino is best
With thanks. Quite a lot of knowledge.
station casinos online games https://igamingcasino.info/soccer-betting/ 21.com casino casino online
Nicely put. Regards!
wynn online casino michigan https://hotgamblingguide.org/online-casino-massachusetts/ mister green online casino
Kudos, I like this!
what online casino slot game is easiest to win https://onlinecasinoindex.us/online-casinos-with-fast-payouts/ winz online casino
You said it nicely..
3win2u online casino https://combatcasino.info/states/ gta online casino heist best approach
With thanks. I like it!
casino london online https://shadowcasino.info/massachusetts-online-casino/ online casinos with slingo
Nicely put. Kudos!
schweiz casino online https://cryptogamblingguru.com/online-casino-florida-real-money/ online casinos that accept us credit cards
Thank you! An abundance of posts.
reputable online casino uk https://shadowcasino.info/betting-apps/ online us casinos no deposit bonus
Whoa lots of superb facts!
free codes for casinos online https://cryptogamblingguru.com/real-money-online-casino-new-york/ acorn casino online slots
Thanks. Plenty of content.
thunder valley casino online games https://casinoslotssaid.com/sport-betting-apps/ choctaw casino online
Cheers. Good information!
best online casino no deposit bonuses 2022 https://mapcasino.info/review-shazam/ best ak online casino site
Fantastic material, With thanks!
best 2by2gaming online casino https://combatcasino.info/real-money-blackjack/ blackjack counting cards online casino
Cheers! I value it!
online casino min deposit $5 https://combatcasino.info/review-betwhale/ casino online con pasaporte
Well voiced without a doubt. !
vegas palms online casino flash https://findscasino.info/reviews/ american dad season 13 watch online casino normale
You said it perfectly..
best online casino with free signup bonus real money usa https://cryptogamblingguru.com/real-poker-real-money/ casino online vergleich
You made the point.
brand new online casinos usa no deposit bonus 2021 https://uscasinoguides.com/soccer-betting/ newest us online casinos
Many thanks, Lots of content!
qatari online casino https://usagamblingexperts.com/online-omaha-poker/ harrahs online casino pa
This is nicely expressed. !
chile online casino https://hotgamblingguide.org/best-poker-online-real-money/ top revolut online casinos
Terrific facts. Thanks a lot.
beste online casino mit sofortauszahlung https://casinoslotssaid.com/mybookie-no-deposit-bonus/ the best casino online ireland
Nicely put, With thanks.
harrah’s online casino pa harrah’s promotion https://shadowcasino.info/review-ignition/ ver pelicula casino online
Whoa quite a lot of amazing advice!
little river online casino promo code https://mgmonlinecasino.us/poker-video-online/ vegas casino online coupon codes
Helpful information. Thank you!
best app for online casino https://casinoslotoking.com/casinos/ playing online casino games for real money
You said that effectively.
online casino real money easy withdrawal https://mapcasino.info/fast-payout-casinos/ michigan online casino slots
This is nicely expressed! .
best no deposit online casino https://casinoslotoking.com/ craps online casinos
Regards, I value it.
canadian online casinos https://uscasinoguides.com/tennis-betting/ online casino apk download
Regards, I enjoy it.
missouri online casino sites https://cryptogamblingguru.com/best-online-casino-illinois-real-money/ online casino sverige
Very good information, Cheers.
deposit $1 online casino https://casinosonlinenew.com/esports-betting/ online casino vГ©lemГ©nyek
Cheers. Lots of info.
aplicatie de casino online https://snipercasino.info/online-casino-pennsylvania/ newest online casinos with no deposit bonuses
Position well taken!.
online casino play now https://casinosonlinenew.com/online-sportsbook/ new online casinos no deposit bonus 2021
Fantastic info. Thanks a lot!
online casino real https://magicalcasino.info/online-blackjack/ new online casino from kingcasinobonus
Appreciate it! Numerous material.
casinos online confiables argentina https://uscasinoguides.com/virginia-casinos/ online casino sign up bonus 2022
Well spoken really! .
online casino random number generator https://hotgamblingguide.com/poker-online-real-money/ online us casinos no deposit
You actually expressed that terrifically.
live casino online no deposit bonus https://buckscasino.info/boxing-betting/ www jackpot city online casino
You actually mentioned this wonderfully!
list of blacklisted online casinos https://eseomail.com/bitcoin-casinos-usa/ new online casinos no deposit bonus 2020
Lovely forum posts, Kudos!
casino online de verdad https://cryptogamblingguru.com/new-pa-online-casino-real-money/ australian online casino reviews 2020
Kudos. Helpful stuff.
best 2019 online casino usa https://cryptogamblingguru.com/bet-on-tennis/ new online casino 2024
Beneficial write ups. With thanks!
casino online film https://casinoshaman.com/best-online-casino-apps/ online casino free bonus money
Great, thanks for sharing this article. Really Great.
You actually stated that adequately!
best online canada casino https://magicalcasino.info/no-deposit-bonus-casinos/ borgata online casino nj phone number
Good content. Thank you!
casino grand bay online https://hotgamblingguide.org/online-casino-california-real-money/ 2024 online casino
You reported this very well!
online casino amatic https://casinoslotoking.com/crash-bitcoin-gambling/ non international online casinos
Wonderful data. With thanks.
was ist das beste online casino https://casinoshaman.com/golf-betting-games-baseball/ parx casino online gambling
I am curious to find out what blog platform you’re working with?
I’m experiencing some minor security issues with my latest blog and I’d
like to find something more secure. Do you have any recommendations? https://www.wtvm.com/2024/03/30/crimson-tide-clemson-tigers-set-battle-spot-final-four/
I really like and appreciate your blog article. Really Cool.
Looking forward to reading more. Great blog article.Really looking forward to read more. Cool.
Why users still make use of to read news papers when in this technological globe
the whole thing is accessible on web? https://menbehealth.wordpress.com/
I loved your blog post.Really looking forward to read more. Much obliged.
Very energetic article, I liked that bit. Will there bea part 2?
Thanks again for the blog article.Much thanks again. Really Great.
Normally I do not learn article on blogs, however I would like to say that thiswrite-up very forced me to take a look at and do so! Your writing taste has been amazed me.Thank you, quite nice post.
Really enjoyed this post.Much thanks again.
I will immediately snatch your rss as I can not find your e-mail subscription link or newsletter service.Do you’ve any? Please let me recognise so that I may subscribe.Thanks.
Wow that was unusual. I just wrote an very long comment but after I clicked submit my comment didn’t appear.Grrrr… well I’m not writing all that over again. Anyway, just wanted to say great blog!
https://1xbetnplogin.com/
https://1xbetvnlogin.com/
Muchos Gracias for your post.Much thanks again. Cool.
Really enjoyed this article.Really thank you! Really Great.
A round of applause for your article post. Want more.
Fantastic blog article. Really Great.
I cannot thank you enough for the blog.Thanks Again. Keep writing.
Great, thanks for sharing this blog article.Much thanks again. Great.
You actually mentioned this fantastically.
A big thank you for your blog article.Really looking forward to read more. Want more.
I think this is a real great blog.Thanks Again. Want more.
Thanks for sharing, this is a fantastic article.Much thanks again. Great.
wow, awesome article post.Thanks Again. Really Cool.
ivermectin pour on for fleas ivermectin for lyme
Im thankful for the article post.Thanks Again. Really Great.
What’s up colleagues, how is the whole thing, and what you want to say about this article, in my view its genuinely amazing in favor of me.
Hey, thanks for the article.Thanks Again. Cool.
I really liked your blog.Really thank you! Much obliged.
Very interesting info !Perfect just what I was looking for! “If you want to test your memory, try to recall what you were worrying about one year ago today.” by Rotarian.
Major thanks for the article.Much thanks again. Want more.
You completed several good points there. I did a search on the matter and found a good number of people will consent with your blog.
https://www.gametracker.com/clan/Dynamickillercs/forum.php?thread=200741
Major thankies for the blog article.Much thanks again. Want more.
https://www.chojnow.pl/forum/thread/view/id/627604
You reported this adequately.
I really enjoy the article.Really looking forward to read more. Really Great.
Thank you ever so for you post.Really looking forward to read more. Cool.
A big thank you for your blog.Thanks Again.
Really enjoyed this blog.
ivermectin powder ivermectin 2ml sarcoptic mange treatment for dogs ivermectin how much ivermectin to give a dog for mange
I would like to thank you for the efforts you’ve put in penning this blog. I really hope to see the same high-grade blog posts from you later on as well. In truth, your creative writing abilities has inspired me to get my own, personal blog now 😉
Tarologie gratuite immediate divination en ligne
Excellent material. With thanks.reflective essay on writing how to write five paragraph essay assignment writers
Hi there! I’m at work surfing around your blog from my newiphone! Just wanted to say I love reading your blogand look forward to all your posts! Keep up the excellent work!
Hey There. I found your blog using msn. This is a really well written article.I’ll make sure to bookmark it and come back to read more of your useful info.Thanks for the post. I’ll definitely comeback.
I really love your blog. I’ll be back for more. thank you for sharing it.
Piece of writing writing is also a excitement,if you be acquainted with afterward you can writeor else it is difficult to write.
Regards for all your efforts that you have put in this. Very interesting info.
https://dissertation-now.com/tutoriage-com/
Профессиональный сервисный центр по ремонту бытовой техники с выездом на дом.
Мы предлагаем:ремонт бытовой техники в мск
Наши мастера оперативно устранят неисправности вашего устройства в сервисе или с выездом на дом!
https://dissertation-now.com/term-paper/