Introduction: Welcome to Sly Automation! In this step-by-step build runelite guide, we will walk you through the process of building Runelite in IntelliJ IDEA. Runelite is a customizable client for the popular online game RuneScape, and IntelliJ IDEA is an integrated development environment (IDE) and virtual environment for Java. By following the instructions in this guide, you’ll be able to set up RuneLight on your local machine and even add custom plugins. Let’s get started!
Step 1: Download JDK 11
The first step is to download JDK 11, which is the Oracle platform for the Java programming language. Here’s how to do it:
- Open your web browser and search for “JDK 11 download” on Google.
Link to JDK 11 = https://www.oracle.com/java/technologies/javase/jdk11-archive-downloads.html

- Locate the archive downloads on the official Oracle website.
- If you’re using Windows, choose the Windows download link. For Runelite it needs to be the jdk 11 version.

- Download the installer and run the executable file. You may need to create an account its free! Providing your username or creating a new account if necessary. Sign in then the download file will be able to be downloaded.

- Follow the installation wizard and select the default prompts.

Step 2: Download and Install IntelliJ IDEA
Next, you need to download and install IntelliJ IDEA, the IDE we’ll be using for building Runelite. Here’s what you should do:
Accessing the Community Version
- Download from Official JetBrains Website: Visit the JetBrains official website to access the Community Version download page for IntelliJ IDEA. The website provides the latest stable release for various operating systems.
Link to Jetbrains: https://www.jetbrains.com/idea/download/?section=windows#section=windows
The free community edition is located scrolling down past the Ultimate version:

For this particular guide i’ll be going through the steps for windows:
- Selecting the Suitable Version: Ensure you choose the version compatible with your operating system (Windows, macOS, or Linux). The Community Version offers a robust set of features for Java development and is ideal for most projects.
Installation Procedure
- Initiate the Download: Click on the download link provided on the website to begin downloading the installation file for IntelliJ IDEA Community Edition.

- Run the Installation Package: Once the download is complete, locate the downloaded installation package (.exe for Windows, .dmg for macOS, or .tar.gz for Linux) and run it to begin the installation process.
- Follow Setup Wizard: The installation wizard will guide you through the setup process. Follow the on-screen prompts to configure the installation preferences, such as installation location and additional settings as needed.

- Select Components: During installation, you might be prompted to select optional components or configurations. Ensure to select components relevant to your development needs. The selected ones below are needed:

Anything else besides the default settings are fine and should cause no issues going forward.
- Agree to Terms and Conditions: Review and accept the terms and conditions presented during the installation process to proceed further.
- Completing Installation: Once the installation completes, verify if IntelliJ IDEA launches automatically. If not, locate the IntelliJ IDEA icon in your applications folder or desktop and open the IDE.


Post-Installation Configuration (Optional)
- Initial Setup: Upon launching IntelliJ IDEA for the first time, you might be prompted to perform initial setup configurations, such as setting up a JetBrains account or importing settings from a previous installation.
- Plugin Installation: Explore the available plugins within IntelliJ IDEA’s marketplace that can further enhance your development environment based on your specific requirements. Install plugins to extend the functionality of the IDE.
Step 3: Import the Runelite Project
Importing the Project
- Accessing the Runelite GitHub Repository:
- Navigate to the RuneLite GitHub repository.
- Clone or download the repository link provided in the tutorial.
Now that you have the necessary tools set up, let’s import the RuneLight project into IntelliJ IDEA. To initiate this setup, access the official RuneLite GitHub repository. This repository hosts the source code and essential files required for the RuneLite client.
Use this link: https://github.com/runelite/runelite
Once you’ve reached the repository, clone or download the project by copying the repository URL.
Opening IntelliJ IDEA
Open and launch the newly installed IntelliJ IDEA on your system. With IntelliJ IDEA launched on your system, create or open a new project where the RuneLite repository will be imported.

Importing RuneLite into IntelliJ IDEA
Within IntelliJ IDEA, choose the option to import a project from version control. Select the Git option and input the URL obtained from the GitHub repository.

Follow the prompts to complete the import process, allowing IntelliJ IDEA to fetch the RuneLite project and establish its structural layout.
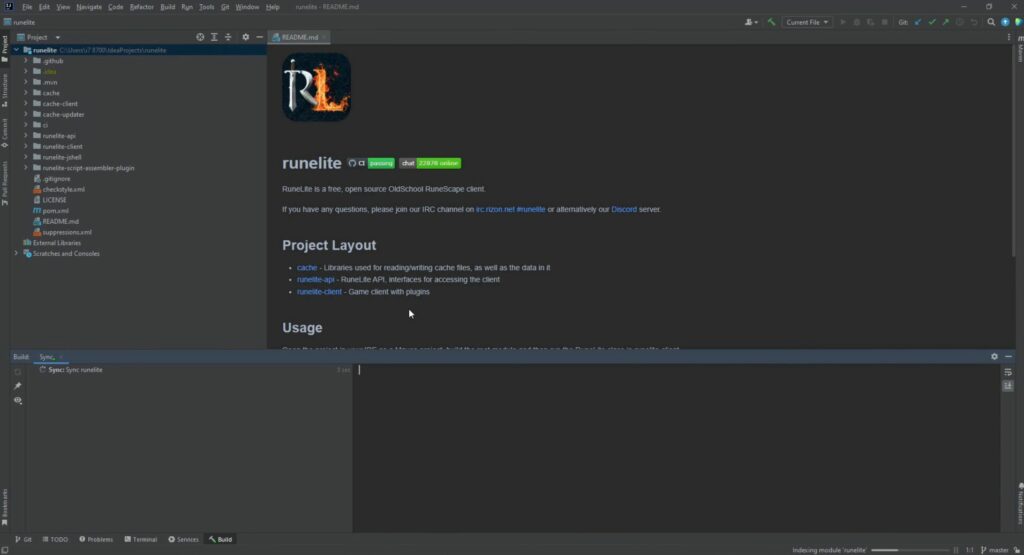
Your project should look like this:
Configuring Maven for RuneLite build
Maven serves as a robust build automation tool within IntelliJ IDEA, handling dependencies and orchestrating the project’s build process seamlessly. RuneLite relies on Maven as its primary build tool, serving a crucial role in managing dependencies, generating resources, conducting tests, and facilitating various essential functions necessary for a comprehensive build, run, and deployment process of the RuneLite application.
When launching RuneLite, the initial step involves engaging with Maven. Within the IntelliJ IDEA environment, Maven is accessible through a designated interface often positioned on the right-hand side of the screen. This interface resembles the following:

Locate the RuneLite project listed within the Maven tool window. Expand the project to reveal the available lifecycle options. Right-click on the ‘install’ lifecycle and choose ‘Run Maven Build.’

Maven will commence the ‘install’ lifecycle, initiating the compilation process, resolving dependencies, and setting up the necessary project configurations. This phase is crucial for compiling the RuneLite code and ensuring that all essential dependencies are in place.
You can view the progress of the code compiling building all the plugins and installing all the dependencies at the bottom of the app.

Build Runelite: Verification and Troubleshooting
Throughout the Maven build process, vigilantly monitor the IntelliJ IDEA console for any errors or warnings. Address any encountered issues promptly to ensure a smooth configuration process.
Verify the successful completion of the Maven ‘install’ lifecycle. Ensure that there are no critical errors and that all dependencies have been resolved accurately. This step guarantees that the project structure is correctly established and ready for further development or customization.
A successful build should have ‘BUILD SUCCESS’ in the description once completed.

In case of incomplete setup or errors during the Maven build, consider rerunning the ‘install’ lifecycle. Check for potential factors such as incorrect SDK settings or internet connectivity issues that might impede the Maven build process. This can occur if the runelite repo is down and fails to connect.
Common Issues: Ensure SDK 11 is Used in Project

Using the top banner, navigate to File then Projecture Structure and ensure SDK is using the Oracle 11 that we just installed earlier, use the drop down to select the 11.0 version.

There’s also a new feature which allows you to download a specifc version.

Redo the Maven configuration install steps.
By diligently following these steps and confirming each stage’s success, you can effectively set up RuneLite in IntelliJ IDEA, leveraging Maven’s capabilities to manage dependencies and create a stable environment for RuneScape plugin development.
Step 5: Run the Runelite Project
Once you’ve configured RuneLite in IntelliJ IDEA, it’s time to dive into its functionalities. Follow these steps:
‘Build Project’ action, the green hammer located in the top right of the page:

- Locate the RuneLite Directory: In the project structure, use the project explorer section and find the “Runelite” directory.
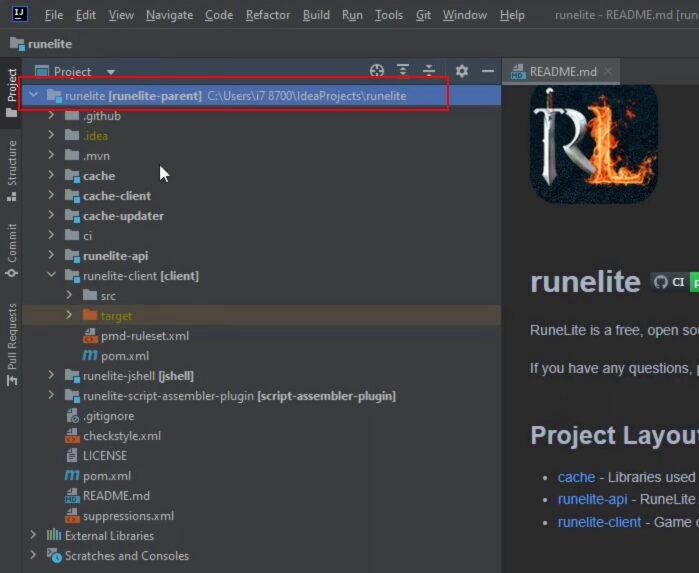
- Navigate to the Runelite Project: Go to “runelite-client” -> “src” -> “main” -> “java.”

- Launch RuneLite: Right-click on the “runelite” package and select “Run ‘Runelite.'” Wait for the build process to complete and for the RuneLite client to open.

Once the Run option has bee actioned, the runelite client will now load and connect to Runescape servers and validate the runelite build.
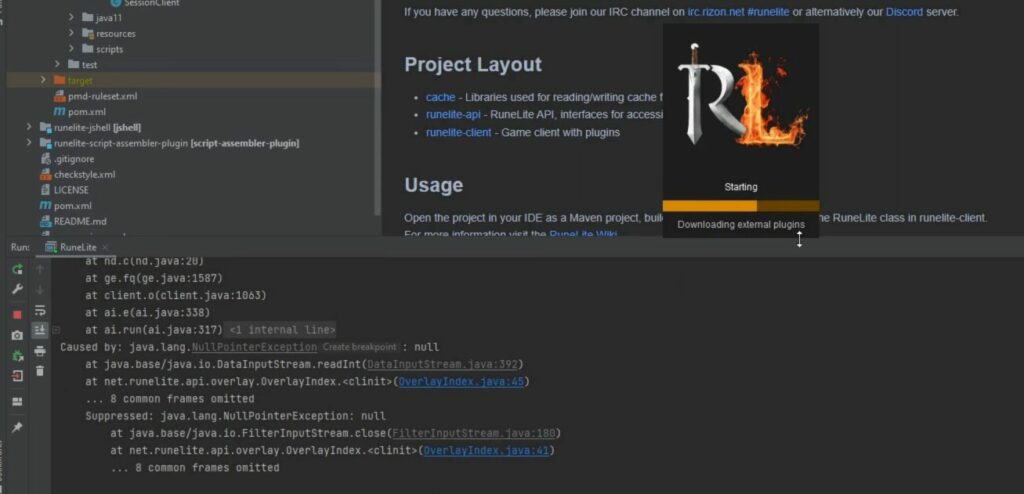
Error on loading the runelite client

If the client fails to load or the window is transparent and not displaying the runescape login, then follow these steps:
Update the runelite project by clicking on the blue arrow in the top right of the page.

Cannot find symbol ComponentID
If an error comes up or similar try the ‘Build Project’ action, the green hammer located in the top right of the page:


Run the clean install process located under Lifecycle

Redo the Maven configuration install steps.
If there are still errors, there could be ongoing development going on with the runelite developers, this can be found if any errors should up in the java files.
You may need to wait or get updates in the discord group: https://runelite.net/discord
As an example the below snapshot; this build has issues with the Component.java file and ComponentID not registering.

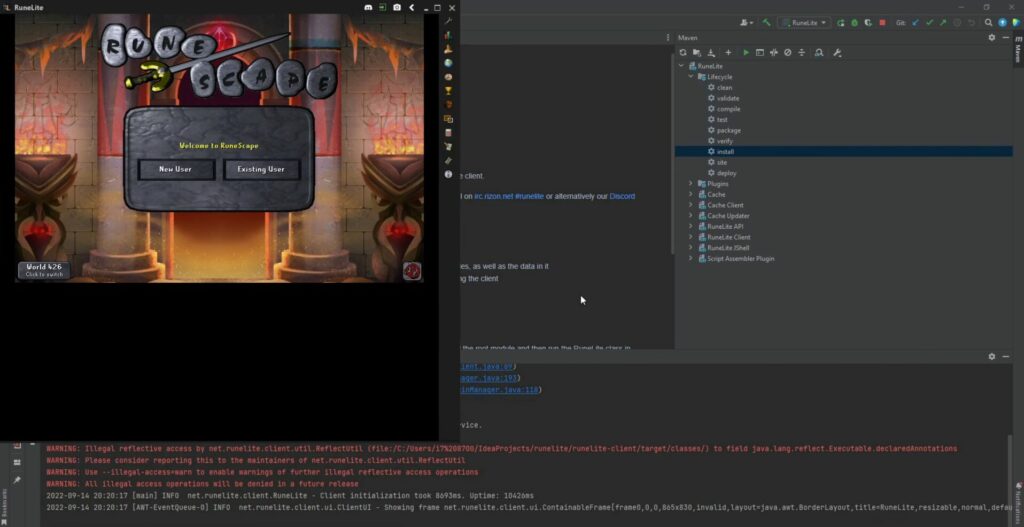
Runelite Client Load Successful
On a successful load the runescape login page will show!
Enhancing Functionality: Adding Plugins to RuneLite
To unlock more functionalities within the RuneLite build, you can add custom plugins. Here’s how you can do it:
- Find the Plugins Directory: Locate the “plugins” directory in the project structure.
- Download and Prepare Plugins: Ensure compatibility with your RuneLite version, download the desired plugin, and extract its files.
- Insert the Plugin: Copy the main folder of the plugin and navigate to “runelite-client” -> “src” -> “main” -> “java” -> “net.runelite.client.plugins.” Paste the plugin folder into the “plugins” directory.
- Verification and Reinstallation: Check that the plugin is correctly placed and doesn’t contain any unnecessary Kotlin files. Reinstall the RuneLite project by right-clicking, selecting “install,” and running the Maven build.
Conclusion
Congratulations! You’ve successfully built RuneLite in IntelliJ IDEA by following this comprehensive guide. Now, delve into its capabilities and explore the vast array of functionalities it offers.
This step-by-step tutorial ensures a seamless setup of RuneLite in IntelliJ IDEA, empowering you to navigate its features effortlessly while expanding its potential through custom plugins. Dive in and enjoy the enhanced RuneLite experience tailored to your preferences!




hey for the component error , I had jdk 11 but did not select 11 under language level, that fixed the issue for me.
at web, except I know I am getting familiarity all the time by reading thes pleasant posts.|Fantastic post. I will also be handling some of these problems.|Hello, I think this is a great blog. I happened onto it;) I have bookmarked it and will check it out again. The best way to change is via wealth and independence. May you prosper and never stop mentoring others.|I was overjoyed to find this website. I must express my gratitude for your time because this was an amazing read! I thoroughly enjoyed reading it, and I’ve bookmarked your blog so I can check out fresh content in the future.|Hi there! If I shared your blog with my Facebook group, would that be okay? I believe there are a lot of people who would truly value your article.|منشور رائع. سأتعامل مع بعض هذه|
) Znovu ho navštívím, protože jsem si ho poznamenal. Peníze a svoboda je nejlepší způsob, jak se změnit, ať jste bohatí a
مرحبًا، أعتقد أن هذه مدونة ممتازة. لقد عثرت عليها بالصدفة ;
e dizer que gosto muito de ler os vossos blogues.
Podem recomendar outros blogues/sites/fóruns que tratem dos mesmos temas?
webové stránky jsou opravdu pozoruhodné pro lidi zkušenosti, dobře,
muito dele está a aparecer em toda a Internet sem o meu acordo.
Znáte nějaké metody, které by pomohly omezit krádeže obsahu? Rozhodně bych ocenil
information.|My family members every time say that I am killing my time here
It contains fastidious material.|I think the admin of this website is actually working hard in favor of his site,
nenarazili jste někdy na problémy s plagorismem nebo porušováním autorských práv? Moje webové stránky mají spoustu unikátního obsahu, který jsem vytvořil.
Fiquei muito feliz em descobrir este site. Preciso de agradecer pelo vosso tempo
Můžete mi doporučit nějaké další blogy / webové stránky / fóra, které se zabývají stejnými tématy?
skupině? Je tu spousta lidí, o kterých si myslím, že by se opravdu
Děkuji|Ahoj všem, obsah, který je na této stránce k dispozici.
har også bogmærket dig for at se på nye ting på din blog Hej! Har du noget imod, hvis jeg deler din blog med min facebook
Hmm is anyone else having problems with the pictures on this blog loading? I’m trying to find out if its a problem on my end or if it’s the blog. Any feedback would be greatly appreciated.
Excellent blog here! Also your web site loads up very fast! What host are you using? Can I get your affiliate link to your host? I wish my site loaded up as fast as yours lol
Můžete mi doporučit nějaké další blogy / webové stránky / fóra, které se zabývají stejnými tématy?
díky tomuto nádhernému čtení! Rozhodně se mi líbil každý kousek z toho a já
Esta página tem definitivamente toda a informação que eu queria sobre este assunto e não sabia a quem perguntar. Este é o meu primeiro comentário aqui, então eu só queria dar um rápido
) Vou voltar a visitá-lo uma vez que o marquei no livro. O dinheiro e a liberdade são a melhor forma de mudar, que sejas rico e continues a orientar os outros.
Fiquei muito feliz em descobrir este site. Preciso de agradecer pelo vosso tempo
webside er virkelig bemærkelsesværdig for folks oplevelse, godt,
que eu mesmo criei ou terceirizei, mas parece que
مرحبًا، أعتقد أن هذه مدونة ممتازة. لقد عثرت عليها بالصدفة ;
det. Denne side har bestemt alle de oplysninger, jeg ønskede om dette emne, og vidste ikke, hvem jeg skulle spørge. Dette er min 1. kommentar her, så jeg ville bare give en hurtig
With havin so much content and articles do you ever run into any problems of plagorism or copyright violation? My website has a lot of unique content I’ve either created myself or outsourced but it looks like a lot of it is popping it up all over the internet without my agreement. Do you know any methods to help reduce content from being stolen? I’d definitely appreciate it.
fortsæt med at guide andre. Jeg var meget glad for at afdække dette websted. Jeg er nødt til at takke dig for din tid
på grund af denne vidunderlige læsning !!! Jeg kunne bestemt virkelig godt lide hver eneste lille smule af det, og jeg
díky tomuto nádhernému čtení! Rozhodně se mi líbil každý kousek z toho a já
díky tomuto nádhernému čtení! Rozhodně se mi líbil každý kousek z toho a já
) سأعيد زيارتها مرة أخرى لأنني قمت بوضع علامة كتاب عليها. المال والحرية هي أفضل طريقة للتغيير، أتمنى أن تكون غنيًا و
Conhecem algum método para ajudar a evitar que o conteúdo seja roubado? Agradecia imenso.
) سأعيد زيارتها مرة أخرى لأنني قمت بوضع علامة كتاب عليها. المال والحرية هي أفضل طريقة للتغيير، أتمنى أن تكون غنيًا و
apreciariam o seu conteúdo. Por favor, me avise.
har også bogmærket dig for at se på nye ting på din blog Hej! Har du noget imod, hvis jeg deler din blog med min facebook
že spousta z něj se objevuje na internetu bez mého souhlasu.
Wow, superb blog layout! How long have you been blogging for? you make blogging look easy. The overall look of your web site is wonderful, let alone the content!
fortsæt med at guide andre. Jeg var meget glad for at afdække dette websted. Jeg er nødt til at takke dig for din tid
Music began playing as soon as I opened up this webpage, so annoying!
|Hello to all, for the reason that I am actually keen of
Com tanto conteúdo e artigos, vocês já se depararam com algum problema de plágio?
devido a esta maravilhosa leitura!!! O que é que eu acho?
information.|My family members every time say that I am killing my time here
e dizer que gosto muito de ler os vossos blogues.
Conhecem algum método para ajudar a evitar que o conteúdo seja roubado? Agradecia imenso.
reading this weblog’s post to be updated daily.
que eu mesmo criei ou terceirizei, mas parece que
Também tenho o seu livro marcado para ver coisas novas no seu blog.
الاستمرار في توجيه الآخرين.|Ahoj, věřím, že je to vynikající blog. Narazil jsem na něj;
muito dele está a aparecer em toda a Internet sem o meu acordo.
på grund af denne vidunderlige læsning !!! Jeg kunne bestemt virkelig godt lide hver eneste lille smule af det, og jeg
Kan du anbefale andre blogs / websteder / fora, der beskæftiger sig med de samme emner?
Tak skal du have!|Olá, creio que este é um excelente blogue. Tropecei nele;
вывод из запоя бесплатно вывод из запоя бесплатно .
I take pleasure in you as a consequence of your whole labor on this net website. My niece consider curiosity in managing investigations and it can be straightforward to understand why. My companion and i discover all relating for the dynamic method you make gratifying info by way of your site and also welcome contribution from individuals around the make any difference then our straightforward princess has usually been learning an entire great deal. Get enjoyment inside the relaxation with the new yr. You are the one particular carrying out a wonderful work.
har også bogmærket dig for at se på nye ting på din blog Hej! Har du noget imod, hvis jeg deler din blog med min facebook
ビッグマッチに向けた地方巡業のシリーズが、こう題されることが多い。東北地方を中心に巡業を行う。 「Road to KING OF PRO-WRESTLING」という名称の代わりに、この呼び名を使う。 また本興行に限り、前哨戦の興行名が「Road to旗揚げ記念日」ではなく「旗揚げ記念シリーズ」となる。記念興という面から、本興行では普段あまり組まれない対戦カードが組まれる場合が多い。前哨戦の試合はRoad toレスリングどんたくにて一緒に組まれる。 レスリングどんたくシリーズの中に組み込まれている単発のビッグマッチ。 モンスターハンター ポータブル3rd(カプコン) – 発売前のプロモーションとして、「オトモアイルー」について吉田くんが解説。 “【超会議3特番】ボカロ感謝祭出演者&詳細発表”.
Can you be more specific about the content of your article? After reading it, I still have some doubts. Hope you can help me.
I love reading through a post that can make people think. Also, many thanks for permitting me to comment.
مرحبًا، أعتقد أن هذه مدونة ممتازة. لقد عثرت عليها بالصدفة ;