


Introduction:
In this tutorial, we will guide you through the process of creating a simple autoclicker bot using Python and the PyAutoGUI library.
Auto clickers can take the form of a straightforward program that emulates mouse clicks. This variant is quite versatile, seamlessly operating in conjunction with any concurrent computer program. It effectively mimics the action of pressing a physical mouse button during its operation.
Autoclicker bots can automate repetitive tasks in games or applications by simulating mouse clicks. This tutorial is designed for beginners, and by the end, you’ll have a basic autoclicker bot that can be used in various scenarios. We’ll cover the installation of PyAutoGUI, basic scripting for mouse clicks, and advanced features such as randomization and a simple exit mechanism.
Prerequisites:
Before you begin, make sure you have Python installed on your system. If not, you can follow our previous tutorial on how to install Python and IDLE.
Installation:
- Open the command prompt in administrator mode.
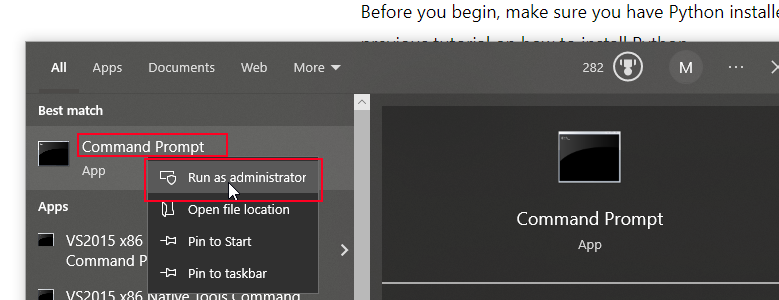
- Type the following command to install the PyAutoGUI library:
pip install pyautoguiGetting Started:
- Open IDLE (Python’s Integrated Development and Learning Environment).
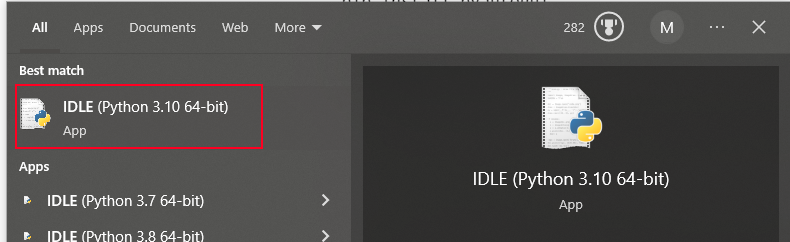
- Create a new Python file by clicking on “File” > “New File.”
Scripting the Autoclicker:
Now, let’s create a simple autoclicker script using PyAutoGUI.
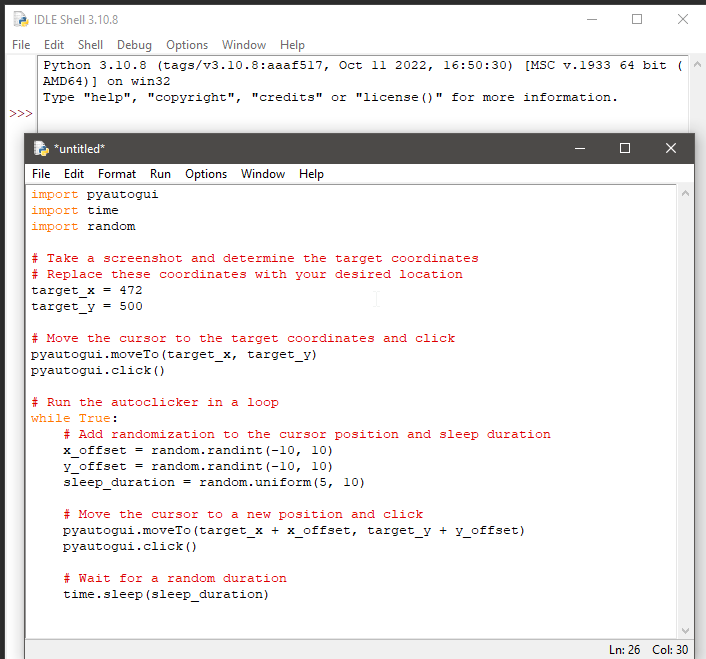
import pyautogui
import time
import random

# Take a screenshot and determine the target coordinates
# Replace these coordinates with your desired location
target_x = 472
target_y = 500

# Move the cursor to the target coordinates and click
pyautogui.moveTo(target_x, target_y)
pyautogui.click()

# Run the autoclicker in a loop
while True:
    # Add randomization to the cursor position and sleep duration
    x_offset = random.randint(-10, 10)
    y_offset = random.randint(-10, 10)
    sleep_duration = random.uniform(5, 10)

    # Move the cursor to a new position and click
    pyautogui.moveTo(target_x + x_offset, target_y + y_offset)
    pyautogui.click()

    # Wait for a random duration
    time.sleep(sleep_duration)
This code provides the foundation for a simple autoclicker bot using Python and the PyAutoGUI library. Let’s break down the key components of the code:
Importing Libraries:
import pyautogui
import time
import randompyautogui: This library provides functions for controlling the mouse and keyboard. It’s used to simulate mouse clicks and movement.time: Thetimemodule is used for adding time delays in the script.random: Therandommodule is used for generating random values, adding variability to the autoclicker.
Setting Target Coordinates:
target_x = 472
target_y = 500
These variables represent the initial target coordinates where the autoclicker will simulate mouse clicks.
Initial Click:
pyautogui.moveTo(target_x, target_y)
pyautogui.click()
The script starts by moving the mouse cursor to the specified coordinates (target_x and target_y) and then simulates a mouse click using pyautogui.click().
Autoclicker Loop:
while True:This creates an infinite loop (while True:) where the autoclicker actions will continuously occur.
Randomization of Cursor Position:
x_offset = random.randint(-10, 10)
y_offset = random.randint(-10, 10)
Random values for x_offset and y_offset are generated within the range of -10 to 10 pixels. This introduces variability to the autoclicker’s cursor position.
Simulating Mouse Clicks with Randomization:
pyautogui.moveTo(target_x + x_offset, target_y + y_offset)
pyautogui.click()
The script moves the mouse cursor to a new position by adding the random offsets to the target coordinates and then simulates a mouse click.
Introducing Sleep Duration:
time.sleep(sleep_duration)The script pauses execution for a random duration (sleep_duration) between 5 and 10 seconds using time.sleep().
This script essentially creates an autoclicker that clicks at a specified location with randomization in cursor position and sleep duration. It serves as a foundation for further enhancements and customization, as demonstrated in the later parts of the tutorial.
Save the file with a meaningful name, such as “bot_tutorial.py.”

Running the Autoclicker:
- Press F5 to run the script.
- The autoclicker will start clicking at the specified coordinates with randomization.
- Press Ctrl+C to stop the script.
Enhance the Features:
To enhance the autoclicker, we can add an exit mechanism using the Caps Lock key and improve the script for specific games. Here’s an example:
import pyautogui
import time
import random
import keyboard

# Determine the target coordinates (replace with your own)
target_x = 472
target_y = 500

# Disable PyAutoGUI's default pause
pyautogui.PAUSE = 0

# Function to check if Caps Lock is pressed
def is_caps_lock_pressed():
    return keyboard.is_pressed('caps lock')

# Autoclicker loop
while True:
    x_offset = random.randint(-10, 10)
    y_offset = random.randint(-10, 10)
    sleep_duration = random.uniform(5, 10)

    pyautogui.moveTo(target_x + x_offset, target_y + y_offset)
    pyautogui.click()

    time.sleep(sleep_duration)

    # Check if Caps Lock is pressed to exit the script
    if is_caps_lock_pressed():
        print("Autoclicker disabled.")
        exit()
Save the file and run it. Press the Caps Lock key to enable or disable the autoclicker.
Conclusion:
Congratulations! You’ve successfully created a basic autoclicker bot using Python and PyAutoGUI. Feel free to explore and modify the script for different games and applications. Happy coding!
Need a video guide here’s one below! Like and subscribe for more content like this!
Here are some more autoclicker project ready for you to enjoy! 😎 🤯
👾 Step-by-Step Coding Tutorial: Creating an Auto Clicker to Dominate Magic Tiles! 🎹 🎼
🎮 Auto Clickers for Roblox: Build your own Auto Clicker for Roblox 👨💻 🦾

Your posts in this blog really shine! Glad to gain some new insights, which I happen to also cover on my page. Feel free to visit my webpage QN5 about Blogging and any tip from you will be much apreciated.