In this tutorial, we’ll walk through the process of creating a simple dice roller application using Python’s Tkinter library. Tkinter is a popular GUI (Graphical User Interface) toolkit for Python that allows us to create windows, dialogs, and other graphical components for our applications. We’ll also be using the PIL (Python Imaging Library) module to handle image loading and manipulation.
Dice Roller
Prerequisites for dice roller app
Make sure you have Python installed on your system. Tkinter usually comes pre-installed with Python, but if not, you can install it using pip:
pip install tkYou'll also need the PIL library, which can be installed via:
pip install PillowStep 1: Setting up the Environment
Create a new Python file (e.g., dice_roller.py) in your preferred text editor or IDE.
Step 2: Writing the dice roller Code
Copy the following code into your Python file:
Sure, here's a step-by-step guide to understanding the given code:
- Import Required Modules:
   import tkinter as tk
   import random
from PIL import Image, ImageTktkinter: Python's standard GUI (Graphical User Interface) toolkit.random: Python's built-in module for generating random numbers.PIL: Python Imaging Library, used for working with images.
- Define the
DiceRollerAppClass:
class DiceRollerApp:- This class represents the application for rolling dice.
- Initialize the Application:
def __init__(self, master):- Constructor method that initializes the application.
master: Represents the parent widget (typically the main window).- Sets up the initial state of the application.
- Configure the Main Window:
self.master.title("Dice Roller")- Sets the title of the main window to "Dice Roller".
- Create Labels and Dropdown Menu:
   self.label = tk.Label(master, text="Dice Roller", font=("Helvetica", 18))
self.labelnum = tk.Label(master, text='Choose Number of Dice:')- Creates labels to display text in the application.
font=("Helvetica", 18)sets the font of the label to Helvetica with a size of 18.
   options = [1, 2, 3, 4, 5, 6, 7]
   numberdrop = tk.IntVar()
   self.numroll = numberdrop
   numberdrop.set(1)
self.drop = tk.OptionMenu(master, numberdrop, *options)- Creates a dropdown menu (
OptionMenu) with numbers from 1 to 7. IntVar()creates a variable to hold an integer value.set(1)sets the initial value of the dropdown to 1.
- Load Dice Images:
self.dice_images = [Image.open(f"dice{i}.png") for i in range(1, 7)]- Loads dice images using PIL (Python Imaging Library).
- Assumes dice images are named
dice1.png,dice2.png, …,dice6.png.
- Create Result Frame and Roll Button:
   self.result_frame = tk.Frame(master)
self.roll_button = tk.Button(master, text="Roll", command=self.roll_dice)Frameis a container widget to hold other widgets.Buttoncreates a clickable button labeled "Roll".command=self.roll_diceassociates the button with theroll_dicemethod.
- Roll Dice Method:
def roll_dice(self):- Method to handle the roll button click event.
- Clear Previous Results:
   for widget in self.result_frame.winfo_children():
widget.destroy()- Clears any previous results displayed in the result frame.
- Get Number of Dice to Roll:
num_dice = self.numroll.get()- Retrieves the selected number of dice from the dropdown menu.
- Generate Random Results:
results = [random.randint(0, 5) for _ in range(num_dice)]- Generates random numbers (dice rolls) based on the selected number of dice.
- Display Dice Images:
   for result in results:
       dice_image = ImageTk.PhotoImage(self.dice_images[result])
       label = tk.Label(self.result_frame, image=dice_image)
       label.image = dice_image
label.pack(side=tk.LEFT)- Creates labels for each dice roll result and displays corresponding dice images.
ImageTk.PhotoImageconverts PIL images to Tkinter-compatible image objects.- Each label is packed side by side in the result frame.
- Main Function:
   def main():
       root = tk.Tk()
       app = DiceRollerApp(root)
root.mainloop()- Entry point of the program.
- Creates an instance of
Tk, the main window of the application. - Initializes the
DiceRollerAppclass. - Starts the Tkinter event loop (
mainloop()).
- Run the Application:
   if __name__ == "__main__":
main()- Checks if the script is being run directly.
- Calls the
mainfunction to start the application when the script is executed.
Step 3: Understanding the Code
- We start by importing necessary modules:
tkinterfor GUI,randomfor generating random numbers, andPILfor handling images. - The
DiceRollerAppclass is the main application class that inherits fromtkinter.Frame. It initializes the GUI components such as labels, dropdown menus, and buttons. - The
roll_dicemethod is called when the "Roll" button is clicked. It generates random numbers representing dice rolls and displays corresponding dice images. - In the
mainfunction, we create an instance of thetkinter.Tkclass, which represents the main window of our application. We then instantiate theDiceRollerAppclass with this root window and start the event loop by callingroot.mainloop().
Step 4: Running the dice roller Application
Save the file and run it using your Python interpreter:
python dice_roller.py
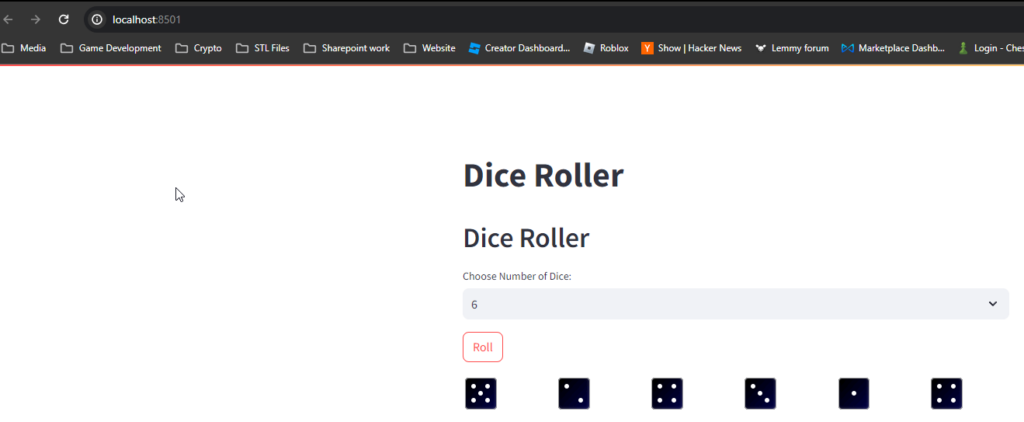
You should see a window titled "Dice Roller" with a dropdown menu to select the number of dice, a "Roll" button, and a space to display the rolled dice images. Click the "Roll" button to see the dice rolls in action!
Coding a dice roller in streamlit!
import streamlit as st
import random
from PIL import Image

class DiceRollerApp:
def __init__(self):
self.numroll = 1
st.title("Dice Roller")
self.dice_images = [Image.open(f"dice{i}.png") for i in range(1, 7)] # Load dice images

# Display title
st.header("Dice Roller")

# Choose number of dice
self.numroll = st.selectbox("Choose Number of Dice:", list(range(1, 8)), index=0)

# Roll button
if st.button("Roll"):
self.roll_dice()

def roll_dice(self):
# Display dice results
columns = st.columns(self.numroll)
for _ in range(self.numroll):
result = random.randint(0, 5) # Index for selecting dice images
w, h = self.dice_images[result].size
columns[_].image(self.dice_images[result], use_column_width=False, width=w)

def main():
dice_app = DiceRollerApp()

if __name__ == "__main__":
main()
Import Statements:
import streamlit as st: Imports the Streamlit library and aliases it asst. Streamlit is a Python library used for building web applications.import random: Imports the random module, which is used to generate random numbers.from PIL import Image: Imports the Image module from the Pillow library, which is used to work with images in Python.
DiceRollerApp Class:
- This class represents the main application. It contains methods for initializing the app and rolling dice.
__init__ Method:
- Initializes the
DiceRollerAppobject. - Sets the default number of dice to 1.
- Loads the dice images using PIL's
Image.open()method and stores them in theself.dice_imagesattribute. - Creates the Streamlit app title and header.
- Adds a select box for choosing the number of dice.
- Adds a roll button.
roll_dice Method:
- Generates random numbers representing the results of rolling the dice.
- Displays the dice images corresponding to the random results.
- Uses Streamlit's
st.columns()to create a specified number of columns to display the dice images. - Iterates over each column, generating a random result for each dice roll, and displays the corresponding dice image using Streamlit's
image()function. w, h = self.dice_images[result].sizeis used to get the width of the image so its not blown out and displayed as the length of the column- The
use_column_width=False parameter ensures that the image doesn't occupies the full width of the column, andwidth=w ensures the image is displayed at the orginal size.
main Function:
- Entry point of the script.
- Creates an instance of the
DiceRollerAppclass.
Streamlit Web Application:
- When executed (
streamlit run script_name.py), the Streamlit framework automatically serves the application on a local server. - Users can interact with the app by selecting the number of dice they want to roll and clicking the roll button.
- The app displays the results of rolling the dice as images of dice faces, with each image scaled to 100% width.

This guide provides an overview of how the code works and can help coders understand the logic behind building a simple web application using Streamlit for rolling dice.
Conclusion
In this tutorial, we learned how to create a simple Dice Roller application using Python's Tkinter library and Streamlit. You can further customize this application by adding features like sound effects, animations, or score tracking. Experiment with different layouts, colors, and fonts to make the application more visually appealing. Have fun rolling those virtual dice!
Need more python app ideas? Check out: Youtube to mp3 code or mm to inches app


Impressive posts! My blog YV6 about Airport Transfer also has a lot of exclusive content I created myself, I am sure you won’t leave empty-handed if you drop by my page.
If you are going for finest contents like me,
just pay a visit this site all the time since it
presents feature contents, thanks
Look into my blog: nordvpn coupons inspiresensation [https://t.co]
This is a topic that is close to my heart… Take care!
Exactly where are your contact details though?
Here is my webpage – nordvpn coupons inspiresensation (s.bea.sh)
I am really enjoying the theme/design of your blog.
Do you ever run into any web browser compatibility problems?
A few of my blog readers have complained about my blog not operating correctly in Explorer but looks great in Firefox.
Do you have any tips to help fix this issue?
Here is my webpage; nordvpn coupons inspiresensation (https://tinyurl.com)
350fairfax nordvpn coupon
I’m really loving the theme/design of your web site.
Do you ever run into any browser compatibility problems?
A handful of my blog audience have complained about my blog not working
correctly in Explorer but looks great in Firefox. Do you have any
solutions to help fix this issue?
Hello! I just wish to give you a huge thumbs up for your excellent info you’ve got here on this
post. I am coming back to your website for more soon.
Feel free to surf to my homepage :: vpn
Incredible story there. What occurred after? Thanks!
Remarkable! Its really awesome post, I have got much clear
idea about from this piece of writing.
This helped me a lot, thank you. 👉 Watch Live Tv in crystal-clear HD — movies, sports, horse racing, music, and global entertainment powered by oneo tv.