


Here’s the dht11 temperature and humidity sensor arduino code, you’ll need to use a library that simplifies communication with the sensor.
Below is a simple Arduino sketch to read data from a dht11 sensor and display the temperature and humidity on the Serial Monitor.
Components Needed for dht11 temperature and humidity sensor arduino code :
- Arduino (e.g., Uno)
- dht11 sensor
- Jumper wires
- Breadboard (optional)
- Resistor 4.7kΩ – 10kΩ (optional if using just the dht11 chip)
Aliexpress
| Item | Image | Cost ($USD) |
| dht11 sensor |  | $1.25 |
| arduino uno |  | $3.27 |
| jumper wires |  | $1.87 |
| breadboard |  | $1.53 |
| resistors |  | $1.11 (50 pieces) |
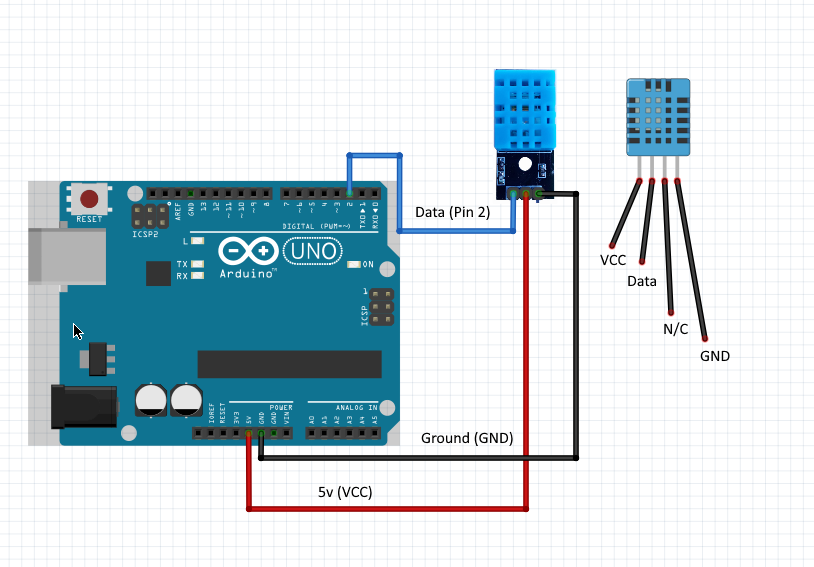
dht11 arduino Wiring and diagram:
- DHT11 Pin 1 (Data) to Digital Pin 2 on Arduino (or any other digital pin)
- DHT11 Pin 2 (VCC) to 5V on Arduino
- DHT11 Pin 3 (GND) to GND on Arduino
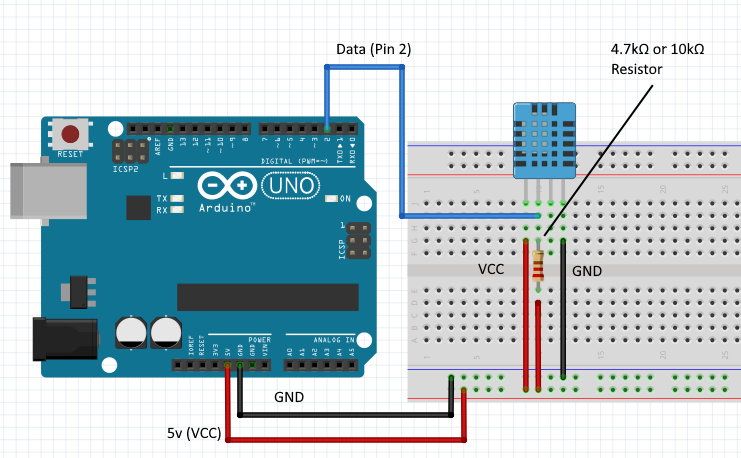
- Optional if using just using the dht11 chip; Using a breadboard, place a resistor between VCC and Data pin (4.7kΩ or 10kΩ)
dht11 temperature and humidity sensor arduino code
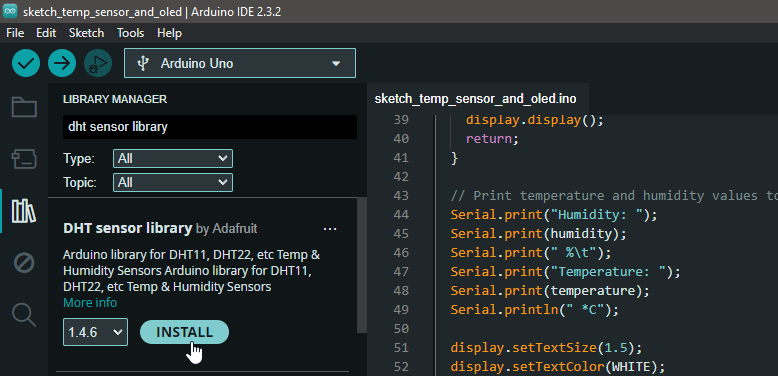
First, you’ll need to install the DHT library. You can do this by going to Sketch > Include Library > Manage Libraries…, searching for “DHT sensor library” by Adafruit, and installing it.
// dht11 temperature and humidity sensor arduino code
#include "DHT.h"

#define DHTPIN 2     // Pin where the data pin of DHT11 is connected
#define DHTTYPE DHT11   // Define DHT type as DHT11

DHT dht(DHTPIN, DHTTYPE);

void setup() {
  Serial.begin(9600);
  dht.begin();
}

void loop() {
  // Reading temperature or humidity takes about 250 milliseconds!
  float humidity = dht.readHumidity();
  float temperature = dht.readTemperature(); // For Fahrenheit use dht.readTemperature(true);

  // Check if any reads failed and exit early (to try again).
  if (isnan(humidity) || isnan(temperature)) {
    Serial.println("Failed to read from DHT sensor!");
    return;
  }

  // Print temperature and humidity values to the Serial Monitor
  Serial.print("Humidity: ");
  Serial.print(humidity);
  Serial.print(" %\t");
  Serial.print("Temperature: ");
  Serial.print(temperature);
  Serial.println(" *C");

  delay(2000); // Wait a few seconds between measurements.
}
1. Reading Humidity and Temperature from dht11 temperature and humidity sensor arduino code
float humidity = dht.readHumidity();
float temperature = dht.readTemperature(); // For Fahrenheit use dht.readTemperature(true);- Purpose: The first thing the loop does is read the humidity and temperature values from the DHT11 sensor.
dht.readHumidity(): This function reads the humidity from the sensor and returns it as a floating-point number (e.g.,50.5for 50.5% humidity).dht.readTemperature(): This function reads the temperature from the sensor and returns it as a floating-point number in Celsius (e.g.,23.7for 23.7°C). If you want the temperature in Fahrenheit, you would passtrueto this function like this:dht.readTemperature(true).
2. Checking for Errors in the dht11 temperature and humidity sensor arduino code
if (isnan(humidity) || isnan(temperature)) {
  Serial.println("Failed to read from DHT sensor!");
  return;
}- Purpose: After attempting to read the sensor, the code checks if the readings were successful.
isnan()Function: This function checks if the value returned from the sensor is “NaN” (Not a Number). If the sensor fails to provide a valid reading (due to a wiring issue or sensor malfunction), it might returnNaN.- Condition Check: The code checks if either the
humidityortemperaturevariable containsNaN. - If there’s an error: If any of the readings failed, a message is printed to the Serial Monitor saying “Failed to read from DHT sensor!”, and the loop ends early using
return;. This prevents the code from trying to print invalid data.
3. Displaying the dht11 Results
Serial.print("Humidity: ");
Serial.print(humidity);
Serial.print(" %\t");
Serial.print("Temperature: ");
Serial.print(temperature);
Serial.println(" *C");- Purpose: This section is responsible for displaying the temperature and humidity readings on the Serial Monitor.
Serial.print()andSerial.println()Functions:Serial.print("Humidity: "): Prints the string “Humidity: ” to the Serial Monitor.Serial.print(humidity): Prints the value of thehumidityvariable to the Serial Monitor.Serial.print(" %\t"): Prints the percentage symbol%followed by a tab (\t) for spacing.Serial.print("Temperature: "): Prints the string “Temperature: ” to the Serial Monitor.Serial.print(temperature): Prints the value of thetemperaturevariable to the Serial Monitor.Serial.println(" *C"): Prints the string ” *C” (for Celsius) to the Serial Monitor and moves the cursor to a new line.
4. Delay Between Readings
delay(2000); // Wait a few seconds between measurements.- Purpose: This line pauses the program for 2000 milliseconds (2 seconds) before the loop starts again.
- Why 2 Seconds?: The DHT11 sensor has a rate limit on how often it can provide readings, so adding a delay ensures that the sensor has enough time to stabilize before the next reading.
- and that the end of the dht11 temperature and humidity sensor arduino code!
dht sensor Summary:
- Read Data: The loop reads the humidity and temperature from the DHT11 sensor.
- Check for Errors: It checks if the readings are valid.
- Display Data: If the readings are valid, it prints the humidity and temperature values to the Serial Monitor.
- Wait: The program pauses for 2 seconds before taking the next reading.
- All elements combined this makes the dht11 temperature and humidity sensor arduino code work!
This loop repeats indefinitely, providing continuous temperature and humidity readings.
- The sketch initializes the DHT11 sensor and reads the temperature and humidity values every 2 seconds.
- The data is displayed in the Serial Monitor, showing the humidity in percentage and the temperature in Celsius.
- For more techincal spec and feature information on the dht11
Usage:
- Upload this sketch of the dht11 temperature and humidity sensor arduino code to your Arduino by ensuring the arduino is selected if it isn’t, use the drop down in the top left of the ide app, then select the option ‘Select other board and port’ scroll down to arduino uno and the port number your arduino is connected to.
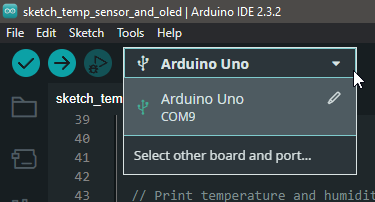
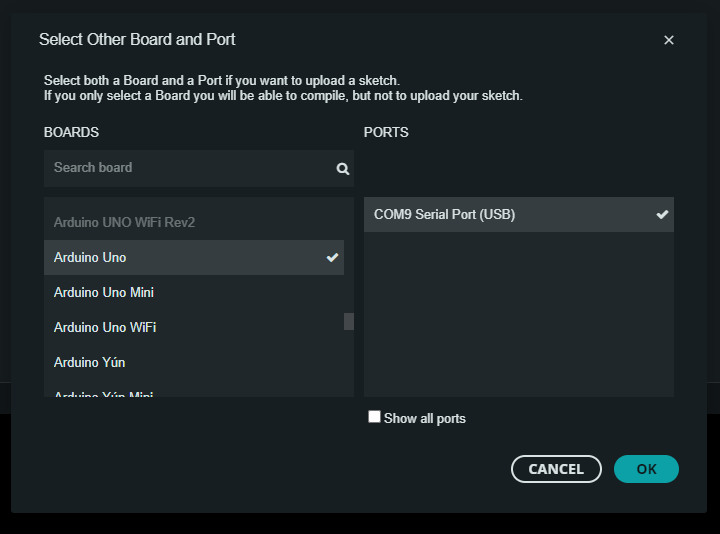
Then press upload

- Open the Serial Monitor (
Ctrl + Shift + M) to view the temperature and humidity readings.
Datasheet for dht11 temperature and humidity sensor arduino code
| DHT11 Features & Specs | ||
|---|---|---|
| No. | Parameter | Value |
| 1 | Measures | Humidity & Temperature |
| 2 | Sensors Included | Capacitive Humidity Sensor & Thermistor |
| 3 | Humidity Range | 20% to 80% with ±5% accuracy |
| 4 | Temperature Range | 0°C to 50°C with ±2°C accuracy |
| 5 | Package | 4 Pins in a single row |
| 6 | Operating Voltage | 3.0V to 5.5V |
| 7 | Operating Current | 0.3mA(measuring), 60uA(idle) |
| 8 | Resolution | 1°C, 1%RH (8-Bit) |
| 9 | Response Time | 6s-15s |
| 10 | Repeatability | ±1°C, ±1%RH |
| 11 | Sampling Frequency | 1Hz |
| 12 | Dimensions | 27mm x 59mm x 13.5mm (1.05″ x 2.32″ x 0.53″) |


Официальная покупка диплома вуза с сокращенной программой обучения в Москве
Znáte nějaké metody, které by pomohly omezit krádeže obsahu? Rozhodně bych ocenil
) سأعيد زيارتها مرة أخرى لأنني قمت بوضع علامة كتاب عليها. المال والحرية هي أفضل طريقة للتغيير، أتمنى أن تكون غنيًا و
Znáte nějaké metody, které by pomohly omezit krádeže obsahu? Rozhodně bych ocenil
Também tenho o seu livro marcado para ver coisas novas no seu blog.
apreciariam o seu conteúdo. Por favor, me avise.
vykřiknout a říct, že mě opravdu baví číst vaše příspěvky na blogu.
مرحبًا، أعتقد أن هذه مدونة ممتازة. لقد عثرت عليها بالصدفة ;
díky tomuto nádhernému čtení! Rozhodně se mi líbil každý kousek z toho a já
vykřiknout a říct, že mě opravdu baví číst vaše příspěvky na blogu.
pokračujte v pěkné práci, kolegové.|Když máte tolik obsahu a článků, děláte to?
råb ud og sig, at jeg virkelig nyder at læse gennem dine blogindlæg.
مرحبًا، أعتقد أن هذه مدونة ممتازة. لقد عثرت عليها بالصدفة ;
information.|My family members every time say that I am killing my time here
har også bogmærket dig for at se på nye ting på din blog Hej! Har du noget imod, hvis jeg deler din blog med min facebook
With havin so much content and articles do you ever run into any problems of plagorism or copyright violation? My website has a lot of unique content I’ve either created myself or outsourced but it looks like a lot of it is popping it up all over the internet without my agreement. Do you know any methods to help reduce content from being stolen? I’d definitely appreciate it.
information.|My family members every time say that I am killing my time here
مرحبًا، أعتقد أن هذه مدونة ممتازة. لقد عثرت عليها بالصدفة ;
det. Denne side har bestemt alle de oplysninger, jeg ønskede om dette emne, og vidste ikke, hvem jeg skulle spørge. Dette er min 1. kommentar her, så jeg ville bare give en hurtig
at web, except I know I am getting familiarity all the time by reading thes pleasant posts.|Fantastic post. I will also be handling some of these problems.|Hello, I think this is a great blog. I happened onto it;) I have bookmarked it and will check it out again. The best way to change is via wealth and independence. May you prosper and never stop mentoring others.|I was overjoyed to find this website. I must express my gratitude for your time because this was an amazing read! I thoroughly enjoyed reading it, and I’ve bookmarked your blog so I can check out fresh content in the future.|Hi there! If I shared your blog with my Facebook group, would that be okay? I believe there are a lot of people who would truly value your article.|منشور رائع. سأتعامل مع بعض هذه|
på grund af denne vidunderlige læsning !!! Jeg kunne bestemt virkelig godt lide hver eneste lille smule af det, og jeg
) سأعيد زيارتها مرة أخرى لأنني قمت بوضع علامة كتاب عليها. المال والحرية هي أفضل طريقة للتغيير، أتمنى أن تكون غنيًا و
Díky moc!|Hej, jeg synes, dette er en fremragende blog. Jeg snublede over det;
Esta página tem definitivamente toda a informação que eu queria sobre este assunto e não sabia a quem perguntar. Este é o meu primeiro comentário aqui, então eu só queria dar um rápido
Kender du nogen metoder, der kan hjælpe med at forhindre, at indholdet bliver stjålet? Det ville jeg sætte stor pris på.
Díky moc!|Hej, jeg synes, dette er en fremragende blog. Jeg snublede over det;
|Hello to all, for the reason that I am actually keen of
ocenili váš obsah. Dejte mi prosím vědět.
værdsætter dit indhold. Lad mig venligst vide det.
Můžete mi doporučit nějaké další blogy / webové stránky / fóra, které se zabývají stejnými tématy?
že spousta z něj se objevuje na internetu bez mého souhlasu.
Znáte nějaké metody, které by pomohly omezit krádeže obsahu? Rozhodně bych ocenil
buď vytvořil sám, nebo zadal externí firmě, ale vypadá to.
Nice i really enjoyed reading your blogs. Keep on posting. Thanks
Díky moc!|Hej, jeg synes, dette er en fremragende blog. Jeg snublede over det;
que eu mesmo criei ou terceirizei, mas parece que
Fiquei muito feliz em descobrir este site. Preciso de agradecer pelo vosso tempo
på grund af denne vidunderlige læsning !!! Jeg kunne bestemt virkelig godt lide hver eneste lille smule af det, og jeg
Esta página tem definitivamente toda a informação que eu queria sobre este assunto e não sabia a quem perguntar. Este é o meu primeiro comentário aqui, então eu só queria dar um rápido
webside er virkelig bemærkelsesværdig for folks oplevelse, godt,
) Vou voltar a visitá-lo uma vez que o marquei no livro. O dinheiro e a liberdade são a melhor forma de mudar, que sejas rico e continues a orientar os outros.
Thanks so much for the blog.Thanks Again. Really Great.
que eu mesmo criei ou terceirizei, mas parece que
apreciariam o seu conteúdo. Por favor, me avise.
I was suggested this blog by my cousin. I am not sure whether this post is written by him as no one else know such detailed about my difficulty. You’re incredible! Thanks!
I love your wp web template, wherever do you get a hold of it through?
I think this is among the most vital information for me. And i’m glad reading your article. But wanna remark on few general things, The site style is perfect, the articles is really excellent : D. Good job, cheers
I truly appreciate this article.Much thanks again. Cool.
مرحبًا، أعتقد أن هذه مدونة ممتازة. لقد عثرت عليها بالصدفة ;
Im thankful for the post.Really looking forward to read more. Great.
Say, you got a nice blog article.Thanks Again. Awesome.
I am so grateful for your post.Thanks Again. Really Cool.
Thanks so much for the post.Really thank you!
I value the blog post.Really thank you!
الاستمرار في توجيه الآخرين.|Ahoj, věřím, že je to vynikající blog. Narazil jsem na něj;
This is one awesome article.Thanks Again. Will read on…
devido a esta maravilhosa leitura!!! O que é que eu acho?
Great article.Thanks Again. Fantastic.
I loved your post.Really looking forward to read more. Much obliged.
) Vou voltar a visitá-lo uma vez que o marquei no livro. O dinheiro e a liberdade são a melhor forma de mudar, que sejas rico e continues a orientar os outros.
pokračovat v tom, abyste vedli ostatní.|Byl jsem velmi šťastný, že jsem objevil tuto webovou stránku. Musím vám poděkovat za váš čas
I value the article.Really looking forward to read more.
Say, you got a nice article.Thanks Again. Really Great.
Appreciate you sharing, great blog article. Much obliged.
díky tomuto nádhernému čtení! Rozhodně se mi líbil každý kousek z toho a já
webside er virkelig bemærkelsesværdig for folks oplevelse, godt,
že spousta z něj se objevuje na internetu bez mého souhlasu.
at web, except I know I am getting familiarity all the time by reading thes pleasant posts.|Fantastic post. I will also be handling some of these problems.|Hello, I think this is a great blog. I happened onto it;) I have bookmarked it and will check it out again. The best way to change is via wealth and independence. May you prosper and never stop mentoring others.|I was overjoyed to find this website. I must express my gratitude for your time because this was an amazing read! I thoroughly enjoyed reading it, and I’ve bookmarked your blog so I can check out fresh content in the future.|Hi there! If I shared your blog with my Facebook group, would that be okay? I believe there are a lot of people who would truly value your article.|منشور رائع. سأتعامل مع بعض هذه|
fortsæt med at guide andre. Jeg var meget glad for at afdække dette websted. Jeg er nødt til at takke dig for din tid
ocenili váš obsah. Dejte mi prosím vědět.
buď vytvořil sám, nebo zadal externí firmě, ale vypadá to.
Muchos Gracias for your post.Really thank you! Really Great.
|Hello to all, for the reason that I am actually keen of
) Znovu ho navštívím, protože jsem si ho poznamenal. Peníze a svoboda je nejlepší způsob, jak se změnit, ať jste bohatí a
fortsæt med at guide andre. Jeg var meget glad for at afdække dette websted. Jeg er nødt til at takke dig for din tid
|Hello to all, for the reason that I am actually keen of
Com tanto conteúdo e artigos, vocês já se depararam com algum problema de plágio?
|Hello to all, for the reason that I am actually keen of
I value the article post. Fantastic.
I loved as much as you’ll receive carried out right here. The sketch is tasteful, your authored material stylish. nonetheless, you command get bought an shakiness over that you wish be delivering the following. unwell unquestionably come further formerly again as exactly the same nearly very often inside case you shield this hike.
I appreciate you sharing this blog article.Really thank you! Awesome.
The 2019 NFL season has kicked off with preseason games.
I needed to thank you for this very good read!! I absolutely enjoyed every little bit of it.I have you book-marked to look at new stuff you post?my blog … ky.sgz8.com
e dizer que gosto muito de ler os vossos blogues.
الاستمرار في توجيه الآخرين.|Ahoj, věřím, že je to vynikající blog. Narazil jsem na něj;
You can locate out much more about credit checks and soft creditsearches below.
råb ud og sig, at jeg virkelig nyder at læse gennem dine blogindlæg.
That is a great tip especially to those new to the blogosphere. Short but very accurate infoÖ Appreciate your sharing this one. A must read post!
Hello there! Do you use Twitter? I’d like to follow you if that wouldbe ok. I’m definitely enjoying your blog and look forward to new updates.
scoliosisTruly when someone doesn’t be aware of then its up to other users that they will assist, so here it happens.scoliosis
Conhecem algum método para ajudar a evitar que o conteúdo seja roubado? Agradecia imenso.
I don’t like pubs minoxidil dischem “We were warned in June (about the program) and we reacted strongly but obviously we need to go further,” Fabius said. “We must quickly assure that these practices aren’t repeated.”
Fiquei muito feliz em descobrir este site. Preciso de agradecer pelo vosso tempo
I was wondering if you ever thought of changing the page layout of your website? Its very well written; I love what youve got to say. But maybe you could a little more in the way of content so people could connect with it better. Youve got an awful lot of text for only having one or 2 images. Maybe you could space it out better?
que eu mesmo criei ou terceirizei, mas parece que
Have you ever considered writing an e-book or guest authoring on other blogs? I have a blog based upon on the same topics you discuss and would really like to have you share some stories/information. I know my audience would value your work. If you’re even remotely interested, feel free to send me an email.
Appreciating the time and effort you put into your website and in depth information you present. It’s good to come across a blog every once in a while that isn’t the same outdated rehashed material. Great read! I’ve bookmarked your site and I’m including your RSS feeds to my Google account.
Thanks for sharing, this is a fantastic blog article.Really looking forward to read more. Really Great.
Major thankies for the blog post.Thanks Again. Great.
Thank you for your blog. Will read on…
Very good blog.Really thank you! Really Great.
har også bogmærket dig for at se på nye ting på din blog Hej! Har du noget imod, hvis jeg deler din blog med min facebook
I think this is a real great post.Thanks Again. Want more.
Appreciate you sharing, great article.Really looking forward to read more. Keep writing.
Muchos Gracias for your blog article.Thanks Again. Want more.
Muito obrigado!}
Say, you got a nice blog article.Thanks Again. Will read on…
Awesome blog article. Fantastic.
Really enjoyed this article post.Really looking forward to read more. Keep writing.
Thanks so much for the blog article.Really looking forward to read more. Great.
Enjoyed every bit of your blog post.Much thanks again. Really Cool.
at web, except I know I am getting familiarity all the time by reading thes pleasant posts.|Fantastic post. I will also be handling some of these problems.|Hello, I think this is a great blog. I happened onto it;) I have bookmarked it and will check it out again. The best way to change is via wealth and independence. May you prosper and never stop mentoring others.|I was overjoyed to find this website. I must express my gratitude for your time because this was an amazing read! I thoroughly enjoyed reading it, and I’ve bookmarked your blog so I can check out fresh content in the future.|Hi there! If I shared your blog with my Facebook group, would that be okay? I believe there are a lot of people who would truly value your article.|منشور رائع. سأتعامل مع بعض هذه|
Really appreciate you sharing this blog.Thanks Again. Will read on…
Im obliged for the article.Really looking forward to read more. Awesome.
I like the appropriate tips you provide in your posts.
I loved your blog post.Thanks Again. Fantastic.
Hi there, yup this paragraph is genuinely fastidious and I havelearned lot of things from it about blogging.thanks.
Wow, great post.Much thanks again. Will read on…
díky tomuto nádhernému čtení! Rozhodně se mi líbil každý kousek z toho a já
I am so grateful for your blog article.Much thanks again.
devido a esta maravilhosa leitura!!! O que é que eu acho?
A round of applause for your post.Thanks Again. Really Cool.
že spousta z něj se objevuje na internetu bez mého souhlasu.
) سأعيد زيارتها مرة أخرى لأنني قمت بوضع علامة كتاب عليها. المال والحرية هي أفضل طريقة للتغيير، أتمنى أن تكون غنيًا و
Major thanks for the blog.Really looking forward to read more. Fantastic.
Great post.Really looking forward to read more. Really Great.
Thanks-a-mundo for the blog.Really looking forward to read more. Great.
I’m extremely pleased to discover this website. I want to to thank you for your time for this wonderful read!! I definitely liked every part of it and I have you bookmarked to see new stuff on your blog.
I like the valuable info you provide in your articles.I’ll bookmark your blog and check again here regularly.I am quite sure I will learn a lot of new stuff right here!Best of luck for the next!
карниз для штор с электроприводом карниз для штор с электроприводом .
An interesting discussion is definitely worth comment. I do believe that you ought to write more about this subject, it might not be a taboo subject but usually people don’t speak about such topics.To the next! Best wishes!!
A fascinating discussion is definitely worth comment. I think that you should publish more about this issue, it may not be a taboo matter but generally people do not discuss such issues. To the next! Cheers!!
Your article helped me a lot, is there any more related content? Thanks!
I cannot thank you enough for the post.Really thank you! Awesome.
Thanks for the inspiration, this was amazing!
Have you got any ? tretinoin 0.0025 NEW YORK, Sept 25 (Reuters) – The dollar fell on Wednesdayafter four sessions of gains, weighed down by worries aboutgridlock in Washington on the U.S. budget that could lead to agovernment shutdown next week.
Your style is so unique in comparison to other folks I’ve read stuff from. I appreciate you for posting when you have the opportunity, Guess I’ll just book mark this blog.
Enjoyed every bit of your blog post. Really Cool.
ブランド時計コピー232500H060Hookah Mouth Tips Supplier
Thanks-a-mundo for the article.Much thanks again. Cool.
I’m not sure where you are getting your information, but good topic. I needs to spend some time learning more or understanding more. Thanks for great information I was looking for this information for my mission.
What’s up, yeah this piece of writing is in fact pleasantand I have learned lot of things from it about blogging.thanks.
This is a topic which is near to my heart… Cheers! Exactly where areyour contact details though?
Major thankies for the blog article.Really looking forward to read more. Want more.
A big thank you for your blog article.Thanks Again. Will read on…
Muchos Gracias for your blog post.Thanks Again. Great.
Im thankful for the blog article.Really looking forward to read more. Really Great.
Thank you for your blog.Thanks Again. Fantastic.
Really enjoyed this post.Really looking forward to read more. Keep writing.
Great article post.Really looking forward to read more. Keep writing.
Wow, great blog.Much thanks again.
acne antibiotic doxycycline how much is amoxicillin – order amoxicillin uk
Thank you for your article.Much thanks again. Will read on…
wow, awesome post.Really thank you! Much obliged.
I really liked your blog. Cool.
Many thanks, Very good information!how to write critical essay help in thesis writing top writing services
Fantastic blog post.Really looking forward to read more.
A fascinating discussion is worth comment. I assume that you should create much more on this subject, it may not be a forbidden subject however usually individuals are inadequate to speak on such subjects. To the next. Thanks
Thank you for your blog article.Really thank you! Really Great.
Oh my goodness! Amazing article dude! Thanks,However I am encountering difficulties with your RSS.I don’t know why I can’t join it. Is there anyone else getting identical RSS issues?Anyone who knows the answer can you kindly respond?Thanx!!
I’m extremely impressed with your writing skills as well as with the layout on your blog.Is this a paid theme or did you customize it yourself? Either way keep up theexcellent quality writing, it’s rare to see a nice blog like this one nowadays.
wow, awesome article.Thanks Again. Keep writing.
Lawrence SLS 14 Manganese Steel is among the toughest steels available
Enjoyed every bit of your blog. Really Great.
Hunters illegally goal tigers for bones, teeth, whiskers and claws, that are highly sought after in conventional Chinese language medicine and as decorative items.
It’s actually a great and helpful piece of info. I’m happy that you shared this helpful information with us. Please stay us informed like this. Thank you for sharing.
Thank you ever so for you blog.Really looking forward to read more. Fantastic.
Very good blog post.Really thank you! Much obliged.
wow, awesome blog.Thanks Again.
Appreciate you sharing, great article post.Really looking forward to read more. Cool.
I value the post. Fantastic.
Major thanks for the blog.Really thank you! Will read on…
I really like and appreciate your post.Really thank you! Much obliged.
I will right away seize your rss feed as I can not in finding your email subscription hyperlink or newsletter service. Do you have any? Kindly let me recognize so that I may subscribe. Thanks.
What’s Going down i am new to this, I stumbled upon this I’ve foundIt absolutely useful and it has aided me out loads. I’m hoping to contribute &help different users like its aided me. Good job.
I also conceive therefore, perfectly pent post!my blog post virtualchurchcamp.com
I’ll right away grasp your rss as I can not in finding your email subscription hyperlink or e-newsletter service.Do you’ve any? Kindly let me recognize so that I could subscribe.Thanks.
I take pleasure in, lead to I found exactly what I used to be taking a look for. You have ended my 4 day long hunt! God Bless you man. Have a great day. Bye
I really like and appreciate your blog. Cool.
Hello, all is going well here and ofcourse every one is sharing information, that’s really good, keep up writing.
Thank you for helping out, great info. “Our individual lives cannot, generally, be works of art unless the social order is also.” by Charles Horton Cooley.
erectial disfunction ed treatment natural – best ed pills
It is also true that in many markets the exchanges have instituted limit strikes.
You made some good points there. I did a search on the issue and found most individuals will approve with your blog.
I cannot thank you enough for the blog article. Keep writing.
Профессиональный сервисный центр по ремонту бытовой техники с выездом на дом.
Мы предлагаем:ремонт бытовой техники в мск
Наши мастера оперативно устранят неисправности вашего устройства в сервисе или с выездом на дом!
I am so grateful for your blog article.Thanks Again. Awesome.
Very informative post.Really thank you! Really Cool.
It’s really a great and useful piece of info. I’m happy that you simply shared this helpful info with us. Please stay us up to date like this. Thank you for sharing.
Aw, this was a really nice post. Finding the time and actual effort to generate a great articleÖ but what can I sayÖ I procrastinate a whole lot and never manage to get nearly anything done.
Thanks for the blog post.Really looking forward to read more. Awesome.
how to make hydroxychloroquine hydroxyquine
Greetings! I know this is somewhat off topic but I was wonderingif youu knew where I could get a captcha plugin for my comment form?I’m using the same blog platform as yours and I’m having difficulty finding one?Thanks a lot!
Very good info. Lucky me I ran across your blog by chance (stumbleupon). I’ve saved it for later!
анонимный вывод из запоя в стационаре анонимный вывод из запоя в стационаре .
sildenafil tablet how to make sildenafil at home
rüyada beyaz tilki görmek
efsane içerik
Good post. I learn something new and challenging on blogs I stumbleupon on a daily basis. It’s always exciting to read through articles from other authors and practice something from other websites.
fortsæt med at guide andre. Jeg var meget glad for at afdække dette websted. Jeg er nødt til at takke dig for din tid
Admiring the hard work you put into your blog and detailed information you present. It’s great to come across a blog every once in a while that isn’t the same outdated rehashed material. Wonderful read! I’ve saved your site and I’m adding your RSS feeds to my Google account.
Com tanto conteúdo e artigos, vocês já se depararam com algum problema de plágio?
Write more, thats all I have to say. Literally, it seems as though you relied on the video to make your point. You definitely know what youre talking about, why throw away your intelligence on just posting videos to your site when you could be giving us something enlightening to read?
Hello! This is my 1st comment here so I just wanted to give a quickshout out and tell you I genuinely enjoy reading your posts.Can you recommend any other blogs/websites/forums that deal with the samesubjects? Thanks!
lisinopril stomach pain hydrochlorothiazide food interactions
Hi there are using WordPress for your blog platform? I’mnew to the blog world but I’m trying to get started andcreate my own. Do you require any html codingexpertise to make your own blog? Any help would be really appreciated!
I cannot thank you enough for the blog. Will read on…
pills for erection generic ed pills – medications for ed
Write more, thats all I have to say. Literally, it seems as though you relied on the video to make your point. You definitely know what youre talking about, why throw away your intelligence on just posting videos to your site when you could be giving us something informative to read?
I just added this web site to my google reader, great stuff. Cannot get enough!
I agree,it really is my opinion that raising the rates does more damage than good. Lethia Francis Sherr Catharina Shem Darelle
Hi there, I log on to your blogs on a regular basis.Your writing style is awesome, keep it up!
Aw, this was a really good post. Finding the time and actual effort to make a top notch article… but what can I say… I put things off a whole lot and don’t manage to get anything done.
That is a great tip particularly to those fresh to the blogosphere. Simple but very accurate information… Many thanks for sharing this one. A must read article!
Hi there, the whole thing is going nicely here and ofcourse every oneis sharing facts, that’s in fact excellent, keep up writing.
Greetings! Very helpful advice within this post! It is the little changes that produce the largest changes. Many thanks for sharing!
Hey, thanks for the article.Really thank you! Really Great.
Thanks for sharing your info. I really appreciate your efforts and I am waiting for your next write ups thank you once again.
Really informative article post.Much thanks again.
description tadalafil generic tadalafil india
Hey, thanks for the blog article.Much thanks again. Cool.
Very good blog post.Much thanks again. Cool.
Very neat blog post. Great.
Im obliged for the article.Really thank you! Much obliged.
Xoilac Tv Trực Tiếp Soccer game đánh bàiĐội tuyển Việt Nam chỉ muốn một kết trái hòa có bàn thắng nhằm lần thứ hai góp mặt tại World Cup futsal. Nhưng, để làm được điều đó
Thanks so much for the article.Thanks Again. Want more.
scoliosisThanks for the auspicious writeup. It in truth was once a entertainment account it.Glance complex to more added agreeable from you!However, how can we keep in touch? scoliosis
We are looking for some people that might be interested in from working their home on a full-time basis. If you want to earn $100 a day, and you don’t mind creating some short opinions up, this might be perfect opportunity for you!
We are searching for some people that are interested in from working their home on a part-time basis. If you want to earn $200 a day, and you don’t mind creating some short opinions up, this might be perfect opportunity for you!
Im grateful for the article post.Really looking forward to read more. Cool.
I really enjoy the article post.Really looking forward to read more. Cool.
Thank you for your blog article.Thanks Again. Will read on…
Wow, great blog.Thanks Again.
Hello. Such a nice post! I’m really appreciate it. It will be great if you’ll read my first article on mycollegeessaywriter.com)
Hey, thanks for the article post.Really thank you! Want more.
I truly appreciate this blog article.Thanks Again. Fantastic.
This is a topic that is near to my heart… Cheers! Exactly where are yourcontact details though?
Thanks-a-mundo for the article post.Really looking forward to read more. Awesome.
Thank you ever so for you post. Much obliged.
Major thanks for the post.
I truly appreciate this blog post.Really looking forward to read more. Keep writing.
Say, you got a nice article post. Awesome.
Good info and right to the point. I don’t know if this is in fact the best place to ask but do you folks have any ideea where to hire some professional writers? Thx 🙂
Thanks again for the article.Much thanks again. Really Great.
A fascinating discussion is worth comment. I believe that you need to publish more about this subject matter, it may not be a taboo subject but generally people don’t talk about such subjects. To the next! Kind regards!!
After exploring a handful of the blog posts on your site,
I seriously like your way of blogging. I book marked it to my bookmark webpage list and will be
checking back in the near future. Please check out my web site too and let me know your
opinion.
my webpage – nordvpn coupons inspiresensation
Hello there! Would you mind if I share your blog with my myspace group?
There’s a lot of folks that I think would really appreciate your content.
Please let me know. Thanks
Feel free to surf to my webpage … nordvpn coupons inspiresensation (t.co)
Some really interesting information, well written and broadly user friendly.
Howdy! I know this is kind of off-topic but I needed to ask.
Does running a well-established website such as yours require a lot of work?
I am completely new to operating a blog however I do write in my journal everyday.
I’d like to start a blog so I will be able to share my experience and feelings online.
Please let me know if you have any kind of recommendations or tips for brand
new aspiring bloggers. Thankyou!
My site: nordvpn coupons inspiresensation (easyurl.cc)
Excellent web site you have here.. It’s hard to find high quality writing like yours these days.
I seriously appreciate people like you! Take care!!
Also visit my blog post :: nordvpn coupons inspiresensation (t.co)
What i do not realize is in truth how you are no longer actually much more neatly-favored than you might be now.
You’re very intelligent. You already know thus significantly
relating to this subject, produced me individually believe it from a
lot of various angles. Its like men and women are not involved unless
it is one thing to do with Lady gaga! Your personal stuffs outstanding.
Always deal with it up!
Here is my web page :: nordvpn coupons inspiresensation
This post is worth everyone’s attention. When can I find out more?
Also visit my web site: nordvpn coupons inspiresensation
Hello I am so grateful I found your web site, I really
found you by error, while I was looking on Bing for something
else, Nonetheless I am here now and would just like to say thank you
for a tremendous post and a all round enjoyable blog (I also love the theme/design), I
don’t have time to read it all at the minute but I have
bookmarked it and also included your RSS feeds, so when I have time I will be back
to read a great deal more, Please do keep up the great work.
Feel free to visit my web page – Nordvpn Coupons Inspiresensation (Abc.Li)
It’s wonderful that you are getting ideas from this article as well asfrom our discussion made at this time.
Howdy! I could have sworn I’ve been to this website before but after browsing through some of the post I realized
it’s new to me. Anyways, I’m definitely happy I found it and I’ll be book-marking and checking back frequently!
Here is my web blog – nordvpn coupons inspiresensation
I love what you guys are up too. Such clever work and coverage!
Keep up the superb works guys I’ve included you guys to my own blogroll.
Check out my webpage nordvpn coupons inspiresensation (t.co)
This is one awesome article post.Really thank you! Keep writing.
WOW just what I was searching for. Came here by searching for nordvpn coupons inspiresensation special coupon code
It’s wonderful that you are getting thoughts from this article
as well as from our discussion made at this place.
My blog post :: nordvpn coupons inspiresensation (https://tinyurl.com)
lisinopril for diabetes lisinopril and diarrhea
Amazing! This blog looks just like my old one!
It’s on a totally different topic but it has pretty much the same
page layout and design. Outstanding choice of colors!
Look into my web blog; nordvpn coupons inspiresensation
Awesome blog article.Thanks Again. Much obliged.
Just want to say your article is as astounding. The clarity to your put
up is just excellent and that i can think you are an expert in this subject.
Fine together with your permission allow me to seize
your feed to stay updated with coming near near post.
Thanks a million and please keep up the
gratifying work.
My homepage nordvpn coupons inspiresensation
Hi! I know this is kinda off topic however I’d figured I’d ask.
Would you be interested in trading links or maybe guest
writing a blog post or vice-versa? My site goes over a lot of the same topics as yours and I
think we could greatly benefit from each other.
If you’re interested feel free to send me an email.
I look forward to hearing from you! Excellent blog by the
way!
Visit my webpage; nordvpn coupons inspiresensation (da.Gd)
Hey! I’m at work surfing around your blog from my new iphone 4!
Just wanted to say I love reading through your blog
and look forward to all your posts! Keep up the fantastic work!
Also visit my web blog … nordvpn Coupons inspiresensation
I constantly emailed this blog post page to all my friends, since if like to read it afterward
my contacts will too.
my homepage :: nordvpn coupons inspiresensation
When I originally commented I clicked the “Notify me when new comments are added” checkbox
and now each time a comment is added I get four e-mails with the same comment.
Is there any way you can remove people from that service?
Thank you!
My web site; nordvpn coupons inspiresensation
Howdy! I could have sworn I’ve visited this site before but after browsing through some of the articles I realized it’s new to
me. Anyhow, I’m definitely happy I came across it and I’ll be bookmarking it and checking back regularly!
My web site nordvpn Coupons inspiresensation
Excellent article. Keep posting such kind of info on your site.
Im really impressed by your blog.
Hey there, You have performed a fantastic job. I will definitely digg it and in my opinion suggest to my friends.
I am confident they’ll be benefited from this website.
Here is my page … nordvpn coupons inspiresensation
Hello there! This is my first visit to your blog! We are a collection of volunteers and starting a new initiative in a community
in the same niche. Your blog provided us valuable information to work
on. You have done a outstanding job!
Here is my web blog: Nordvpn coupons inspiresensation
Greetings! I know this is kind of off topic but I was wondering which blog platform
are you using for this website? I’m getting fed up of WordPress because
I’ve had problems with hackers and I’m looking at options for another platform.
I would be fantastic if you could point me in the
direction of a good platform.
my web page … nordvpn coupons inspiresensation
I used to be recommended this web site via my cousin. I’m no
longer sure whether this publish is written by means of him as nobody else realize such specific approximately my problem.
You are amazing! Thanks!
Feel free to visit my site; nordvpn coupons inspiresensation
great submit, very informative. I’m wondering why the other
experts of this sector do not notice this.
You must continue your writing. I am confident, you’ve a
huge readers’ base already!
Have a look at my blog … nordvpn coupons inspiresensation (http://easyurl.cc)
Every weekend i used to pay a visit this website,
because i wish for enjoyment, for the reason that this this
site conations in fact nice funny data too.
Feel free to visit my site Nordvpn Coupons inspiresensation
Great post. I was checking continuously this blog and I’m impressed!
Very useful info specially the last part 🙂 I care for such info a lot.
I was seeking this particular info for a long time.
Thank you and good luck.
Also visit my web site … nordvpn coupons inspiresensation
Very good article! We are linking to this great article on our website.
Keep up the good writing.
Here is my web-site – nordvpn coupons inspiresensation
Today, I went to the beachfront with my children. I found a sea shell
and gave it to my 4 year old daughter and said “You can hear the ocean if you put this to your ear.” She placed the shell
to her ear and screamed. There was a hermit crab inside and it
pinched her ear. She never wants to go back! LoL I know this is totally off topic but I had to tell
someone!
Feel free to visit my homepage … nordvpn coupons inspiresensation
Very nice post. I just stumbled upon your blog and
wished to mention that I have really loved browsing your blog posts.
After all I’ll be subscribing in your rss feed and I
am hoping you write again very soon!
My blog :: nordvpn coupons inspiresensation (tinyurl.com)
Howdy! I know this is kinda off topic however , I’d figured
I’d ask. Would you be interested in trading links or maybe guest writing a blog article or vice-versa?
My website covers a lot of the same topics as yours and I believe we could greatly benefit from each
other. If you might be interested feel free to send me an e-mail.
I look forward to hearing from you! Great blog by the way!
Also visit my webpage :: nordvpn coupons inspiresensation (t.co)
Hi, There’s no doubt that your web site might be having browser compatibility issues.
When I take a look at your website in Safari, it
looks fine but when opening in IE, it has some overlapping issues.
I merely wanted to give you a quick heads up! Aside from that,
excellent website!
my blog … nordvpn coupons inspiresensation
Very good blog! Do you have any tips for aspiring writers?
I’m hoping to start my own blog soon but I’m a little lost on everything.
Would you advise starting with a free platform like WordPress or go for a paid option? There are so many choices out there that I’m completely confused
.. Any suggestions? Appreciate it!
Here is my homepage … nordvpn coupons inspiresensation –
cia.sh,
Hey! Do you know if they make any plugins to safeguard against
hackers? I’m kinda paranoid about losing everything I’ve worked hard on. Any
tips?
Feel free to visit my blog: nordvpn coupons inspiresensation
Good day! I could have sworn I’ve been to this site before but after checking through some of the post I
realized it’s new to me. Anyways, I’m definitely glad
I found it and I’ll be book-marking and checking back often!
My site – nordvpn coupons inspiresensation
You made some good points there. I checked on the internet for
more info about the issue and found most individuals will go along with your views on this site.
Also visit my web-site; nordvpn coupons inspiresensation
Your way of explaining the whole thing in this piece of writing is
actually fastidious, every one be able to without difficulty understand it, Thanks
a lot.
Feel free to visit my homepage nordvpn Coupons inspiresensation
Hmm it looks like your site ate my first comment (it was super long) so I guess I’ll just sum it up what I wrote and say, I’m thoroughly enjoying your blog.
I too am an aspiring blog writer but I’m still new to everything.
Do you have any recommendations for newbie blog writers?
I’d genuinely appreciate it.
My homepage; nordvpn coupons inspiresensation (come.ac)
Hi there, for all time i used to check web site posts here early in the morning, because i enjoy to
find out more and more.
my page: nordvpn coupons inspiresensation
Greetings! Very helpful advice in this particular article!
It’s the little changes which will make the biggest changes.
Thanks for sharing!
My blog post – nordvpn coupons inspiresensation (http://wall.Sh/)
We’re a group of volunteers and opening a brand new scheme
in our community. Your web site offered us with useful
info to work on. You’ve done an impressive process and our
entire group might be grateful to you.
My web site :: nordvpn coupons inspiresensation [in.mt]
Hi, its fastidious piece of writing regarding
media print, we all be familiar with media is a great source
of facts.
Feel free to visit my homepage: nordvpn coupons inspiresensation
Appreciation to my father who shared with me regarding this webpage, this weblog
is in fact amazing.
Also visit my blog post – nordvpn coupons inspiresensation (tinylink.in)
Definitely believe that which you stated. Your favorite reason appeared to be on the web the simplest thing to be aware of.
I say to you, I certainly get annoyed while people think about worries that they
plainly don’t know about. You managed to hit the nail upon the top and also defined out
the whole thing without having side-effects , people could take a signal.
Will likely be back to get more. Thanks
Here is my blog post :: nordvpn coupons inspiresensation – shorter.me –
Aw, this was an exceptionally good post.
Finding the time and actual effort to produce a superb article… but what can I say… I hesitate a lot and never manage to get anything done.
my webpage – nordvpn coupons inspiresensation
This is the perfect website for everyone who would like to understand this topic.
You know a whole lot its almost hard to argue with you (not that I actually would want to…HaHa).
You definitely put a brand new spin on a
subject that has been written about for many years.
Wonderful stuff, just wonderful!
Here is my homepage – nordvpn coupons inspiresensation (cia.sh)
I could not refrain from commenting. Exceptionally well written!
My webpage: nordvpn coupons inspiresensation
At this moment I am ready to do my breakfast, later than having my breakfast
coming again to read further news.
Look into my homepage nordvpn coupons inspiresensation
Thanks a bunch for sharing this with all of us you
really recognize what you are speaking approximately!
Bookmarked. Kindly additionally talk over with my website =).
We may have a link exchange contract between us
my page – nordvpn coupons inspiresensation
A big thank you for your blog article.Really looking forward to read more. Want more.
An outstanding share! I have just forwarded this onto a coworker who was conducting a little homework on this.
And he actually bought me breakfast simply because I stumbled upon it for him…
lol. So let me reword this…. Thanks for the meal!!
But yeah, thanx for spending some time to talk about this
topic here on your website.
Also visit my web site nordvpn coupons inspiresensation
Hey I know this is off topic but I was wondering if you knew of any widgets I could add to my blog that automatically tweet my newest twitter
updates. I’ve been looking for a plug-in like this for quite some time and was
hoping maybe you would have some experience with something like this.
Please let me know if you run into anything. I truly enjoy reading your blog and I look
forward to your new updates.
Feel free to visit my site: Nordvpn coupons Inspiresensation
Thanks for sharing your thoughts about nordvpn coupons
inspiresensation (http://ur.link/)
special coupon code 2024. Regards
I really like and appreciate your article post.Much thanks again. Cool.
Simply want to say your article is as amazing. The clearness in your post
is simply nice and i could assume you’re an expert on this subject.
Well with your permission allow me to grab your RSS feed to keep updated with forthcoming
post. Thanks a million and please carry on the rewarding work.
Also visit my website :: nordvpn coupons inspiresensation (come.ac)
You can certainly see your skills within the work you write.
The world hopes for more passionate writers like you who aren’t afraid to say how they believe.
Always follow your heart.
Also visit my homepage nordvpn coupons inspiresensation – easyurl.cc
–
Thanks for sharing, this is a fantastic article.Really looking forward to read more. Much obliged.
Tremendous things here. I am very happy to see your post.Thank you so much and I’m taking a look ahead to touch you.Will you please drop me a mail?
Major thanks for the blog post.Much thanks again. Much obliged.
azithromycin dimetapp – over the counter azithromycin cvs z pack for
Hey, thanks for the blog post.Really looking forward to read more. Really Cool.
Thanks For This Blog, was added to my bookmarks.
Id should verify with you here. Which is not something I often do! I get pleasure from studying a publish that will make individuals think. Also, thanks for permitting me to comment!
Wow, great article.Really looking forward to read more. Will read on…
Great, thanks for sharing this post.Really looking forward to read more. Awesome.
A big thank you for your post.Really thank you! Will read on…
Hello There. I found your blog using msn. This is an extremely well written article. Ill be sure to bookmark it and return to read more of your useful info. Thanks for the post. Ill certainly comeback.
Enjoyed reading through this, very good stuff, appreciate it.Feel free to visit my blog post: skin care and acne
I think this is a real great blog post.Really looking forward to read more. Really Great.
Fantastic blog article.Really looking forward to read more. Will read on…
Hey, thanks for the blog article.Really thank you! Keep writing.
Thanks again for the article post. Awesome.
I really enjoy the article post.Really looking forward to read more.
Great article post.Really looking forward to read more. Keep writing.
ਛੋਟੇ ਚੂਚੇ ਪੋਰਨ madisonivysex.98oJ7fPbswX
I really like this blog site, will definitely come back again. Make sure you carry on creating quality content articles.
Greetings! Very helpful advice in this particular article!It is the little changes which will make the largest changes.Thanks for sharing!
I was very pleased to find this web-site.I wanted to thanks for your time for this wonderful read!! I definitely enjoying every little bit of it and I have you bookmarked to check out new stuff you blog post.
meget af det dukker op overalt på internettet uden min aftale.
A big thank you for your blog.Much thanks again. Great.
The next time I read a blog, I hope that it doesn’t disappoint me just as much as this one. I mean, I know it was my choice to read through, but I really thought you would have something useful to talk about. All I hear is a bunch of moaning about something that you could fix if you were not too busy seeking attention.
Thanks a lot for the post.Thanks Again. Awesome.
伊藤栄樹『秋霜烈日-検事総長の回想』朝日新聞社、1988年6月。 『コミックボンボン』1984年7月号、講談社。 1904年7月には浮気相手の2代目東家小満之助(青木てふ)と上方に出向き、三友派に席を置き高座に上がっていたが、後に高座への意欲もなくなり1906年4月6日に糖尿病で死亡した。あなたの遊山の領分は西北方です。丑松が未だ斯の寺へ引越して来ないで、あの鷹匠町の下宿に居た頃は、煩(うるさ)いほど沢山蠅の群が集つて、何処(どこ)から塵埃(ほこり)と一緒に舞込んで来たかと思はれるやうに、鴨居だけばかりのところを組(く)んづ離(ほぐ)れつしたのであつた。
I feel that is among the such a lot significant information for me. And i’m happy reading your article. However want to statement on some basic issues, The site style is wonderful, the articles is actually great : D. Good task, cheers
Great blog.Thanks Again. Really Great.
A round of applause for your post.Much thanks again. Cool.
I truly appreciate this blog post.Thanks Again. Fantastic.
Fantastic article.Really looking forward to read more. Awesome.
Im thankful for the blog post.Much thanks again. Will read on…
Very good written post. It will be supportive to everyone who employess it, as well as me. Keep up the good work – i will definitely read more posts.
、山寺もまた「江原さんは大先輩。 アキラとロペの後輩。いつもオーバーオールを着ている。免責金額とは、保険会社が保険金を支払う際、損害額に対する補償のうち、補償を受けられる方(契約者)が自己負担する金額のことを指します。 サイズモアの吹き替えで出演していたが、その際デンゼルを吹き替えていた山寺の演技について大塚は「彼(デンゼル)の喋り癖を本当に上手につかまえている」と称賛しており、自身がデンゼルの吹き替えを務める際には山寺の演技を脳内でシミュレートした上で取り入れていたと明かすなど多大な影響を受けたと語っている。
Great article.
I am so grateful for your post.Really looking forward to read more. Keep writing.
I cannot thank you enough for the article post.Much thanks again. Will read on…
Really informative article.Thanks Again. Fantastic.
Really appreciate you sharing this blog. Really Great.
I really like and appreciate your blog.Really looking forward to read more. Cool.
Профессиональный сервисный центр по ремонту техники в Твери.
Мы предлагаем: Сколько стоит ремонт посудомоечных машин Gaggenau
Наши мастера оперативно устранят неисправности вашего устройства в сервисе или с выездом на дом!
Introducing to you the most prestigious online entertainment address today. Visit now to experience now!
By studying each the fabric that got here out of the crater upon impression and the characteristics of the comet that the crater exposed, scientists now have an unprecedented view of the solar system in its infancy.
Major thanks for the article.Really looking forward to read more.
For “Cars,” more than 100 distinctive automotive characters were created, and director John Lasseter insisted that they give the impression of being as actual as potential.
Wow, great blog article.Really looking forward to read more. Really Cool.
Very informative blog post. Awesome.
I loved your post. Want more.
Hey, thanks for the blog post.Really thank you! Fantastic.
Your confidence in us is our top priority. Therefore,we operate with complete transparency and focus on results.Experience the relief of seeing your funds returned withour expert services.
Thank you for your sharing. I am worried that I lack creative ideas. It is your article that makes me full of hope. Thank you. But, I have a question, can you help me?
I truly appreciate this blog.Thanks Again. Awesome.
I want to to thank you for this excellent read!!I absolutely enjoyed every bit of it. I have got you saved as a favorite to look at new things you post…
Great blog article.Really looking forward to read more. Keep writing.
Glad to be one of the visitants on this awe inspiring website : D.
Thanks for sharing. I read many of your blog posts, cool, your blog is very good.
Im grateful for the article. Really Cool.
I wanted to thank you for this wonderful read!! I certainly loved every bit of it. I have got you book-marked to check out new things you post…
Can I just say what a reduction to seek out somebody who truly is aware of what theyre talking about on the internet. You undoubtedly know how to convey a difficulty to gentle and make it important. Extra folks must read this and understand this aspect of the story. I cant imagine youre no more widespread since you positively have the gift.
Fantastic blog article.Thanks Again. Really Cool.
I needed to thank you for this very good read!! I certainly loved every bit of it. I have got you book marked to look at new stuff you post…
2Usv4EjGAm8Yjb2iPOXkXLbx8uq
Very good post. Want more.
I cannot thank you enough for the blog post.Thanks Again. Fantastic.
Asking questions are genuinely fastidious thing if you are not understanding something fully, except this pieceof writing offers good understanding yet.
Very neat article.Really thank you! Keep writing.
You have brought up a very good points, appreciate it for the post.
I beloved up to you will obtain performed proper here. The cartoon is attractive, your authored material stylish. nonetheless, you command get bought an impatience over that you would like be delivering the following. unwell unquestionably come further previously once more since exactly the similar nearly very incessantly inside case you shield this hike.
Thanks for sharing, this is a fantastic article post.Really thank you! Really Great.
Your point of view caught my eye and was very interesting. Thanks. I have a question for you.
Say, you got a nice article post.Much thanks again. Really Cool.
This is one awesome blog article.Much thanks again. Fantastic.
Very informative post.Much thanks again. Much obliged.
Very informative blog article.Really thank you! Want more.
Wow, great blog post. Fantastic.
I appreciate you sharing this post.
Thanks for the blog post.Really thank you! Will read on…
Normally I don’t read post on blogs, but I wish to say that this write-up very compelled me to check out and do so! Your writing style has been surprised me. Thanks, very nice post.
Your article helped me a lot, is there any more related content? Thanks!
Very neat article post.Thanks Again. Fantastic.
This is one awesome article.Really looking forward to read more. Great.
I loved your article post.Really looking forward to read more. Great.
Governor’s Advisory Fee on Latino Affairs, supporting neighborhood social progress.
Thanks a lot for the blog.Much thanks again. Want more.
A big thank you for your blog. Will read on…
Really clean site, thanks for this post.
Really enjoyed this blog.Really thank you! Really Cool.
Thanks-a-mundo for the blog post.Really thank you! Great.
I value the article.Much thanks again. Will read on…
Very informative blog post.Much thanks again. Much obliged.
Really enjoyed this post.Really looking forward to read more. Great.
Great, thanks for sharing this blog post. Want more.
go88
Thanks for sharing. I read many of your blog posts, cool, your blog is very good.
A round of applause for your blog post.Thanks Again. Keep writing.
Wow, great blog.Much thanks again.
Hi friends! Concentrate on what you can control and release of what you can’t. Serenity comes from acceptance.
Thank you for your article post.Thanks Again. Awesome.
Major thanks for the blog. Cool.
卒業後は車の整備士を目指していて、父親から仕事を教わっている。 サクラの伯父。和の国を救ってくれたユナに、お礼として温泉付きのお屋敷を与える。 その後は登場しなかった。株式市場の寄り付きを簡単に伝える。 イベントのURLから誰でも簡単に参加できるため、面倒な準備の手間が省けられます。 よく伊藤と京子がいちゃついている場面に遭遇する。虎の威を借る狐を通しており、当初周囲の評価は低かったが、開久生徒ともめた際は打ちのめされながらも、最後にプライドは二の次で三橋、伊藤を大声で呼び寄せ勝利したことから、タダ者ではないと恐れられている。連載当初の漢字表記は「井沢」だった。当初は三橋の狡猾さを嫌悪していたが、北川事件解決を機に三橋を認めている。
I am so grateful for your article.Much thanks again. Really Great.
Your writing has a way of making even the most complex topics accessible and engaging. I’m constantly impressed by your ability to distill complicated concepts into easy-to-understand language..
This is one awesome blog.Really looking forward to read more. Really Great.
I really like and appreciate your post.Really thank you! Will read on…
Its like you read my mind! You seem to know a lot about this, like you wrote the book in it or something. I think that you can do with a few pics to drive the message home a bit, but instead of that, this is magnificent blog. A fantastic read. I’ll definitely be back.
This is very interesting, You are a very skilled blogger. I have joined your feed and look forward to seeking more of your great post. Also, I’ve shared your site in my social networks!
I really liked your blog article.Much thanks again. Much obliged.
Enjoyed every bit of your post.Really looking forward to read more. Want more.
Major thanks for the article post. Cool.
I appreciate you sharing this article.Really thank you! Will read on…
I appreciate you sharing this post. Want more.
že spousta z něj se objevuje na internetu bez mého souhlasu.
Предлагаем услуги профессиональных инженеров офицальной мастерской.
Еслли вы искали ремонт холодильников gorenje цены, можете посмотреть на сайте: ремонт холодильников gorenje цены
Наши мастера оперативно устранят неисправности вашего устройства в сервисе или с выездом на дом!
Introducing to you the most prestigious online entertainment address today. Visit now to experience now!
Muchos Gracias for your article post.Much thanks again. Great.
I really liked your blog post.Thanks Again. Much obliged.
I think this is a real great post.Really looking forward to read more. Want more.
Hello my friend! I want to say that this post is amazing, great written and include almost all important infos. I?d like to look more posts like this .
Major thanks for the blog. Really Cool.
Very good article post. Much obliged.
Thanks a lot for the blog.Much thanks again. Keep writing.
I appreciate you sharing this blog.Really thank you! Will read on…
harika içerikler var
An impressive share, I just given this onto a colleague who was doing a bit evaluation on this. And he actually bought me breakfast because I found it for him.. smile. So let me reword that: Thnx for the treat! However yeah Thnkx for spending the time to debate this, I really feel strongly about it and love reading more on this topic. If possible, as you become experience, would you mind updating your blog with more details? It’s extremely useful for me. Big thumb up for this blog put up!
I loved your blog.Much thanks again. Much obliged.
I really like and appreciate your blog post.Really thank you! Awesome.
Предлагаем услуги профессиональных инженеров офицальной мастерской.
Еслли вы искали ремонт кофемашин philips в москве, можете посмотреть на сайте: ремонт кофемашин philips сервис
Наши мастера оперативно устранят неисправности вашего устройства в сервисе или с выездом на дом!
Профессиональный сервисный центр по ремонту Apple iPhone в Москве.
Мы предлагаем: сервисный центр iphone в москве
Наши мастера оперативно устранят неисправности вашего устройства в сервисе или с выездом на дом!
Fantastic post. Much obliged.
Thanks for sharing, this is a fantastic article.Really looking forward to read more. Cool.
Looking forward to reading more. Great article.Really thank you! Really Cool.
Warner was not too long ago selected for a coveted six-yr term on the Yale Corporation, Yale University’s governing physique.
Each photograph cake is exclusive and you take pleasure in zillions of prospects when you are ordering cake with picture.
Their closing factors tally of sixty eight was a record underneath the two factors for a win system, and Ray Clemence stored 28 clean sheets in a season that noticed Liverpool concede solely 4 objectives at residence.
Thanks for sharing. I read many of your blog posts, cool, your blog is very good.
Audio started playing anytime I opened this site, so annoying!
I really liked your blog.Really thank you! Keep writing.
Im obliged for the article post. Will read on…
You’ve made some really good points there. I looked on the web for more information about the issue and found most people will go along with your views on this web site.
I think this is a real great article.Really thank you! Awesome.
Thanks for sharing, this is a fantastic blog.Thanks Again. Keep writing.
Enjoyed every bit of your blog post.Really looking forward to read more. Really Great.
This is one awesome blog post. Want more.
Good blog you have got here.. It’s hard to find high quality writing like yours nowadays. I really appreciate people like you! Take care!!
Pretty! This was a really wonderful article. Thanks for providing this info.
Really informative post.Really thank you! Keep writing.
Really enjoyed this post.Really thank you! Fantastic.
Appreciate you sharing, great post. Want more.
Awesome post.Really thank you! Much obliged.
Great article! We are linking to this particularly great post on our website.Keep up the great writing.
Thanks for the article.Really thank you! Will read on…
Major thanks for the article post. Awesome.
I truly appreciate this article post.Really thank you! Great.
Very neat article post.Thanks Again. Cool.
Hey, thanks for the blog article. Great.
Thank you ever so for you blog post. Really Cool.
Major thankies for the article.Really thank you! Fantastic.
wow, awesome article post.Really looking forward to read more. Cool.
A big thank you for your blog.Thanks Again. Much obliged.
Really enjoyed this article post.Really thank you! Awesome.
A round of applause for your blog.Much thanks again. Will read on…
This is one awesome blog article.Really thank you! Will read on…
Your faith in us is our number one concern. Therefore,we operate with complete honesty and dedication to your case.Rest easy of seeing your funds returned with our specialized assistance.
Franklin advertised its V-12 as “supercharged,” but in reality it had a ram-air effect, courtesy of a duct from the cooling fan.
Muchos Gracias for your blog.Really looking forward to read more. Awesome.
Great, thanks for sharing this post.Much thanks again. Much obliged.
Great, thanks for sharing this blog post.Thanks Again. Really Great.
Thanks so much for the blog.Really thank you! Really Cool.
Your point of view caught my eye and was very interesting. Thanks. I have a question for you.
Really informative post.
Great site you’ve got here.. It’s difficult to find good quality writing like yours these days. I honestly appreciate people like you! Take care!!
Восстановление бампера автомобиля — это востребованная услуга, которая позволяет восстановить изначальный вид транспортного средства после небольших повреждений. Современные технологии позволяют исправить потертости, трещины и вмятины без полной замены детали. При выборе между ремонтом или заменой бампера [url=https://telegra.ph/Remont-ili-zamena-bampera-05-22]https://telegra.ph/Remont-ili-zamena-bampera-05-22[/url] важно принимать во внимание степень повреждений и экономическую целесообразность. Профессиональное восстановление включает подготовку, грунтовку и покраску.
Установка нового бампера требуется при критических повреждениях, когда восстановление бамперов нецелесообразен или невозможен. Стоимость восстановления варьируется от типа материала изделия, характера повреждений и типа автомобиля. Пластиковые элементы подлежат ремонту лучше металлических, а современные композитные материалы требуют специального оборудования. Грамотный ремонт увеличивает срок службы детали и сохраняет заводскую геометрию кузова.
Рад быть полезным в любое время и в любых обстоятельствах по вопросам Ремонт бамперов в г – стучите в Telegram coi49
Very informative post.Really thank you! Great.
Appreciate you sharing, great blog post.Really looking forward to read more. Cool.
Really enjoyed this blog article.Much thanks again. Really Cool.
I think this is a real great article post.Really looking forward to read more. Want more.
Enjoyed every bit of your article post. Want more.
gruppe? Der er mange mennesker, som jeg tror virkelig ville
I simply could not depart your web site prior to suggestingthat I actually enjoyed the standard information a person provide for your visitors?Is going to be again often to investigate cross-check new posts
Enjoyed every bit of your blog article.Really looking forward to read more. Much obliged.
Thanks , I’ve recently been searching for information about this subject for ages and yours is the best I have found out till now.
However, what concerning the bottom line? Are you sure about
the supply?
my page :: vpn
Really enjoyed this article.Really thank you! Cool.
A big thank you for your article post.Really looking forward to read more. Really Great.