Introduction:
Hey there, welcome to Slyautomation! In this tutorial guide, we’re going to explore how to create datasets using bounding box annotations, mask key points, and more for both images and videos using CVAT, an open-source computer vision annotation tool. Today, let’s dive into understanding the organization and user interface (UI) of CVAT Github.
Accessing CVAT:
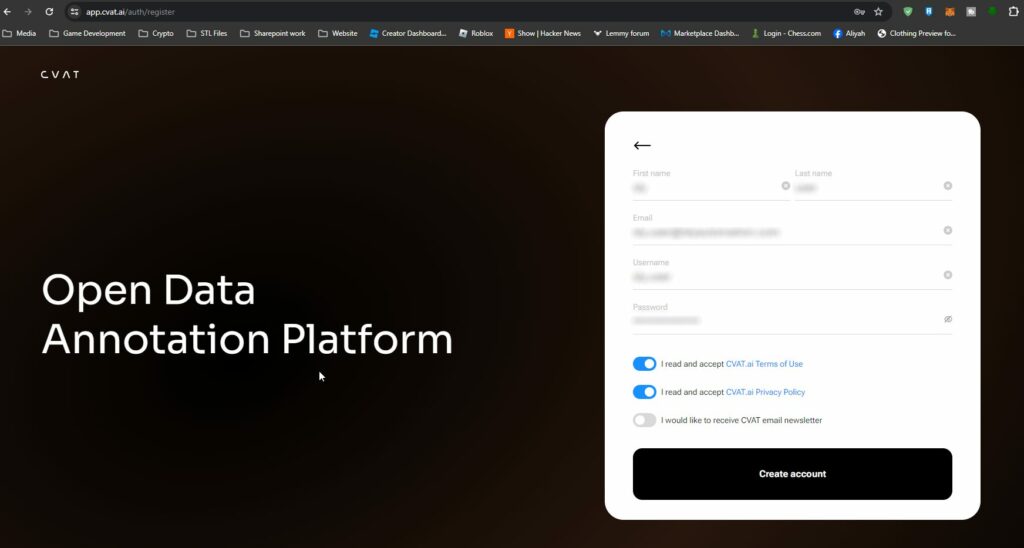
CVAT Github is hosted on cvat.ai, and the best way to get started is to create an account and start annotating for free. Open your web browser and navigate to cvat.ai

Click on “Try for free” to launch the CVAT app in a new tab. You can create an account on CVAT using your email.
Organization and UI Overview:
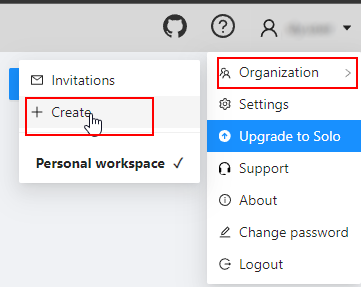
Upon successful login, you’ll land on the task page. Before we jump into annotation tasks, let’s understand the hierarchy of CVAT. CVAT follows a structure where organizations can contain multiple projects. If you are an annotation company dealing with various clients, you can add each client as a separate organization on CVAT.
To create an organization, click on “Create” under the organization drop-down, provide a short name, and fill in the details. Once done, activate the organization from the top right corner. Click on the short name to explore further.
Setting Up Projects:
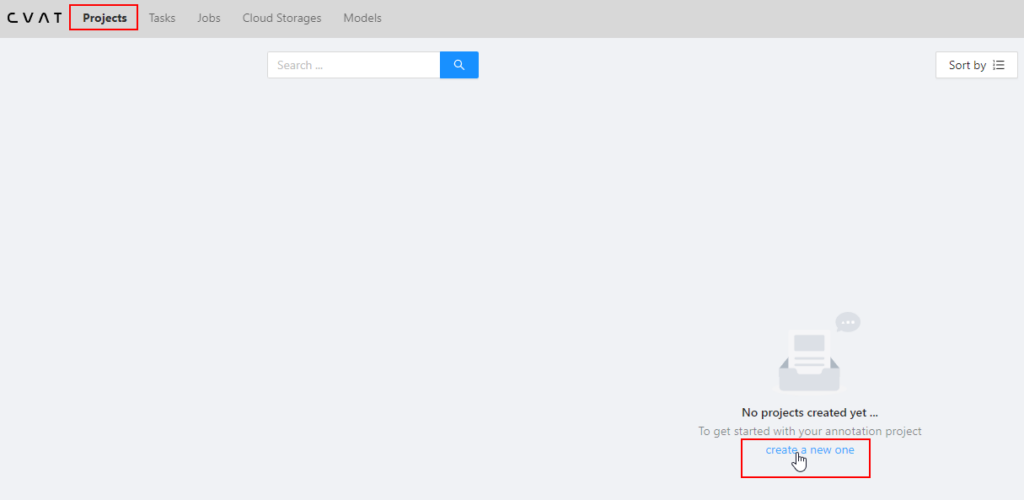
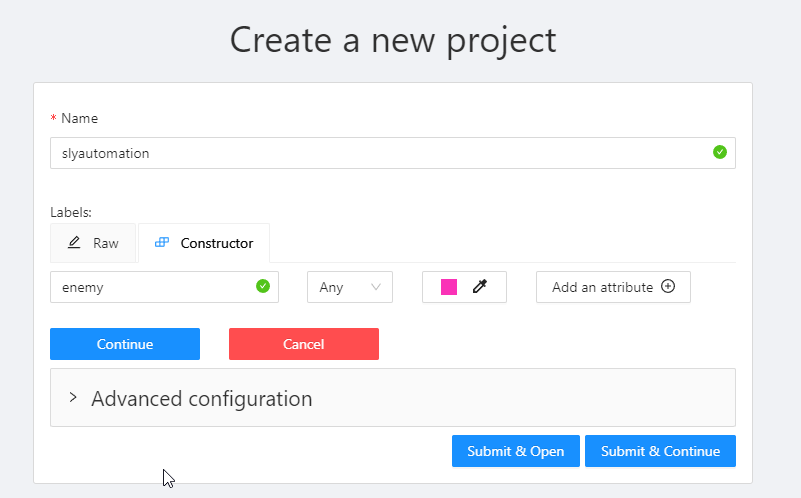
Now, let’s create and set up a project. Click on “Projects” in the header and then the plus sign to create a new project.
Name your project, assign labels, and click on “Submit & Open.” Customize labels and settings according to your requirements. The project page is where you manage your project settings.
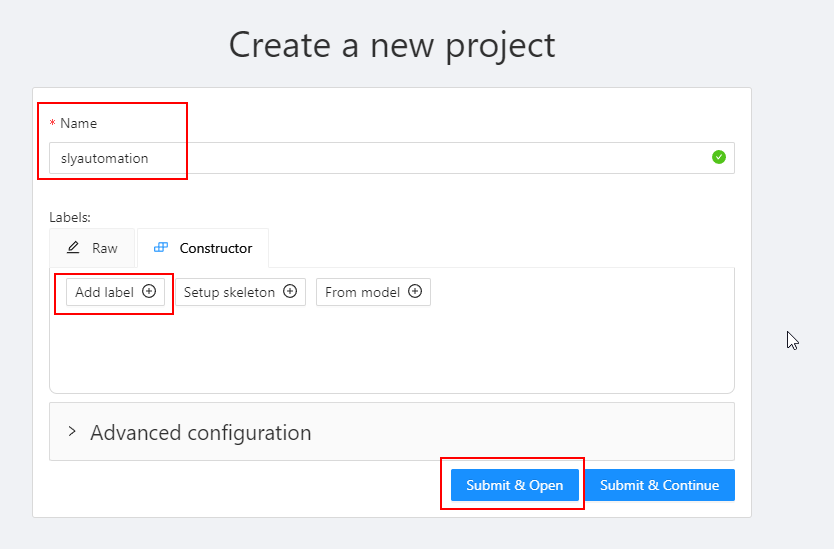
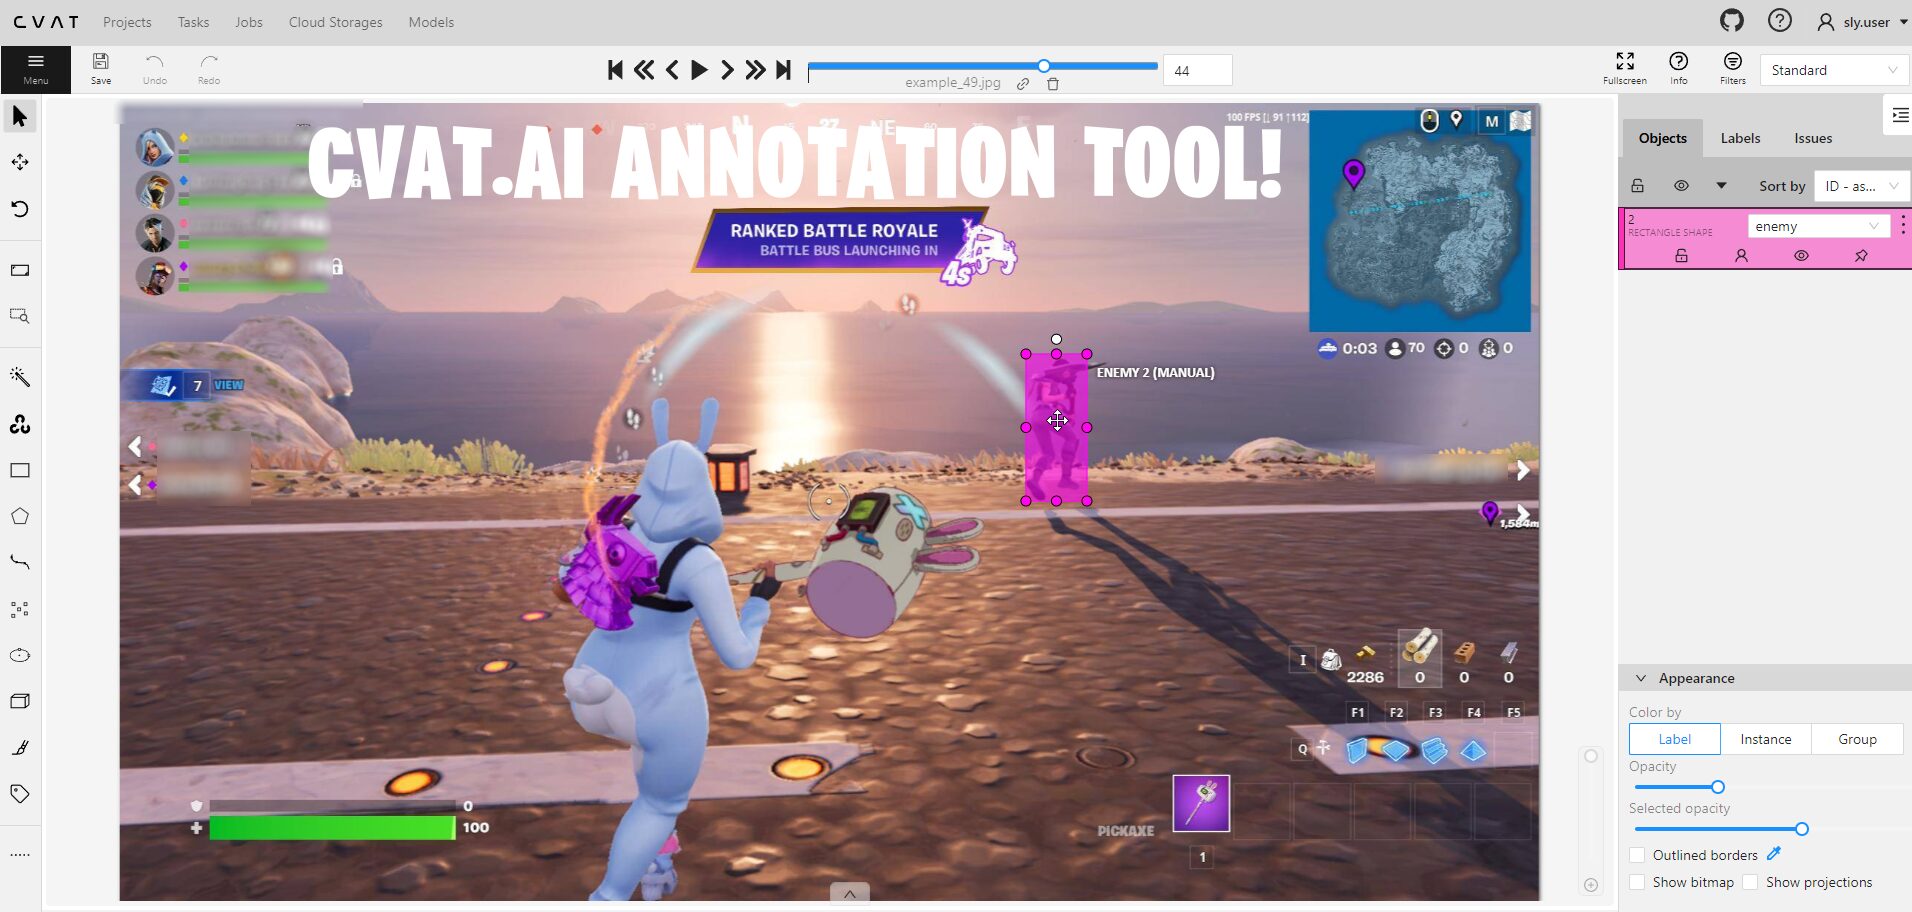
Add a label (e.g., “enemy”) to represent the object you want to detect.
Adding a label to represent the object you want to detect is a crucial step when creating a project in CVAT (Computer Vision Annotation Tool). This step is essential for several reasons:
- Object Identification:
- The label serves as a way to identify and categorize the specific object or class you intend to detect in your images. It acts as a reference for both the annotator and the machine learning model during the training process.
- Multi-Class Projects:
- In projects involving multiple object classes, each class needs a distinct label. This differentiation is essential for training a model to recognize and classify various objects accurately.
- Model Training:
- The labeled data is used to train machine learning models, such as object detectors. During training, the model learns to associate the labeled objects with specific features, enabling it to make predictions on new, unseen data.
- Annotation Tool Configuration:
- CVAT allows users to create and manage projects with different labels. When you add a label, CVAT configures the project to accommodate the specific object or class you want to annotate. This ensures that the annotation tool is tailored to your project’s requirements.
- User Guidance:
- Labels provide guidance to annotators regarding the target object. They help annotators understand the context of the project, what objects to focus on, and how to annotate them according to the defined criteria.
- Data Interpretation:
- When reviewing or sharing the annotated data, the assigned labels make it clear which objects are present in each image. This is crucial for data interpretation, validation, and further analysis.
Creating Tasks:
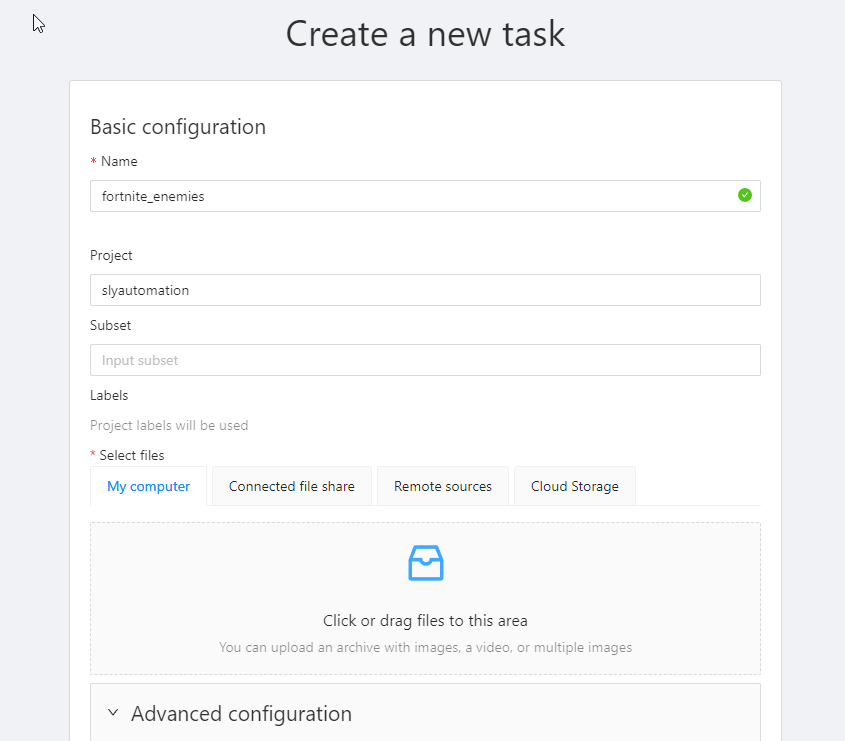
Moving on to tasks, click on the plus sign to create a new task.

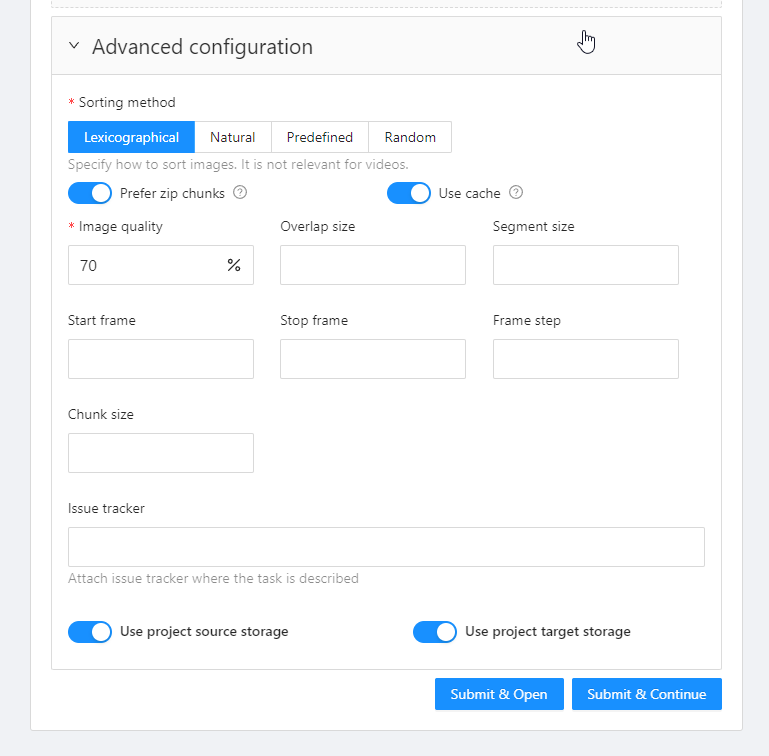
Give it a name, optionally nest it under a project, and select your data. The advanced configuration allows for more customization, such as sorting files, adjusting image quality, and setting segment size. The segment size determines how CVAT divides the data into smaller jobs for annotators.
Need screenshot data? No problem use this take_screenshot_looper made with python!
Creating a Screenshot Looper with Tkinter
In this tutorial, we’ll guide you through the process of creating a Python application using the Tkinter library that allows you to capture screenshots at regular intervals. This simple Tkinter application provides a user-friendly interface for configuring various settings and controlling the screenshot capture process. Follow the steps below to set up and use the provided code for the take_screenshot_loop application.
Step 1: Install Required Libraries
Before you start, ensure you have Python installed on your system. Additionally, install the required libraries using the following command in your terminal or command prompt:
pip install pillow tkinterStep 2: Save the Code
Copy the provided code and save it in a file, for example, screenshot_looper.py.
Step 3: Run the Application
Open a terminal or command prompt, navigate to the directory containing the saved script (screenshot_looper.py), and run the following command:
python screenshot_looper.pyStep 4: Configure Settings
Once the application window opens, you’ll see several Entry widgets to input the following settings:
- Object File Name: The prefix for the screenshot filenames.
- Monitor (left, top, right, bottom): Define the area on the screen to capture in the format left, top, right, bottom.
- Display Time (seconds): Set the time interval between each screenshot.
- Initial Image Index: The starting index for the screenshot filenames.
- Directory: The directory where screenshots will be saved.
Step 5: Start and Stop Capture
Click the “Start” button to initiate the screenshot capture process with the specified settings. To stop capturing screenshots, click the “Stop” button.
Step 6: Review Captured Screenshots
Navigate to the specified directory to find the captured screenshots. The filenames will be in the format {object_file_name}_{image_index}.jpg.
Notes
- If the specified directory does not exist, the application will create it.
- If an error occurs during the capture process, an error message will be displayed.
Conclusion
This Tkinter application provides a convenient way to capture screenshots at regular intervals, making it useful for various tasks such as creating datasets or monitoring visual changes over time. Customize the settings based on your specific requirements, and enjoy the ease of capturing screenshots with this user-friendly interface. Whether you’re a developer, data scientist, or simply someone who needs periodic screenshots, this application streamlines the process for you.
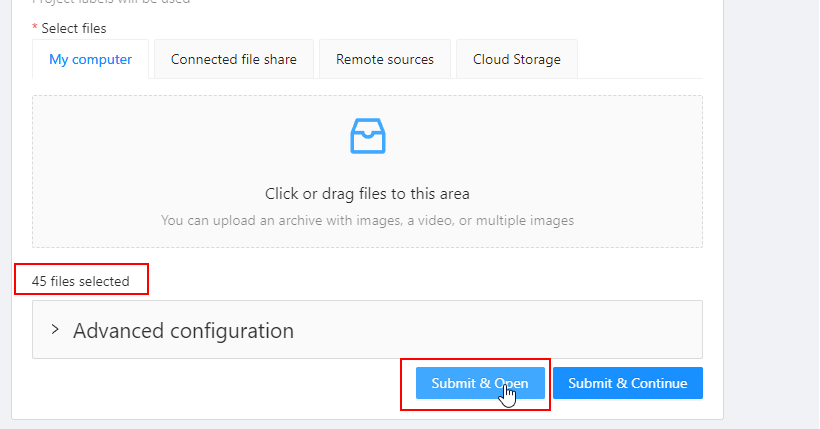
- Scroll down to the “Select Files” section and select all the images to be annoted.
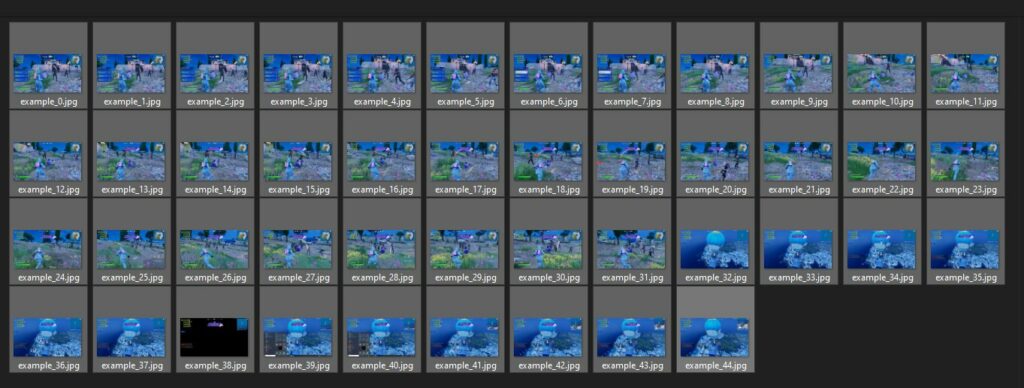
- The number of file ready for upload will be displayed.
- Choose the subset of images you want to upload for annotation from your local machine.
- Once ready, click on the “Submit and Open” button to upload the files.
- Wait for the files to upload. CVAT will process the images and display them in the task.
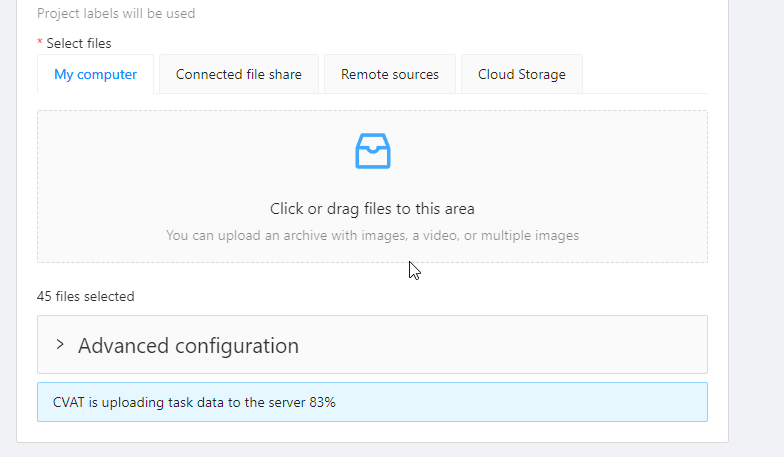
After clicking “Submit & Open,” the data begins uploading to the server, and you’ll land on the task page. Here, clicking on a job brings you to the annotation page of CVAT.
Start Annotation
- Once the images are uploaded, click on the “Job #” hyperlinked text to the Annotation Page.
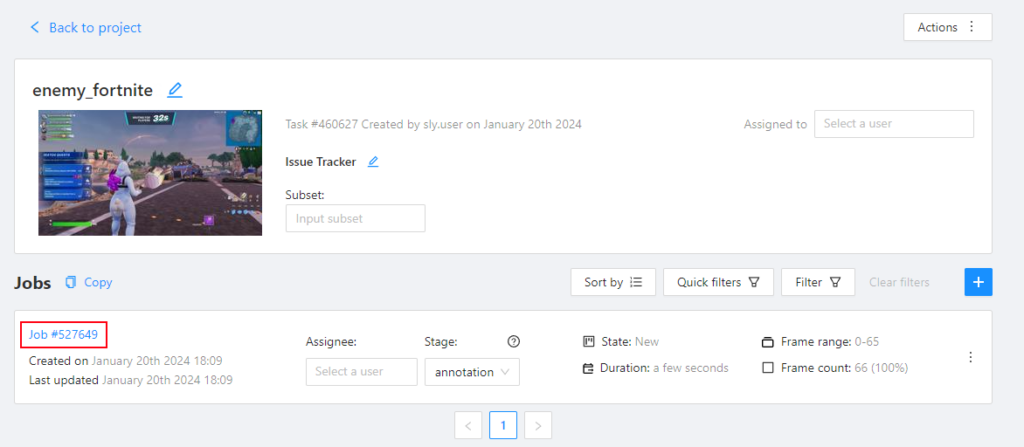
- CVAT will open the annotation task, and you can start annotating the uploaded subset of images.
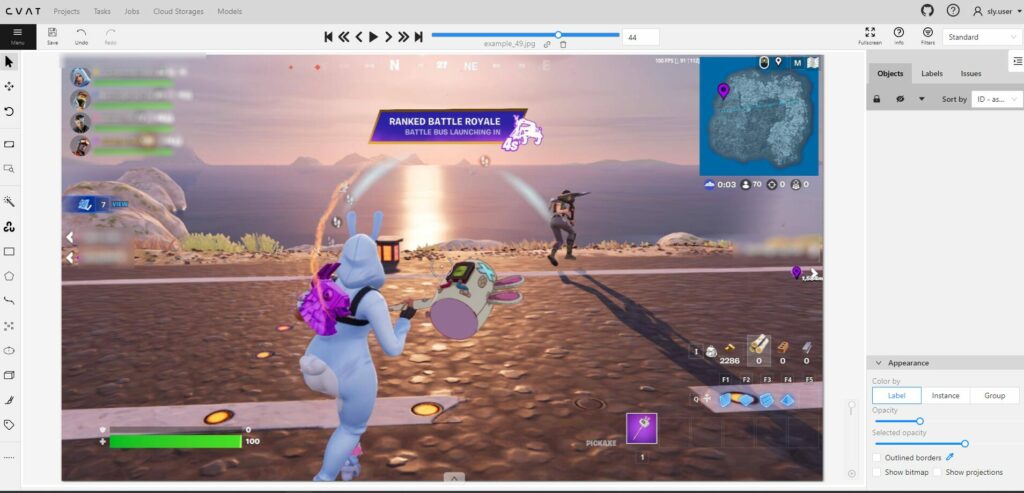
Annotation Page Controls:
The annotation page consists of various controls. The header, top panel, control sidebar, object sidebar, and workspace in the center. Important messages appear as pop-ups. The header remains pinned for easy navigation.
- Top Panel: Used for browsing annotation data. Navigate between frames, undo/redo actions, save, and access the menu.
- Control Sidebar: Contains annotation tools for zooming, creating shapes (rectangle, polygon, ellipse), key points, and track editing.
- Object Sidebar: Displays all objects in the frame, project labels, appearance settings, and reviews.
- Workspace: Displays the image for annotation.
Performing Bounding Box Annotation:
Now that everything is set up, let’s perform a simple bounding box annotation. Select the rectangle annotation tool from the control sidebar, choose the label, and click on the shape.
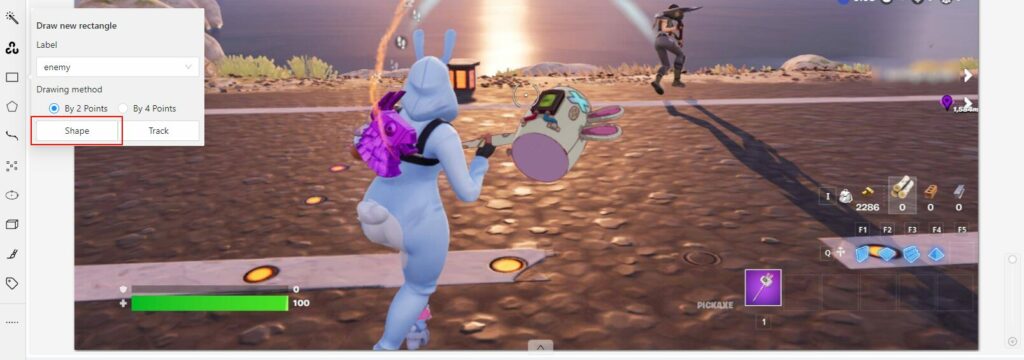
Click on the two opposite points of the object, and you’re done! Save your work and do the same steps for each image. Be sure to annote every object that is relevant to mark.
Export annotations by going to the Menu and selecting “Export job dataset.” Choose the export format, toggle for saving the images as well (only works for the paid version), enter in the zip name and press Ok.

Concluding the CVAT Setup and New project:
That’s a brief overview of the CVAT UI and organization setup. If you found this helpful, check out other tutorial guide on Slyautomation, and don’t forget to comment on what you’d like to see next. Subscribe for more content, and thanks for watching! Until next time.
Tips and Tricks Annotation with CVAT Github
Introduction
In this part of the tutorial guide, we’ll delve into the process of creating datasets using various annotation techniques such as bounding boxes, masks, keypoints, and more, for both images and videos using CVAT – an open-source Computer Vision annotation tool. We’ll focus on annotating bounding boxes.
Annotating Bounding Boxes
To start annotating bounding boxes, follow these steps:
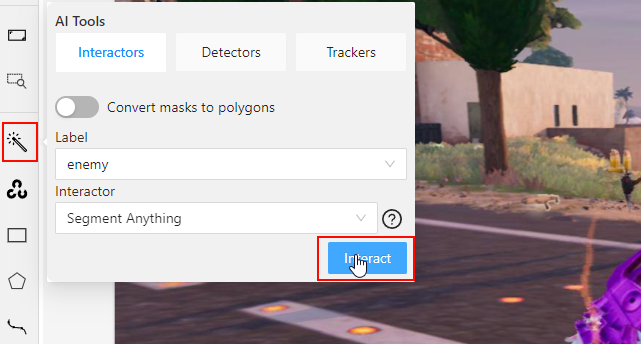
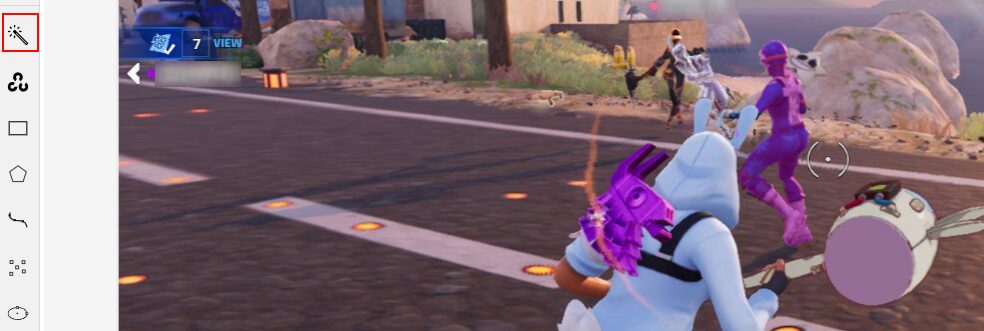
- Use the Ai Tool: Hover over the Wand ai tool in the control sidebar and select the label you want to annotate. In this example, let’s annotate enemy.
And simply select the object within the image, add more points for more accuracy in detecting the object.
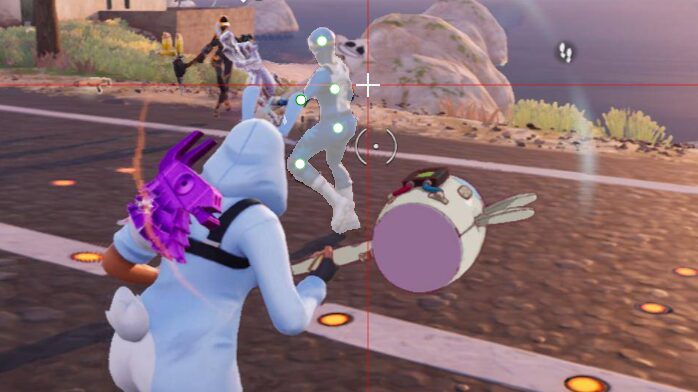
Click the wand ai tool button. Once done, the ai tool will detect it! This example has made a segment of the object.
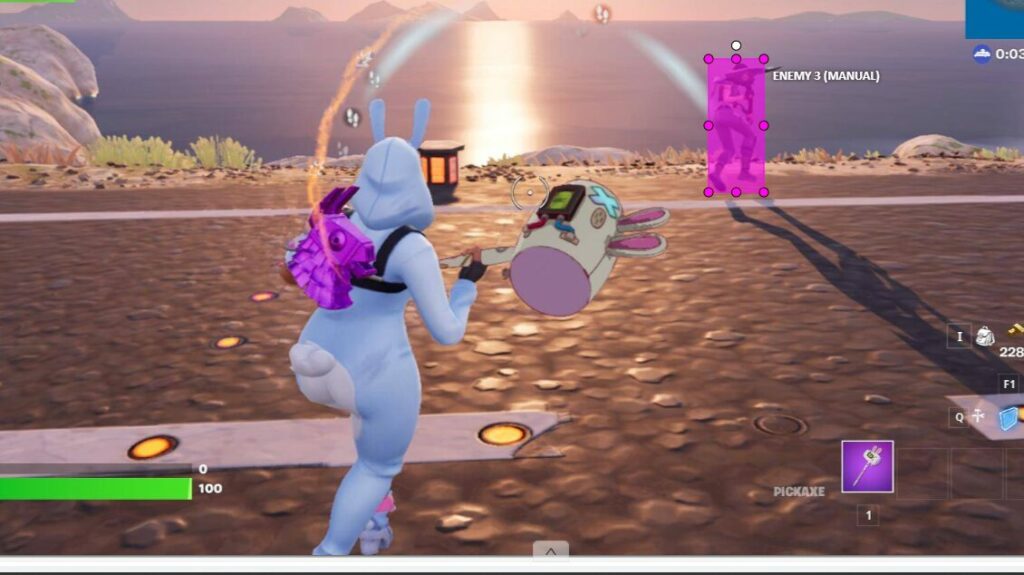
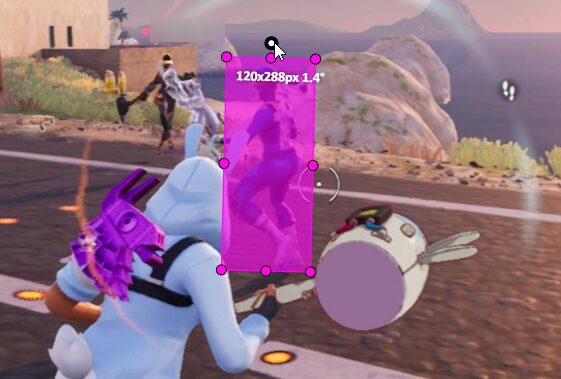
- Two-Point Annotation:
- Click on the shape tool, and red guiding lines will appear on the screen.
- Click on one corner of the object, then click on the opposite corner to create a tight bounding box.
- The bounding box is registered in the object sidebar.
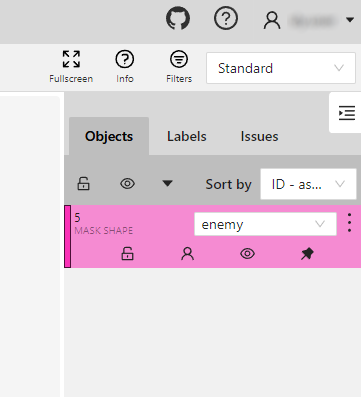
- Right-click on the bounding box to access the object card.
- Shortcuts for Quick Annotation:
- Press
Nto annotate another object quickly. - To redraw an annotation, hover the cursor over the annotation and press
Shift + N.
- Press
- Resizing and Rotation:
- Bounding boxes can be resized or rotated.
- Adjust one of the edges of the bounding box to resize it.
- For rotation, use the white keypoint to turn the bounding box around.
- Four-Point Annotation:
- Click on the top-most, bottom-most, left-most, and rightmost points of the object.
- This creates a rectangle that touches all the specified points.
- Copy and Paste Annotations:
- Hover over the annotation and press
Ctrl + Cto copy. - After pressing
Ctrl + V, a box will appear. Set this box over the new object and resize the edges.
- Hover over the annotation and press
- Navigate Through Images:
- Press
Fto go to the next image in the queue.
- Press
Shortcuts in CVAT
Here is a list of some useful shortcuts in CVAT:
N: Annotate another object.Shift + N: Re-draw an annotation.Ctrl + C: Copy annotation.Ctrl + V: Paste annotation.
Exporting the Dataset for YOLO
After annotating the images, it’s time to export the dataset. CVAT supports multiple formats, and the choice depends on the problem statement and the framework you are using. In this tutorial, we’ll quickly check the YOLO and Coco formats.
- After annotating images, go to the “Tasks” tab.
- Select the task and choose “Export task dataset.”
- Choose the YOLO 1.1 format and click “OK.”

- The download will begin automatically once the generated files containing image annotations in YOLO format are created in cvat.ai.
Organizing Data for YOLO V8
With the zipped file we only need to do the following steps:
- Create two directories within your extracted zip folder directory under obj_train_data:
- “images” for storing images.
- “labels” for storing YOLO-formatted annotation files.
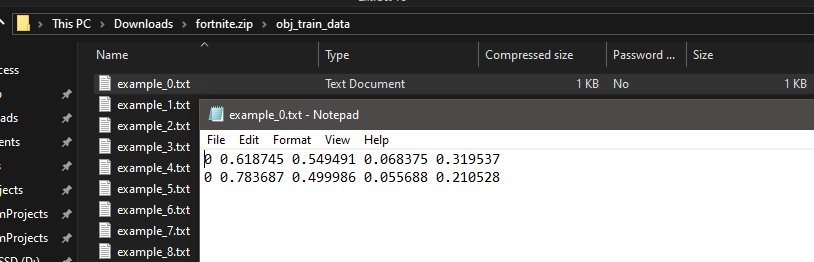
- Place all images in the “images” directory.
- Place all the txt files (annotation file) in the “labels” directory. These will already be using the YOLO format.
- Move the root folder into your project!
The YOLO format for each annotation file is:
<class_id> <center_x> <center_y> <width> <height>
<class_id>: The class identifier (e.g., 0 for enemy).<center_x>and<center_y>: Relative coordinates of the bounding box center.<width>and<height>: Relative dimensions of the bounding box.
Conclusion
That concludes our tutorial on bounding box annotation using CVAT. Leave a comment to let us know what you would like to see next, and don’t forget to subscribe! Happy coding!